Returns and Refurbs

Contents
 »
» 
Overview
A “Returns and Refurb” program is available to facilitate the return of Equipment and/or Items to Internal Assets, Stock or to a Vendor as applicable.
This process is invaluable for processing Returns, Exchanges, or Rotations.
Returns can be processed directly on a job or by manually inserting a return into the new “Returns and Refurb” program.
Returns post item transactions directly to an Inventory Adjustment Batch.
Items can be transferred to a different inventory location at the same time they are being adjusted.
Both the Adjustment and Transfer batch process is fully automated.
Equipment can also be transferred to a different Customer Site or to an Internal Site whilst maintaining serial number integrity.
The “Returns and Refurb” program is used as a central demarcation point to post all IC Adjustment and Transfer batches.
If for example a Return is added via a Job or an RA it is inserted into the Returns and Refurb program for processing.
There is a new security option added so that if a user has IC Adjustment security they can process a return in Service Manager.
Otherwise they can add returns from the Job or RA systems but cannot actually post the adjustments.
Business Case Scenarios
Advanced Replacement
A customer’s equipment is faulty and a replacement item is sent in advance as soon as a request is received from the customer provided the item is in stock.
The faulty item may be returned to stock either at zero cost or at a predefined standard cost ready for refurbishment or scrapping at a later date.
This is usually a priority service that the customers often pays a premium for.
1 – for -1 Replacement
The customer’s equipment is faulty and is returned on an RA.
A new Item/Unit is dispatched to the customer only when the customer’s item is received back.
The faulty item may be returned to stock either at zero cost or at a predefined standard cost ready for refurbishment or scrapping at a later date.
Service and Return
The customer’s equipment is faulty and is returned on an RA.
The unit is serviced and returned back.
Faulty items may be replaced and billed out.
The faulty item may be returned to stock either at zero cost or at a predefined standard cost ready for refurbishment or scrapping at a later date.
Service and Restock
Equipment may have been purchased from a 3rd Party for refurbishment and restocking.
The faulty items must be returned to stock first before they can be refurbished.
In all the above scenarios the existing Equipment is found to be faulty and is either scrapped or returned as an item to a different location in inventory ready to be reworked or refurbished at another time.
Alternatively Equipment can be transferred to an Internal Site awaiting further work.
Creating a Return
There are 4 ways to create a Return.
Sage 300 Desktop |
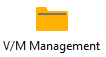
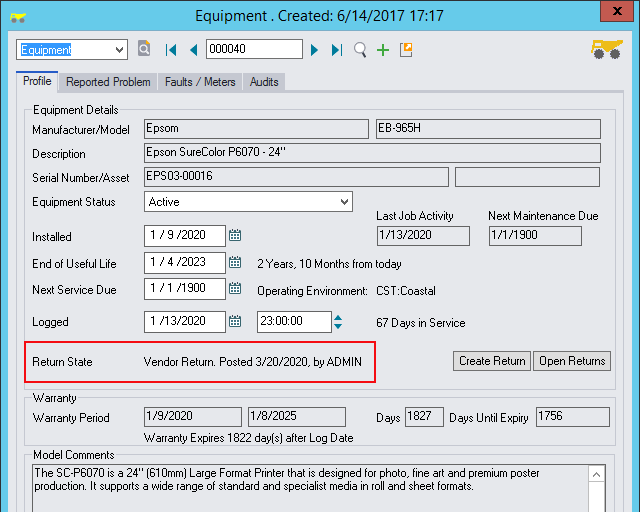
From the Sage 300 Desktop choose V/M Setup, V/M Equipment, Equipment. |
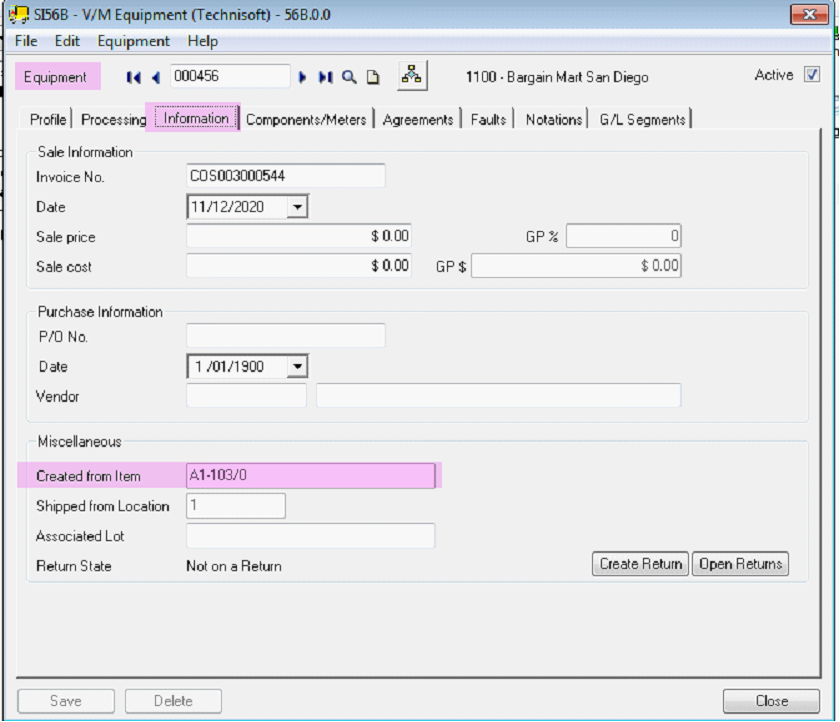
Select an Equipment record and click the Information tab then select “Create Return”.
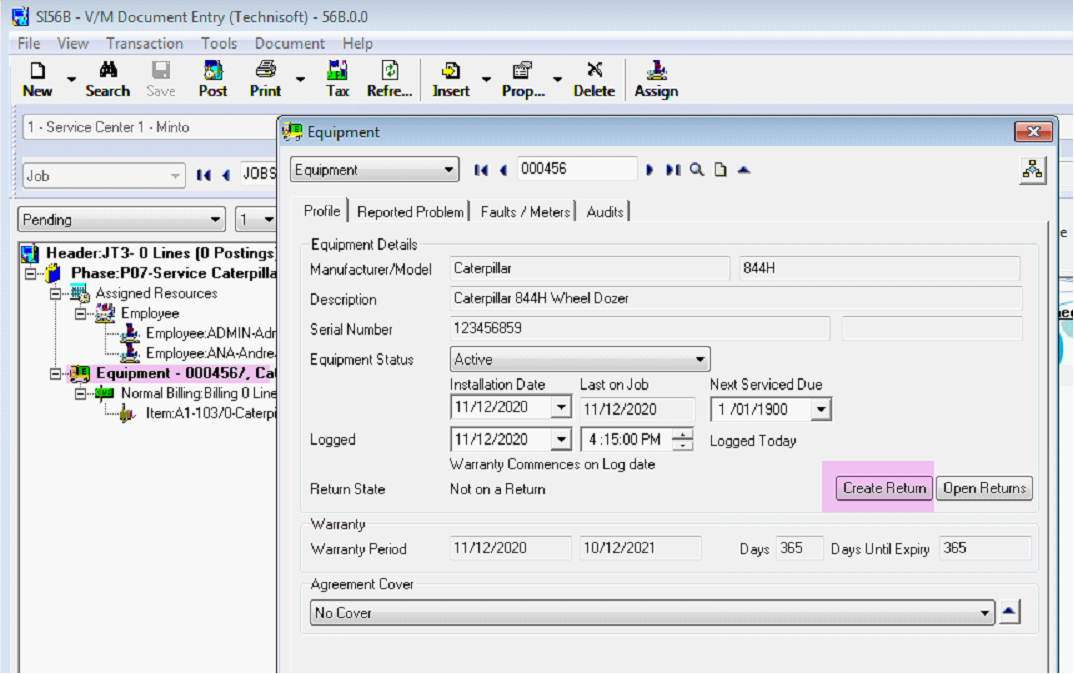
Document Entry |
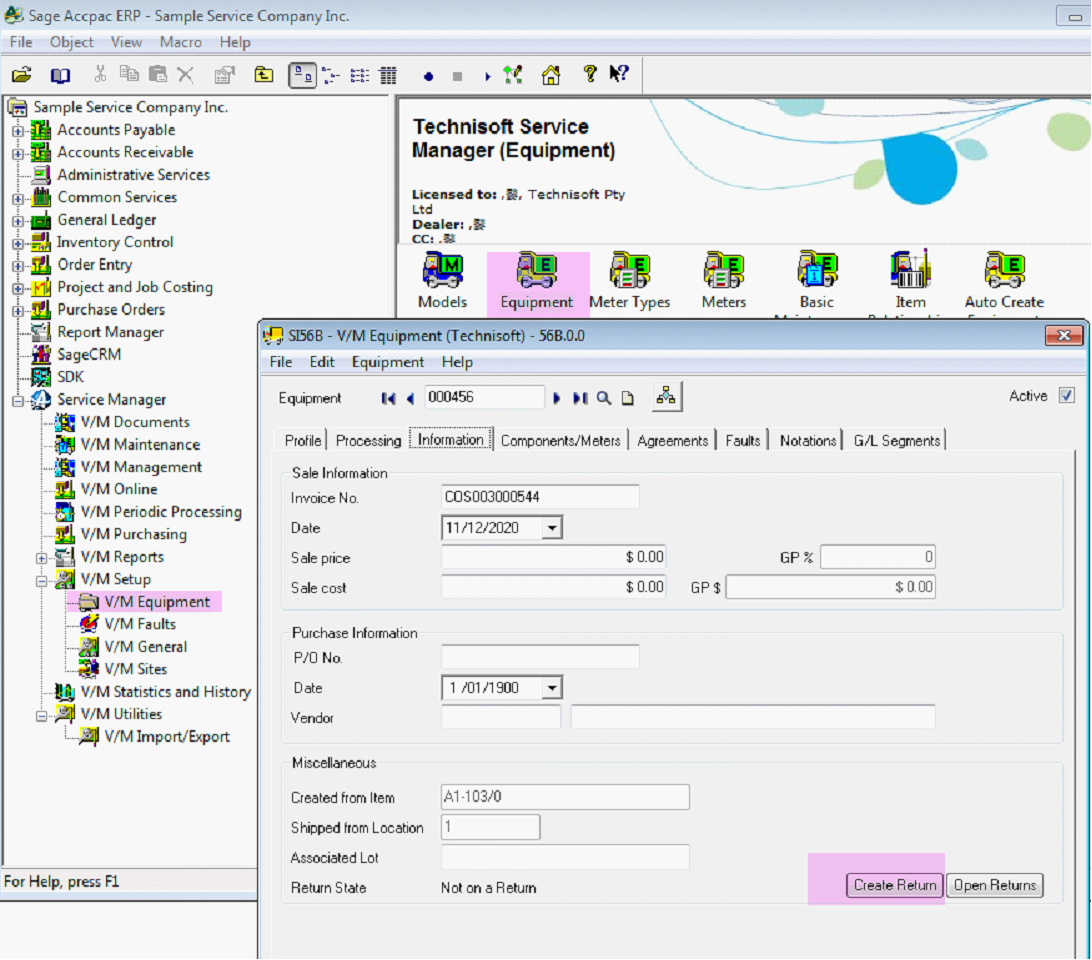
A Return can be entered from a Job in Document Entry by clicking on an Equipment record, right clicking (or double clicking) to open Properties on the Equipment and selecting “Create Return”. |
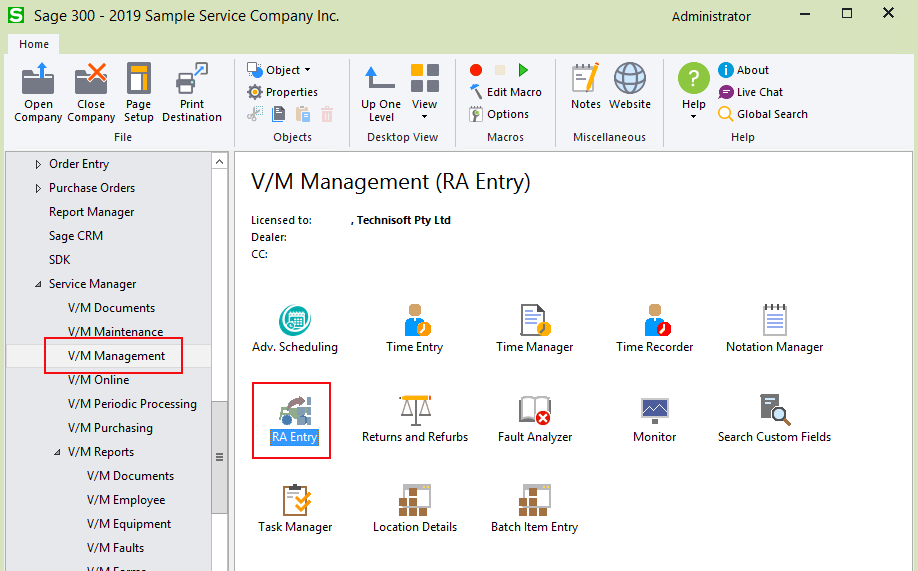
Returns Desktop Program |
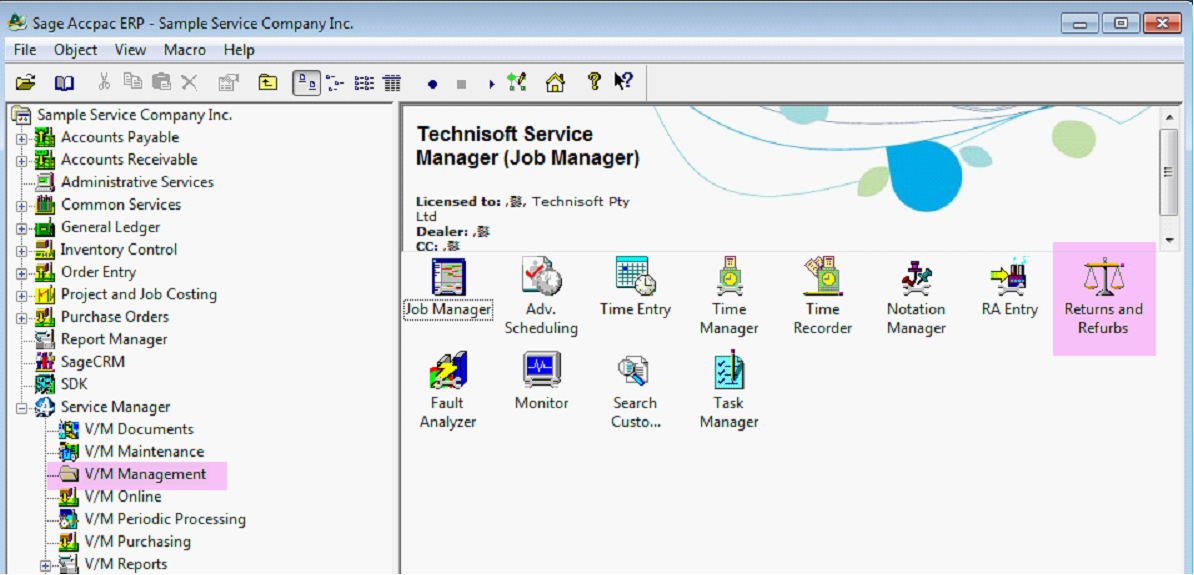
A Return can be added directly from the new “Returns and Refurb” program available on the Sage Accpac Desktop under Service Manager, V/M Management, Returns and Refurbs. Insert a new return. |
RMA |
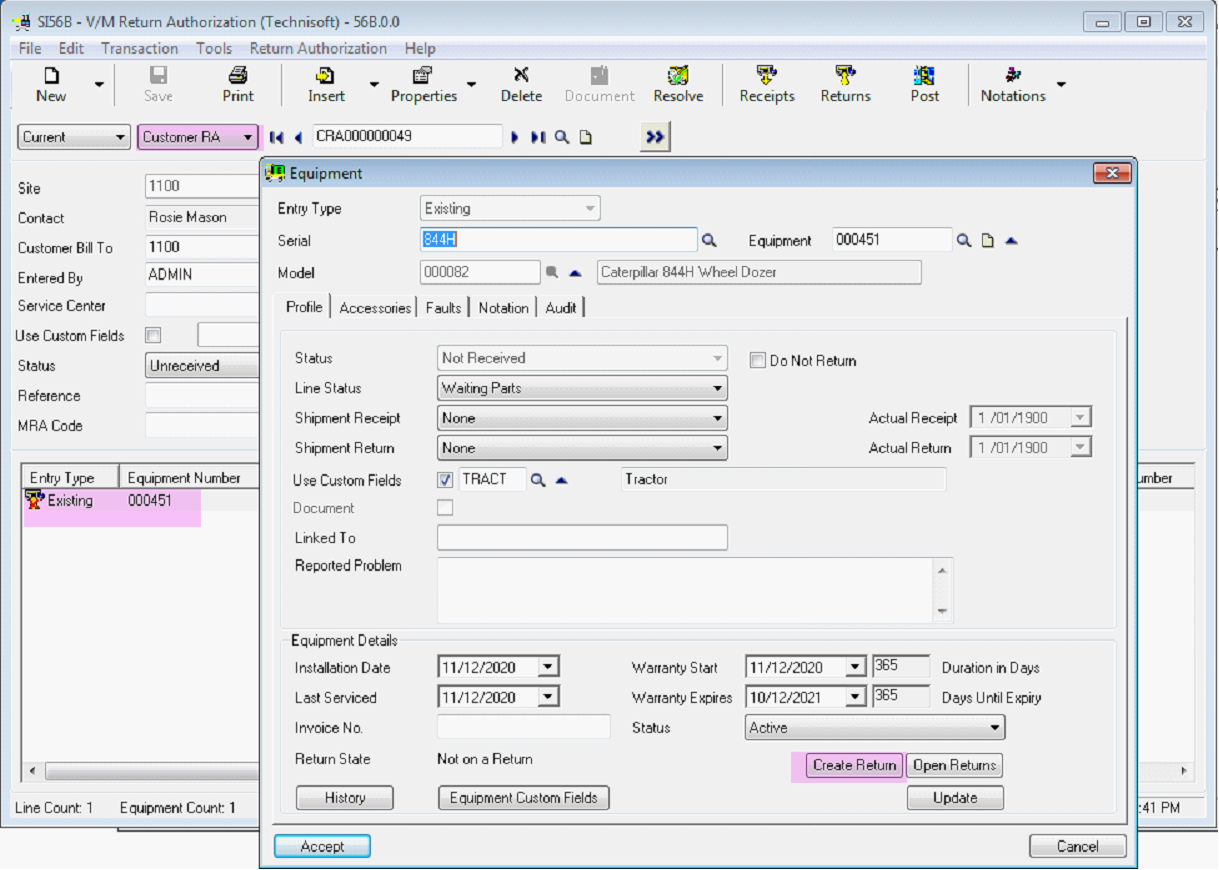
A Return can be entered from a Return Authorization (RA). |
There are two types of RA’s, a Customer RA or Vendor/Manufacturer RMA. Returns can be processed on either document type.
Select an Equipment record on an RA, then double click (or right click Properties) to open the record. Select “Create Return”.
How to Process a Return
Summary
Create a Return
Where Return Type = Return to Inventory - Open “Returns and Refurb” and post the IC Adjustment and/or Transfer.
Where Return Type = Return to Vendor – Open RA Entry and add Equipment to a Vendor Return using Insert, Equipment/Item From, Returns.
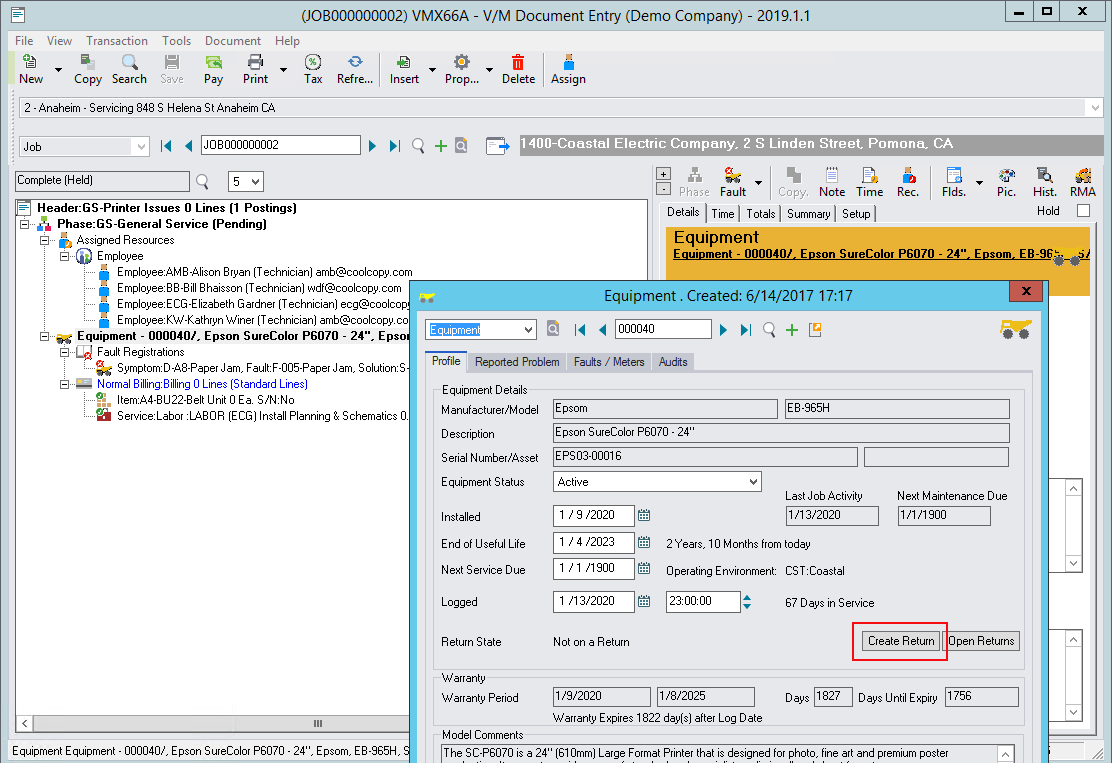
Creating a “Return to Inventory” (from a Job)
Add an Equipment record to a Job.
Select the Equipment and double click or right click to select Properties.
Select Create Return.
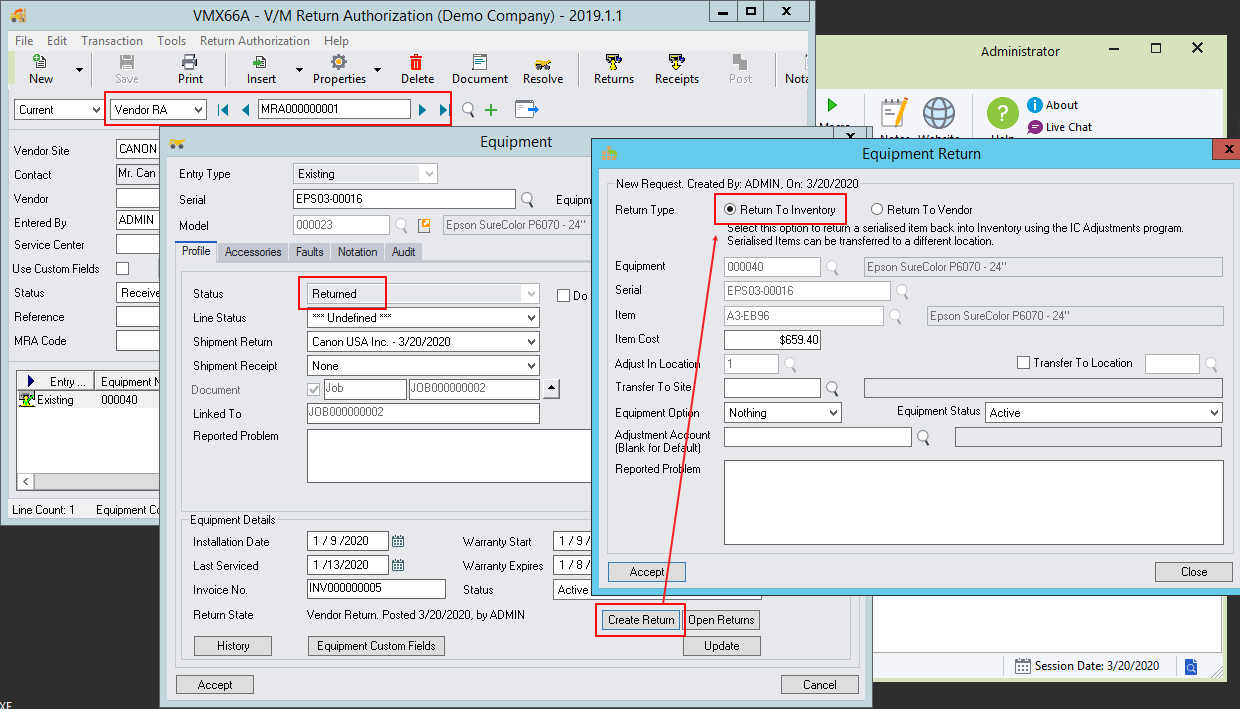
The Return form appears as follows:
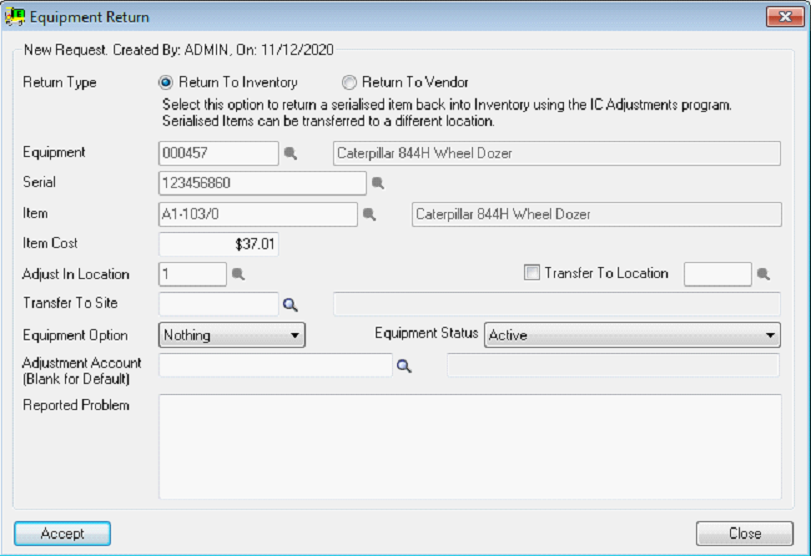
The first step is to select a Return Type and complete the adjustments form.
The second step is to Open Returns and post the transaction to an IC Adjustment and/or IC Transfer or a Vendor RA depending on the Return Type selected.
Return To Inventory
Select this option to return the Equipment back into Inventory.
This adds an entry into the Returns and Refurb program ready for posting as an IC Adjustment.
This field cannot be edited if chained from the Equipment in a job.
The item code will default if the Equipment was sold via Sage 300.
If the Equipment was not originally sold via Sage 300 and was created manually, chose a valid Item Code.
If the Serial Number conforms to the Serial Number Mask for the item selected, it can be adjusted into Inventory.
The item cost will default from the current item cost in the IC Location Details based on the costing method used for the item selected.
The cost may be overridden manually.
This field cannot be edited if chained from the Equipment in a job.
If the Equipment was not originally sold via Sage Accpac and was created manually, chose a valid location to adjust the item in to.
If the item is to be transferred to a different location select a valid Transfer to Location. For Example, Used Stock or Ready for Refurbishment.
The Return will process an IC Adjustment first and an IC Transfer together.
If the equipment is to remain in the database select “Nothing”.
If the equipment is to be deactivated select “De-activate Equipment”. Deactivating Equipment will set the Active flag in the equipment master record off (unchecked).
Use this field to change the Master Equipment status after the IC Adjustment is processed.
If left blank the default Inventory Adjustment account as specified in Inventory Setup, Accounts Sets will be used to process the IC Adjustment.
Specify this account
Add comments which will be passed through to the IC Adjustment posting.
Comments are passed to the IC Adjustment at line level for each item.
Serialized Items can be returned even if the equipment being serviced was not originally sold by the Service Company and never existed in inventory.
To input a Return for a new item that did not previously exist, the Serial Number Mask must be correct (See Inventory Control, I/C Setup, Mask Structures) and the Item code must exist.
It is not possible to create a Return using an IC Adjustment if the Serial Number Mask Structure is incorrect or the Item Code does not exist.
The system will provide appropriate error messages if the item code does not exist or the Serial Number Mask is incorrect.
If the Equipment was sold from Service Manager or Order Entry the serial number will be marked “Unavailable” in inventory. The Serial Number will exist in the Service Manager Equipment database too.
When an item is sold from Service Manager and an Equipment record is auto created and the item code used to create the equipment is stored in the Master Equipment record on the Information tab in the field “Created from Item”.
Similarly if an item is sold via Order Entry and the Auto Create Equipment program is used to create an Equipment Record in Service Manager the item code, is stored on the Information tab in the field “Created from Item”.
If an item has just been sold from Service Manager or Order Entry and a Day End has not yet been run, the Item will not have been updated in the Serial History table in Sage Accpac.
If a Return is created for that item, an error will appear advising the Serial History record cannot be found, ensure IC Day End has been run and try again. It will not be possible to enter the Return until after Day End has been processed.
If the Serial Number was not sold from Service Manager or Order Entry but an item code exists that can be used, a Return can still be created using the new Serial Number provided the Serial Number conforms to the Serial Number Mask for that item.
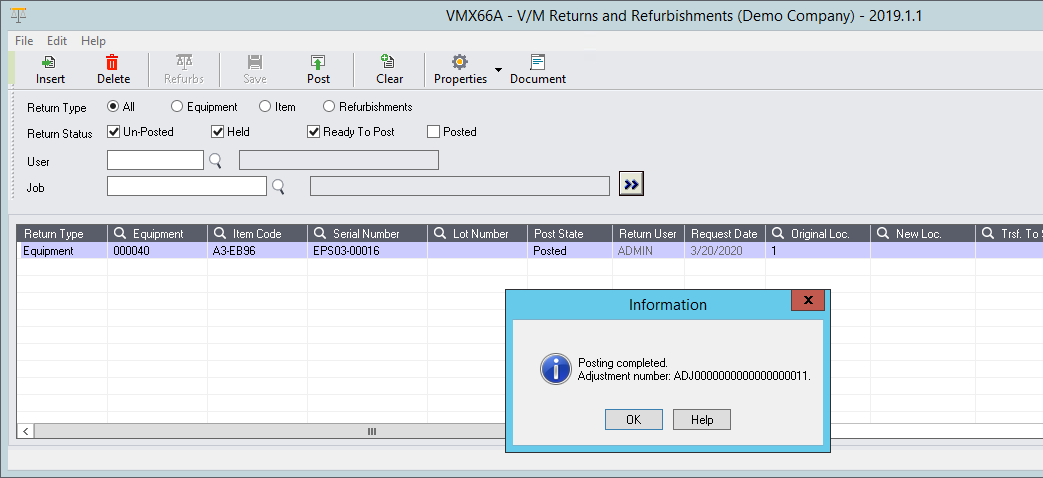
Post IC Adjustment
Once the Return to Inventory has been added, the next step is to post an IC Adjustment using the new “Returns and Refurbs” program.
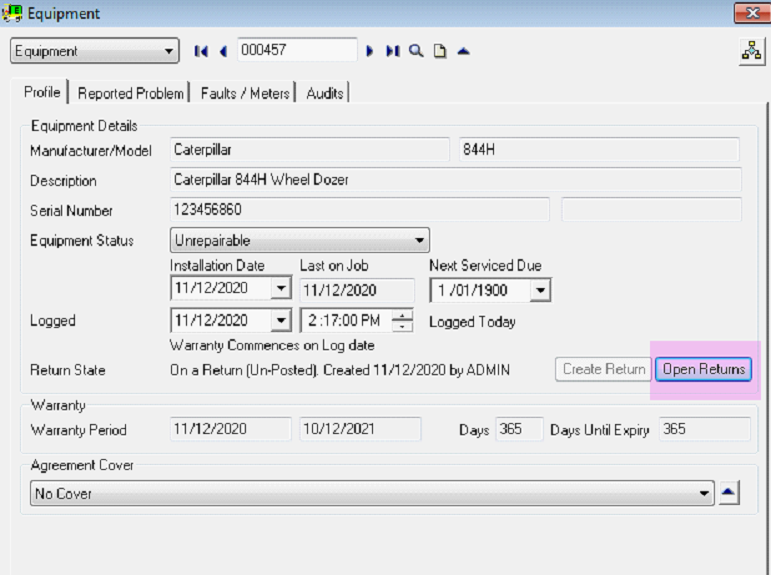
The “Returns and Refurbs” program can be accessed from within a job by clicking on an Equipment node, then double click to open Properties, and select “Open Returns”.
Alternatively “Returns and Refurbs” can be launched directly from the Sage 300 Desktop.

Returns are usually processed by a Returns Officer or someone authorized to post IC Adjustments. Remember security can be enabled on IC Adjustments to prevent posting of a Return.
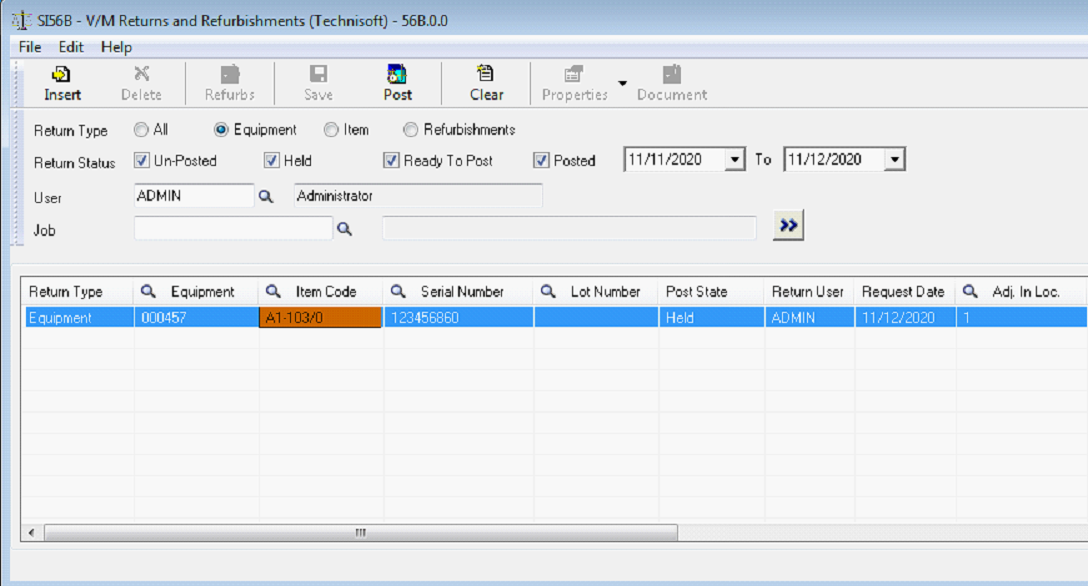
To Post a Return set the “Post State” to “Ready to Post” and select the Post icon in the top Tool Bar. This will post all transactions in the list to IC Adjustments and/or IC Transfers as applicable.
The IC Adjustment and/or IC Transfer Number will be returned to each line as a reference and can be drilled to by selecting the Properties icon in the top tool bar and selecting Open Adjustment or Open Transfer as applicable.
Using the “Returns and Refurb” program
Insert |
New Returns can be entered directly into the Returns program by selecting the Insert icon in the top tool bar. Refurbishments can only be retrieved from Jobs they cannot be created from the “Returns and Refurb” program. |
Delete |
Select Delete to delete an existing return. |
Refurbs |
Select this icon to retrieve Items that have their status set to “Ready for Refurbishment” in a job so they can be posted as an Inventory Adjustment. |
Save |
Select Save to save the current work in the Returns program. |
Post |
Select Post to post IC Adjustments and IC Transfers directly to Inventory Control. |
Clear |
Select clear to clear the Returns form. |
Properties |
Select Properties to view Equipment or Item Properties. Once an IC Adjustment or Transfer has been posted, the Properties icon can be used to drill to the IC Adjustment or Transfer. See the drop down (arrow) on the Properties icon to view all options. |
Document |
Select Document to launch the Job associated with the current Return. If chaining from an existing job this icon will be grayed and cannot be selected. |
Return Type |
Select a Return Type to filter contents to be displayed. “All” to view all return records; “Equipment” to view only those returns that have been created from Equipment records; “Item” to view only those returns that have been crated directly from Items; and select “Refurbishments” to see refurbished items only. |
Return Status |
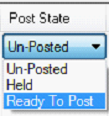
Select a Return Status to filter contents to be displayed. “Un-Posted” - to view all transactions that have not yet been posted to IC Adjustments or Transfers; “Held” - to view any Returns that have their “Post State” set to Held; “Ready - To Post” to view any Returns that have their “Post State” set to ready to post so that they can be posted to an IC Adjustment or Transfer; “Posted” - to view Returns that have already been Posted to IC Adjustments or Transfers. Set a date range to view as required. |
User |
These are Sage 300 Session Users not Employees in Service Manager. Enter a different Session user to view Returns entered by that user. If a new return is entered the current session user will be set changing the user here has no effect other than to display entries entered by different users. |
Job |
Select a Job Number to find all returns on that job. Leave blank for all. |
|
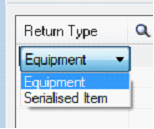
Select a Return Type when inserting a new Return. Both types process IC Adjustments to inventory they just populate the Item Code to be adjusted differently. Selecting Equipment sources the Item Code from the equipment record if one exists. If the equipment was sold in Service Manager or Order Entry and was created via the Auto Create Equipment program, the item code will auto populate once the Equipment is entered. The item code is sourced from the “Created From Item” field on the Information tab in the Equipment Master table when created.
It the Equipment was not sold directly or was created manually, a message will appear warning that no item code exists and an Item Code can be entered manually. Selecting Serialized Item allows any serialized item code to be entered and will display only those serial numbers that have been previously shipped and are unavailable. |
Equipment |
Use the Finder to select an existing equipment record. |
Item Code |
Use the Finder to select an item code. Only serialized item codes will display in the Item Finder. |
Serial Number |
Use the Finder to select a serialized item. If Return Type = Serialized the finder will display all serial numbers that are “Not Available”. i.e. that can be returned. i.e. it is not possible to return an item that has not yet been sold. Use the Finder to select a serialized item. If Return Type = Equipment the finder will display all serial numbers for all Equipment. i.e. that can be returned To adjust a new Serial Number/Item Code into stock, type in the serial number directly. Note the serial number entered must match the serial number mask for that item which can be checked in the Item Finder. |
Lot Number |
If the serialized item also tracks lot numbers, use the finder to find a lot number. It is not possible to process a return for an item that tracks lots only, from the Returns and Refurb program. The item must be serialized. Alternatively use the Inventory Adjustment program directly to return a lot tracked “only” item. |
|
There are three post states. “Un-Posted” - This status is the default status when inserting a new entry. This status indicates the line has been entered but has not yet been posted to an IC Adjustment or Transfer. “Held” – Set this status to prevent the line from posting to an IC Adjustment or Transfer. “Ready to Post” – Set the line to “Ready to Post” when the line is ready to be returned to Inventory via an IC Adjustment. |
Return User |
This cannot be changed and is the current Session User as logged in per the current Sage Accpac session. |
Request Date |
Is set by the system automatically when the Request is entered and cannot be modified. |
Adj. In Loc. |
For previously sold items the Adjust in Location will be set automatically and cannot be edited. If adding Equipment and returning a new Serialized Item the Adjust in Location can be edited. Note it is not possible to insert a new serialized item and specify the Adjust In Location. Use IC Adjustments if adjusting in a serialized item where there is no equipment being returned. |
Trsf. To Loc. |
Often when adjusting an item in there is a requirement to adjust it into a different location. For example a Scrap, Refurbishment, Spares, Pending Repair, or similar location. Use this field to specify a Transfer Location. The IC Adjustment is processed first when the Return is posted followed by an IC Transfer to the new location. This process happens automatically and the IC Transfer Adjustment Code is passed back to the return for audit reference. |
Trsf. To Site |
This allows the equipment record specified in the return to be transferred from the Customer Site it is currently located at to another Site when the Return is posted. This option is commonly used to transfer the Equipment to an Internal Site so that it can be refurbished at a later date. |
Cost |
The Cost field may be edited. It defaults from the IC History table with the last cost for that Item based on the Account Set Costing Method for that item. Eg. If the Account Set uses Moving Average Costing Method it will be the average cost as at the cost of the serial item when last sold. |
Return Quantity |
This field cannot be edited. If the transaction is a Refurbishment the Return Quantity can be set in the Billing Group. See Refurbishments Help Documentation. |
Equipment Option |
This field can be edited to specify whether the currently selected equipment is to be left as is “Nothing” or “Deactivated”. |
Equipment Status |
Edit this field to change the Equipment Status on the Equipment currently selected. |
Comment (F6) |
Enter a 250 character comment. Press F6 to expand the field to see the entire comment. The comment entered here is posted to each line of the IC Adjustment. |
Adjust. Acct. (Blank for Def.) |
If left blank the IC Adjustment GL Account will default from the IC Account Set as specified in Inventory, IC Setup, Account Sets, Adjustment Write-Offs account. After the IC Adjustment has posted this field will be populated with the IC Adjustment Write-Off Account if it is left blank. To change the IC Adjustment GL Account Code enter a GL Account code in this field. |
Posted Employee |
This field is not editable and will be populated with the Employee Code of the person that posted the IC Adjustment or IC Transfer. |
Posted Date |
This field is not editable and will be populated with the Date the IC Adjustment or IC Transfer was posted. |
Refurbishment Type |
There are three Refurbishment types: Increase Quantity and Cost Adjust Cost Only (+/-) Increase Quantity Only These relate to the Refurbishment process and are not relevant for Returns. If processing a Return the Refurbishment Type will default to “No Item Refurbishment”. |
Return Source |
This field indicates where the Return was generated from. Valid sources are Document Entry, RA Entry, Manual. |
Source Document |
If the return was entered from a job this field is populated with the Job Number. If the return was entered from an RA this field is populated with the RA Number. If the return was entered manually this field is left blank. |
Adjustment Code |
This field is populated with the Adjustment Code after the item has been posted by IC Adjustments. |
Transfer Code |
This field is populated with the Transfer Code after the item has been posted by IC Transfers. |

Creating a “Return to Vendor” (from a Job)
Creating a “Return to Vendor” (from a Job)
Add an Equipment record to a Job.
Select the Equipment and double click or right click to select Properties.
Select Create Return.
Select Return Type = Return to Vendor
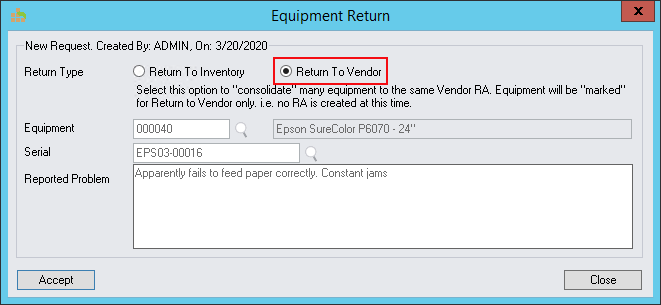
Return Type |
Select this option to consolidate many equipment to the same Vendor RA. Equipment will be “marked” for Return to Vendor only. i.e. no RA is created at this time. Use the RA Entry program to retrieve equipment marked for return by first creating a Vendor RA, and then selecting Insert, Equipment/Item From, Returns. This method of creating a Vendor RA allows for Returns from many jobs to be added to one Vendor RA and pushes the responsibility of creating the Vendor RA onto Stores Control and away from the Engineer/Technician. Alternatively do not use this option and click on the Equipment directly to create an RA in the normal way. |
Equipment |
This field will be populated automatically and cannot be modified. |
Serial |
This field will be populated automatically and cannot be modified. |
Reported Problem |
This field will be populated automatically from the Equipment Reported Problem and cannot be modified except by editing it in the Equipment properties. |
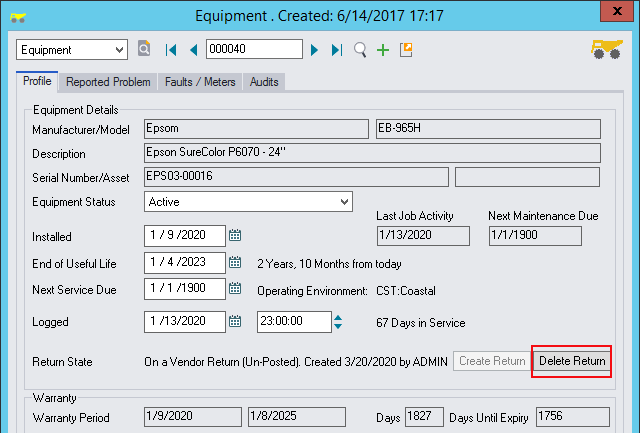
Select Accept and the Equipment Return State will show 'On a Vendor Return' along with the posting status of Un-Posted.
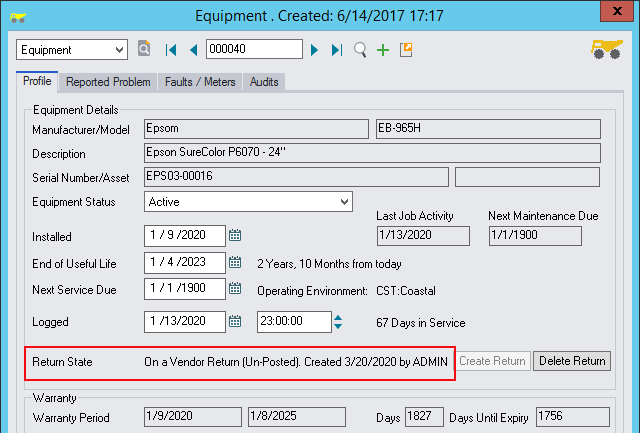
If the equipment has been marked for a Vendor return in error, select “Delete Return” to remove it.
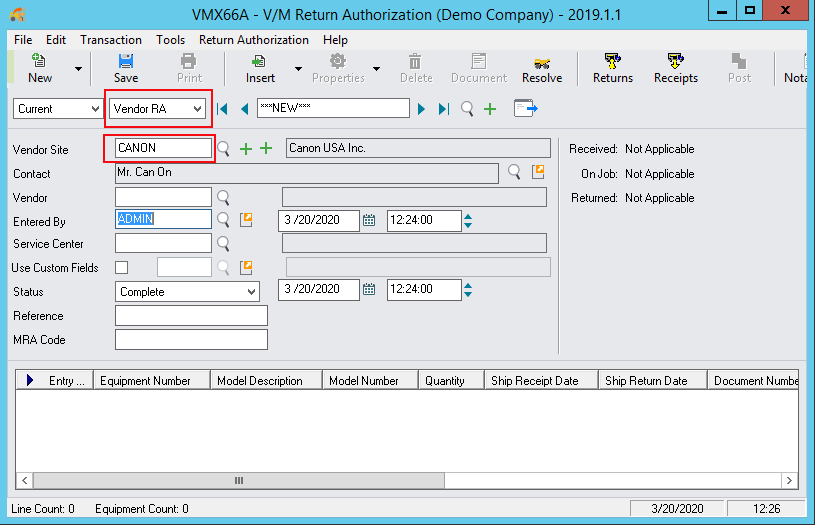
Open RA Entry on the Sage Accpac Desktop.
Create a new Vendor RA or locate an existing Vendor RA.
Note: Be sure to have setup up a Vendor Site type in Site Setup first or it will not be possible to create a Vendor RA.
Enter the Vendor Site
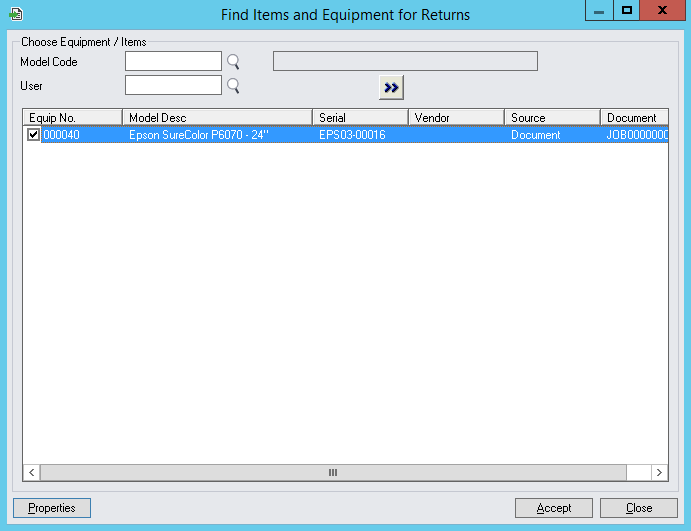
Select the Insert dropdown and select Equipment / Item from Returns
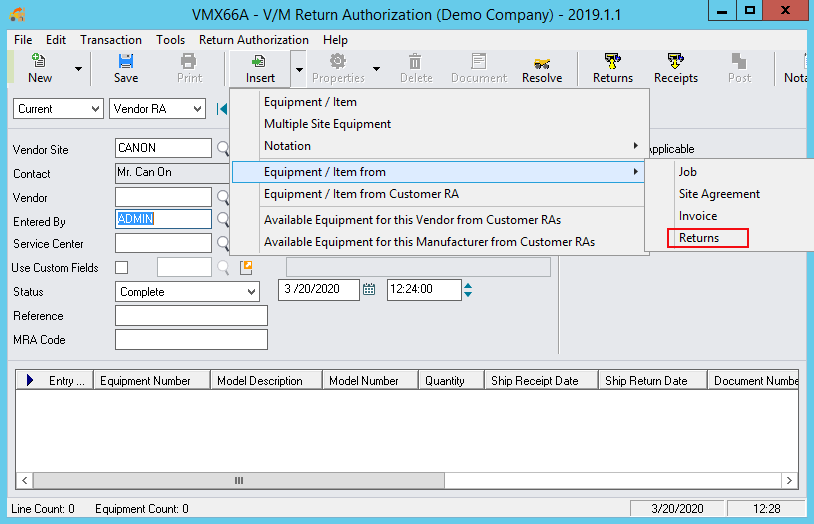
All Equipment “marked” for Return can be retrieved and displayed in the list. Select the Equipment Record/s to be placed on the Vendor RA.
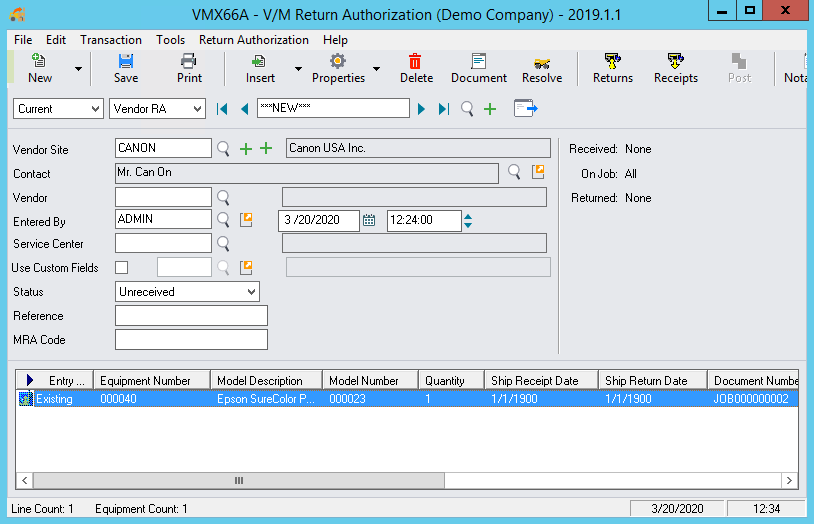
Select the Returns icon in the top tool bar of the Vendor RA to return the equipment to the Vendor.
Once added the Equipment's Return State will update to Vendor Return.
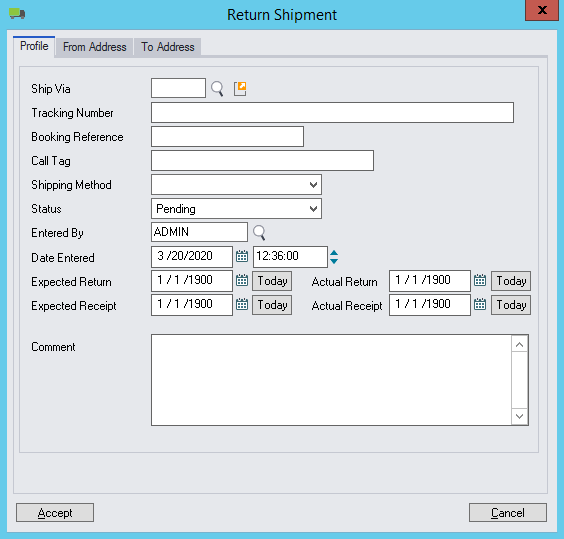
The Equipment can then be physically sent to the Vendor and details noted in the Return Shipment form.
Once the Vendor has repaired the equipment and sent it back, select the Receipt icon in the top tool bar to receive it back. This effectively completes the Vendor RA.
If there is a requirement to return the item just received in, back into stock, for example, if a part comes back and a new one is received, a Return to Inventory can be created from the Vendor RA to return the part back into stock.
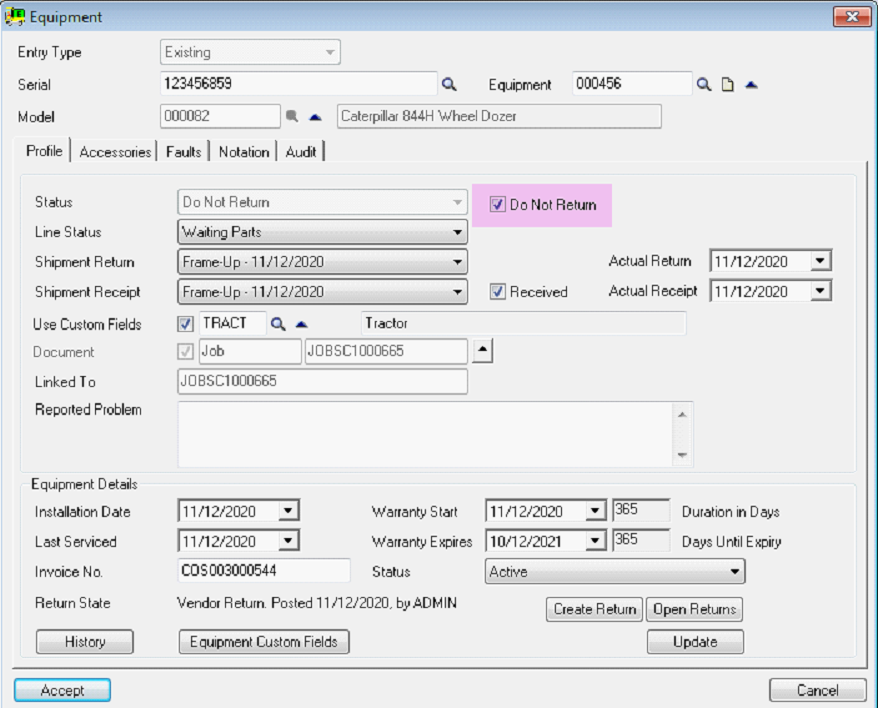
Open properties on the Equipment line in the RA and select “Create Return”.
Complete the Return form and then go to the “Returns and Refurbs“ program to post the Return which will automatically post the IC Adjustment and/or IC Transfer as applicable.
If the equipment is not repairable, and has not been returned by the Vendor, it is recommended the Equipment status on the RA Line be set to “Do Not Return”.