Event Manager

Contents
 »
» 
Overview
Event Manager is a Customer Relationship Management tool, that allows you to:
•filter certain information in the database
•find Customers that match specific criteria and contact them directly using email notification without ever leaving your desk.
Event Manager can:
•check for customers that have Agreements or Equipment Warranty due to expire
•determine who should receive a recall notice for a Major Model Fault
•send out promotional literature to Customers in a particular Industry or Market class
•notify Customers re a pending Fault that may have been reported
•send Newsletters or Birthday greetings
•and more
One very good example of the power Event Manager can unleash is, for instance, "Find all equipment coming out of warranty over the next x amount of years." This information can be used for forecasting and budgeting, financial management and agreement management.
Starting the Event Manager Program
Click the Event Manager desktop icon.
The Event Manager window will be displayed.

Step 1: Create the Query
Specify the type of information you are trying to find. Select this from the drop-down list.
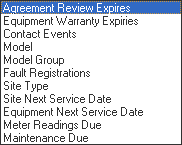
Specify additional criteria. For example, select Agreement Review Expires and clear the Review Date Range check box. Move the Expiry Date forward to 2012.
![]()
Click Go ![]() .
.
All Agreements with an Expiry Date of 1/3/2006 through 1/3/2012 inclusive will be displayed in the Results pane.
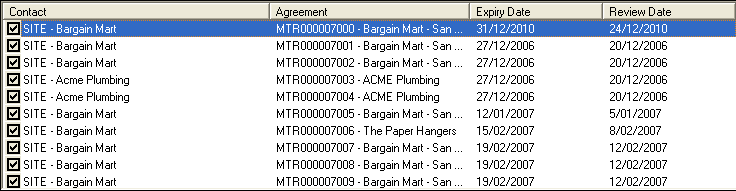
The number of expiring Agreements and thus the number of items in the Results pane, will be displayed in the lower left corner of the screen. In this example, 55 Agreements have an Expiry Date of 1/3/2006 through 1/3/2012 inclusive.
![]()
Service Manager will send an email message for each item that has a tick next to it. If you do not want an email message sent for a particular item, clear its check box. The message will be sent to the email address of the Primary Contact for the Site.
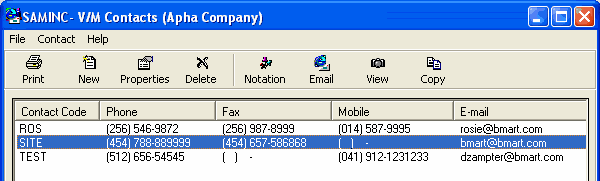
Double-click an item to view the contact information for that item.
Step 2: Format the Email Message
Format the email message as required before sending it to your customers.
Add Database Fields to the Email Message
In typical mail merge fashion, the "master" email message that you will set up, consists of static text and database fields. This will enable each customer to receive a message that contains information specific to that customer without you having to create each message individually.
To add database fields to the master message, click the Fields icon ![]() on the toolbar. The Field List window will be displayed and will remain on top while you drag and drop the required fields onto the master email message.
on the toolbar. The Field List window will be displayed and will remain on top while you drag and drop the required fields onto the master email message.
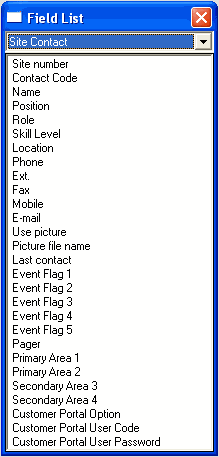
There are four categories of database fields available. Click the drop-down list arrow ![]() to the right of Site Contact and select the required category.
to the right of Site Contact and select the required category.
![]()
Any field from any category can be included in the email message.
Add Attachments to the Email Message
Attachments can be added to the message. To do this, click the Attach icon ![]() on the toolbar and select the required attachment.
on the toolbar and select the required attachment.
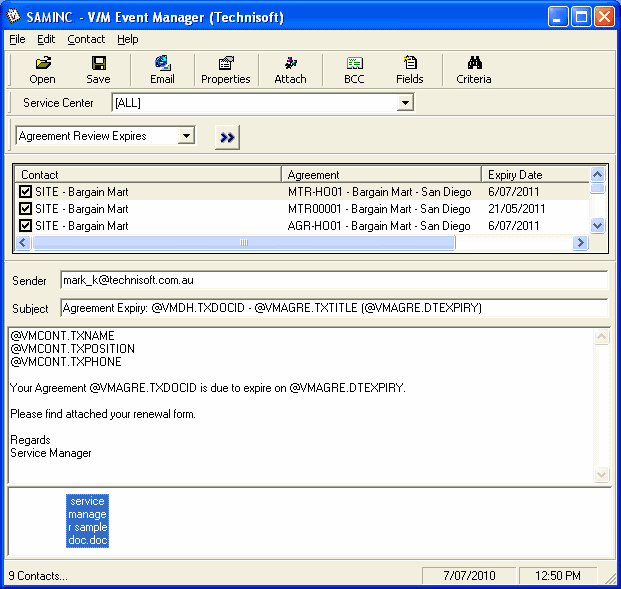
An Example
The following example shows how a master email message can be composed using static text and database fields. An email message will be sent for each item in the Results pane that is ticked. Each Contact will receive this email message with his or her own details, Agreement Numbers, and so on.
Step 3: Send the Email Message
Once the master email message has been composed, you can now send the email messages. To do this, click the Email icon ![]() on the toolbar.
on the toolbar.
Step 4: Save the Master Email Message
Other options available from the toolbar include Save and Open. This will obviously be very handy when complex emails are composed. Simply Save the master email message and Open it when required. Send after searching.