A/P Invoice Entry

Contents
 »
»
Overview
A/P Invoice Entry allows A/P transactions from the integrated Sage 300 Accounts Payable program to be sent to Service Manager where additional fields can be added. If a Service Manager batch is opened using the standard A/P transaction program then the Service Manager fields will not be displayed.
This enables an AP Clerk to enter transactions in AP and post expenses directly to a job eliminating double entry.
When an AP Invoice is entered into an AP batch a Service Manager Job can be selected, and the expense can be placed in a particular Phase or under the relevant Equipment record on that job.
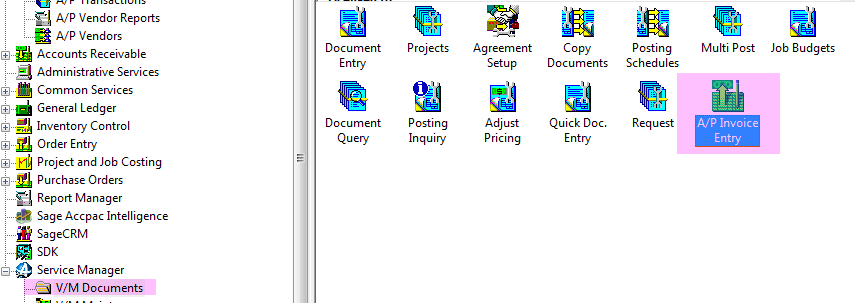
Starting the A/P Invoice Entry Program
Click the A/P Invoice Entry desktop icon.
The Service Manager A/P Invoice Entry program can be copied to any folder on the Sage 300 desktop. To copy it, right click the icon and select copy. Click on the desired folder and in the program area right click and select Paste.
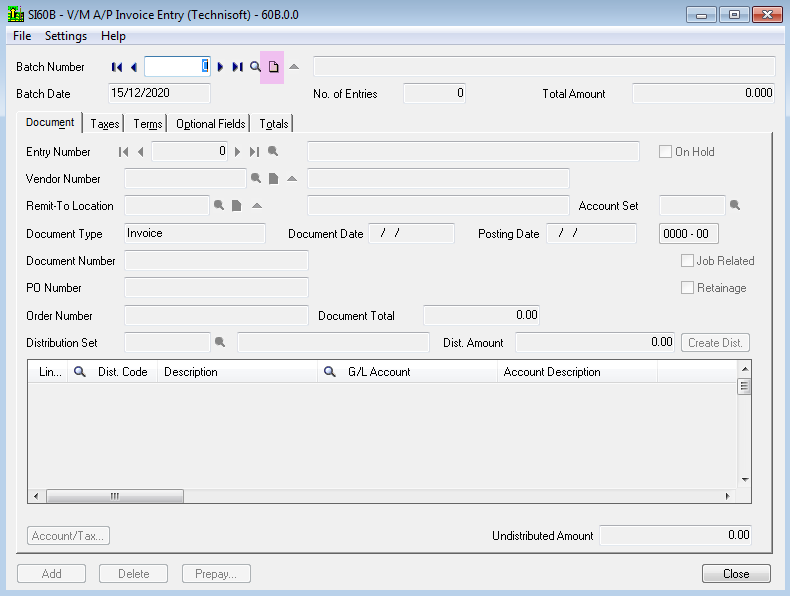
The V/M A/P Invoice Entry window will be displayed.
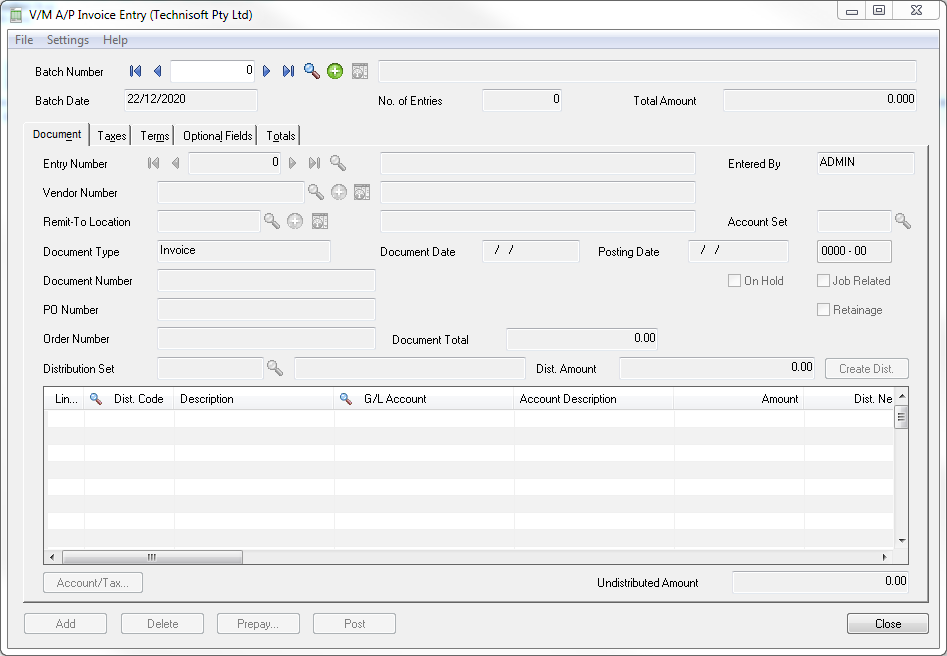
General Workflow Summary AP Batch Entry
Open V/M AP Invoice Entry to create a new AP batch.
Add detail lines to the AP batch and select VM jobs as applicable for each AP entry.
Save the Batch when all lines have been added and the batch is complete.
Open Accounts Payable Invoice Batch List and post the VM batch to update entries on the job and post the transaction to AP.
Post the lines in the job at any time to take up the cost and clear the AP or Service Cost Clearing Account.
Pay the AP account to clear AP Control.
AP GL account summary Service Manager AP Batch Entry
|
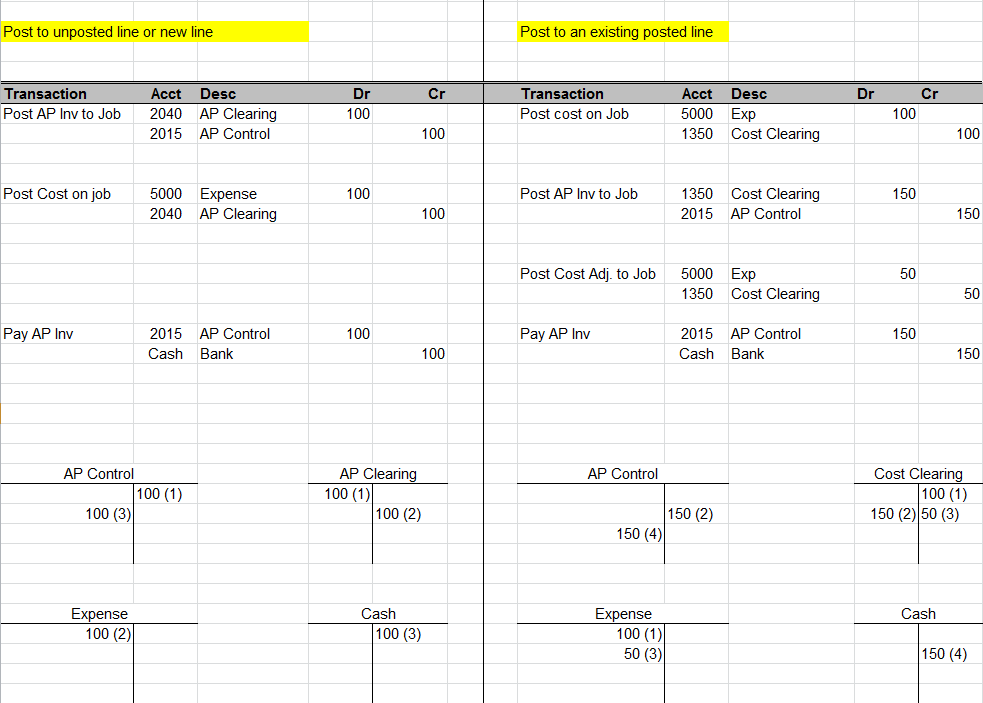
A/P Clearing Account
The AP Clearing Account is specified in V/M Setup, V/M General, G/L Integration.
This account is used for all A/P Batches posted to Service Manager.
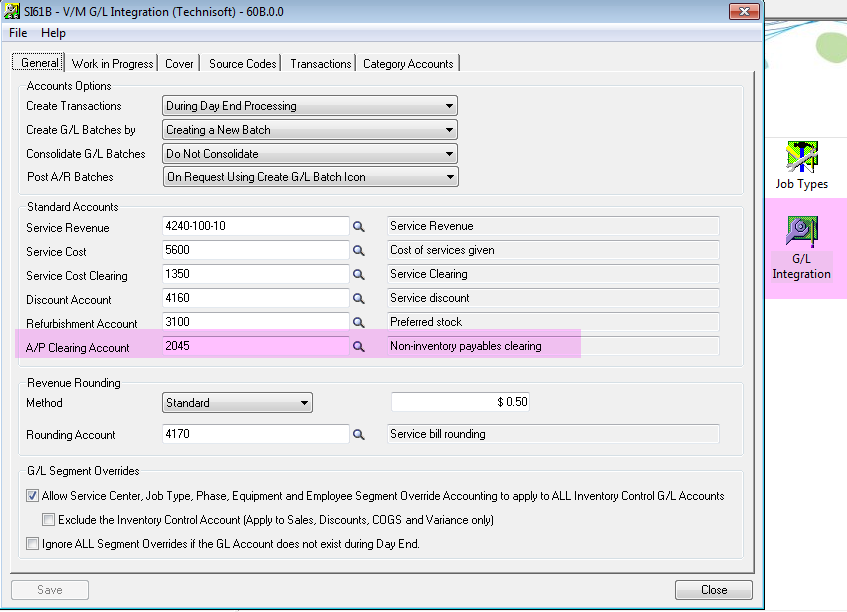
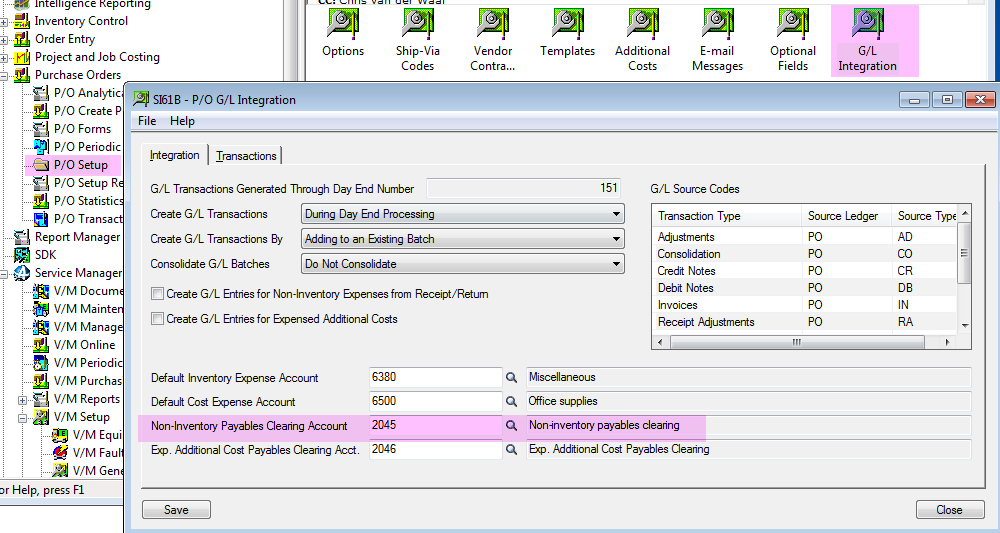
The AP Clearing Account will default from P/O Setup, G/L Integration, Non-Inventory Payables Clearing Account if it exists but this can be overwritten if required
It is not possible to have multiple Accounts Payable Clearing accounts in the one company database.
Creating a new Service Manager A/P Batch
Select the new icon to create a new Service Manager A/P Batch.
The form is identical to the standard A/P Invoice Entry form.
Complete all the Header details on the Document tab as per a standard A/P Invoice Entry batch.
To avoid duplication of documentation because the user interface is identical to the standard A/P Invoice Entry program with just the additional Service Manager fields added, this Upgrade Guide only concentrates on the changes made in order to enter a Service Manager detail line.
Press F1 for standard A/P Invoice Entry help an all standard fields.
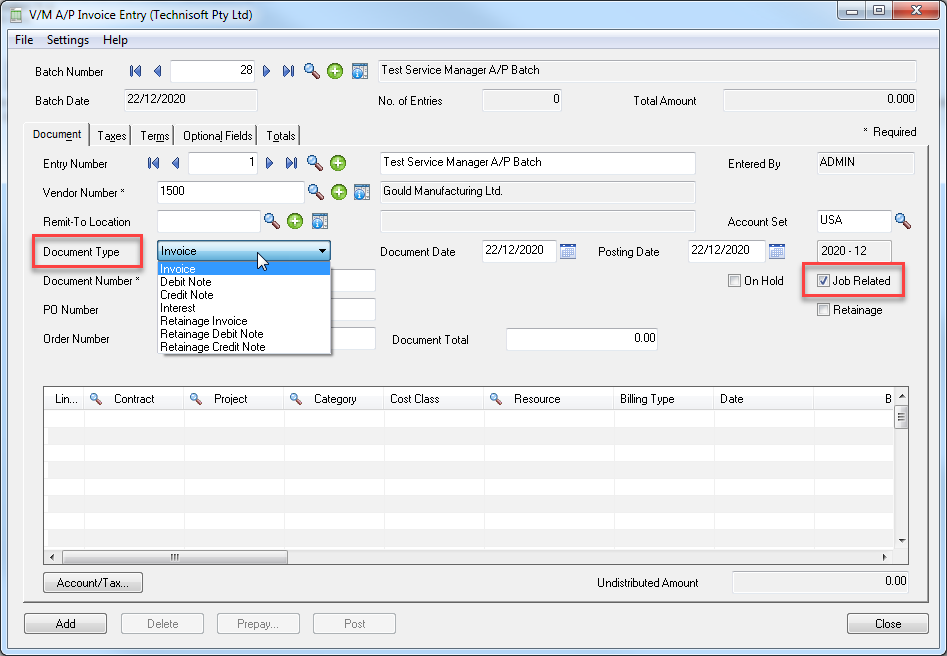
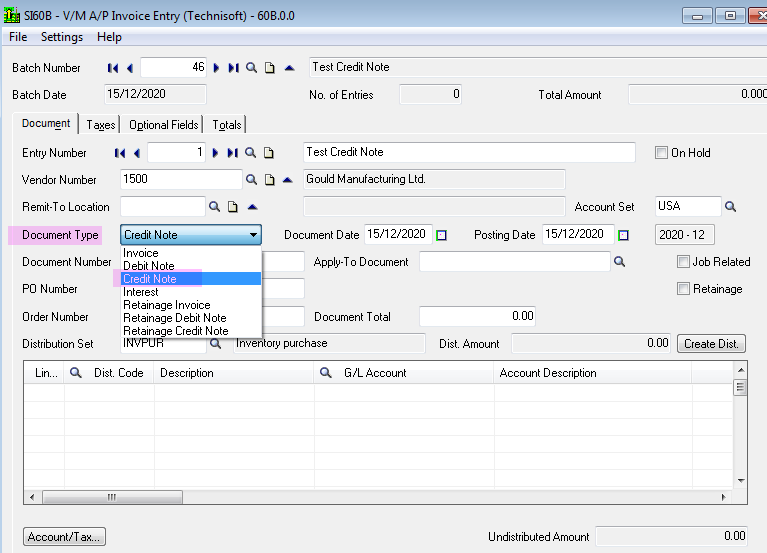
Document Type, Job Related , Document Total
The only document Types supported are Invoice, Debit Note and Credit Note documents.
If another Document Type is selected an error message will display.
The “Job Related” field is for use with Sage 300 product Project Job Costing (PJC).
This field should not be selected if entering details to post to a Service Manager job.
If this field is selected Service Manager fields will not appear and will be replaced by PJC fields.
Enter the “Document Total” including tax in the Document Total field in order to be able to Add the line and subsequently Post the batch.
Inserting a new Service Manager A/P transaction detail line
Click in the Grid area to add a new transaction detail line.
Press the Insert key on the keyboard to add additional entries to the grid.
Select Add to add the line to an AP batch entry.
Alert
Sage unfortunately do not allow edit to the order of the columns in the grid at this time.
We are working with Sage to see if they can provide a function to allow us to modify the column order but that is not available at present.
Transaction Field List
From a workflow perspective the first field to appear in the grid should really be the V/M field specifying whether the entry is Job Related.
That field however does not appear until approximately the 14th field to the right of the grid.
The following fields can still be completed in advance of selecting the Service Manager Job Related field.
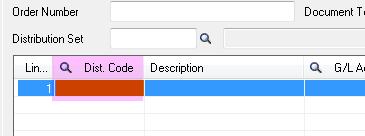
Distribution Code
Distribution code: Enter a distribution code as applicable. Note that if there is a service created in Serviced Manager’s Service Setup program with an identical code, that service will be defaulted to the service code field in the grid when adding an AP entry to an AP batch, otherwise leave this field blank if not required.
GL Account
This field should not modified unless the user is authorized.
Once a job is selected, Service Manager will override that field with either the A/P Clearing Account if a new line is being added to the job, or the Service Clearing Account if an existing line that has already been posted is selected.
If this field is changed it will be overwritten by Service Manager once a job is selected but can be manually changed if required.
Service Manager tries to maintain the integrity of this field to ensure that the Clearing Accounts are properly maintained and cleared.
The GL account will default from V/M G/L Integration Accounts Payable Clearing account if one is specified.

Amount
For each detail you add, enter the amount of the detail in the Amount field, or edit the existing detail amount, if necessary.
The portion of the document total you distribute to details depends on whether tax is included in the price.

Discountable
You use this option to specify whether a selected detail is subject to the invoice discount. For example, if you do not give discounts on freight charges, you can exempt a freight detail from the invoice discount.
To indicate that a detail is not discountable, you simply clear the Discountable option for the detail on the Detail Accounts/Taxes form, or select No for the option on the detail-entry grid.
![]()
Optional Fields
This field indicates whether optional fields are assigned to the document detail. If any invoice details optional fields are set for automatic insertion, the field will be selected when you add a new detail to an invoice, credit note, debit note, entry.
If you use exactly the same optional fields in vendor records and on invoices, the program assigns the optional field values used in the vendor record to transaction details that you add in the Invoice Entry form.
You can accept or delete the optional fields that appear as defaults, and you can add other optional fields that you have set up for invoice details. You can also change the optional field values used in document details.
To check or to change the optional fields and values that are used for a detail
Select the detail, then click the Optional Fields zoom button (up arrow). You can also select the detail on the grid, then press Shift+F9.
An Optional Fields form appears, displaying any invoice details optional fields that are marked for automatic insertion.
Use this Optional Fields form to add or delete optional fields for the detail. You can add any optional fields that are defined for invoice details.
You can also change the default values that appear, as follows:
If the optional field is validated, you must specify a value that is defined for the optional field in Common Services. If the optional field allows blanks, you can leave the value field blank.
If the optional field is not validated, you can select a predefined value, or you can enter any value that is consistent with the type of field (amount, text, yes or no, and so on), providing your entry does not exceed the length permitted for the field.
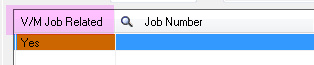
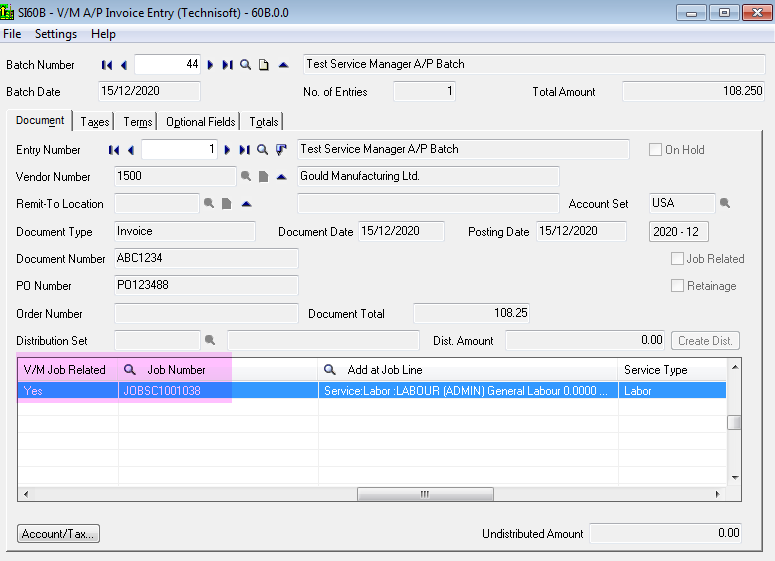
V/M Job Related
Set this field to Yes in order to enter an AP transaction that will be posted to a Service Manager Job.
If you select No, you can enter a standard AP transaction using the A/P Entry form still but that transaction cannot be posted to a Service Manager job.
Click the field to toggle from Yes to No and vice a versa.
Job Number
Click the Job Number field to select the finder or simply select the finder in the column header to find a job.
Select the Job Number to post the AP transaction to.
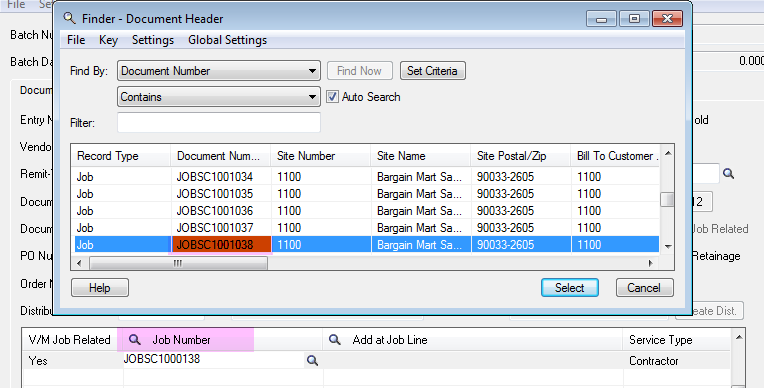
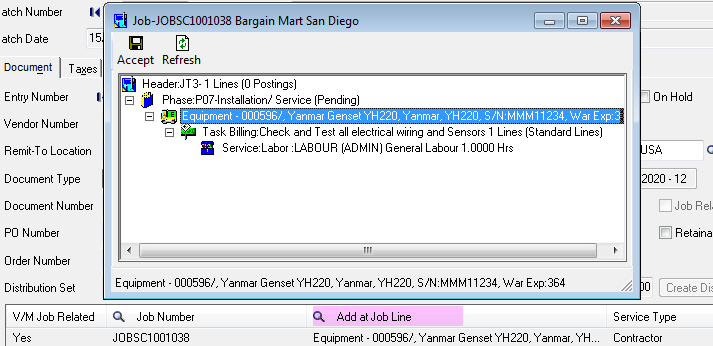
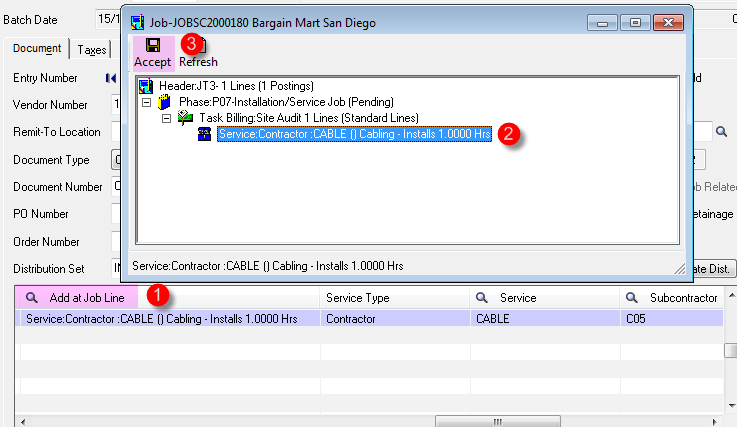
Add at Job Line
Click the “Add at Job Line” field to identify where in the tree of the existing job to place the AP transaction. The Job Finder includes a Criteria Icon to filter the Job Tree to make it easier to locate and position the transaction.
Select Accept to add the entry.
If an existing phase is selected, a new Billing Group will be added to the job and the AP transaction will be added as a new entry to that Billing Group.
Similarly if an existing equipment is selected, a new Billing Group will be added to the job under the equipment and the AP transaction will be added as a new entry to that Billing Group.
If an existing Billing Group is selected the AP transaction will be added to that Billing Group as a new entry.
If an existing Service Line is selected that has not been posted, the line will be updated with the AP transaction detail.
If an existing Service Line is selected that has already been posted, the line will be updated but is checked first to see what cost was posted.
The G/L Account in the AP entry will be changed to reflect the Service Cost Clearing Account used in the posted transaction instead of the AP Clearing Account.
If a cost has been posted then the difference between the cost posted and the value on the AP transaction will be adjusted in the job as a Credit or Debit Cost Adjustment. i.e. no quantity adjustment will occur only the value is updated.
This last option allows a job to be posted in advance of receiving the AP Invoice.
Service Type
Select the Service Type for the transaction being posted to the job.
When a Vendor is entered into the Header of the AP Entry, VM checks to see if there is a Sub contractor setup in the VM tables with a link to that Vendor.
If there is a Sub contractor /Vendor link, VM will default the service to a Contractor service and populate the Subcontractor field automatically.
Both fields can be changed if required.
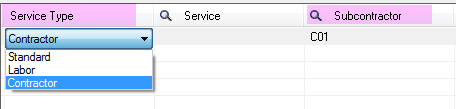
If a Standard or Labor Service Type is selected the Subcontractor field will disappear.
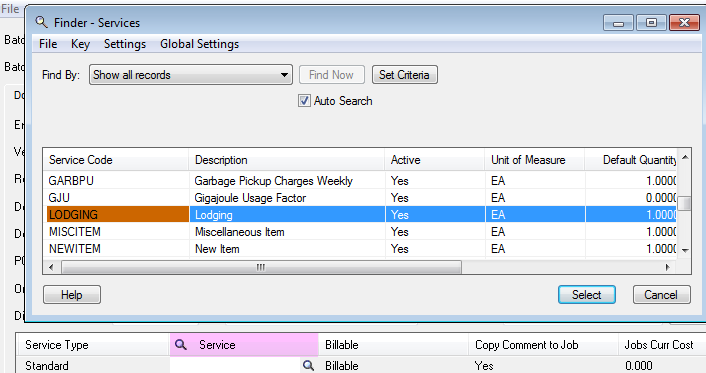
Service
Select the Finder to choose a service to post the AP transaction to in the job.
Note:
It is possible to default the Service Type and Service Code by adding a custom lines to the INI settings file.
For example to have the 'Standard' Service Type with Service code 'CALLOUT' as default, the entry to the INI Settings file would be:
[Custom]
APInvoiceAlwaysJob=1
APInvoiceDefaultServiceType=0
APInvoiceDefaultServiceCode=CALLOUT
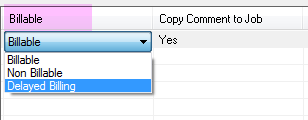
Billable
Select the “Billable” field and a drop down will appear.
Set the line to “Billable” if the AP transaction is to be invoiced to a customer.
Set the line to “Non Billable” to add a Cost Only line to the job for non chargeable work, warranty work, or internal work etc.
Set the line to “Delayed Billing” to add a line that will cost now and bill the line at a later point.
These are defaults and can be changed in the job prior to posting if added in error.
Cust. Bill Amount
Select the “Cust. Bill Amount” field to specify a Customer billing amount.
The Customer Billing Amount is added to the destination document billing unit price in the Customer Currency.
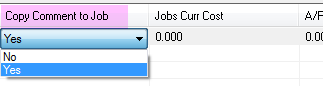
Copy Comments to Job
Select the “Copy Comments to Job” field and choose Yes to have the comments in the AP Comment field copied to a notation in the job, or No to ignore the comments.
This field will default to Yes if a comment exists.
Jobs Curr Cost
This field cannot be edited.
If an existing detail line that has been posted in the job already is selected for the AP transaction entry, this field will display the posted cost in the job for that line. The net value will be displayed if the tax is recoverable.
![]()
A/P Job Cost
This field cannot be edited.
The cost on the current AP entry will be displayed.
If the tax is recoverable the net cost will be displayed.
If the tax is not recoverable the gross value is displayed.
This is a duplicated field so that the totals can easily be seen together.
![]()
Adj. to Job
This field cannot be edited.
If a line is selected that has already been posted to the job, this field will display the difference between the posted cost on the job and the current AP total for that line.
The difference will be posted to the job as a Debit/Credit adjustment with no change to the quantity posted.
![]()
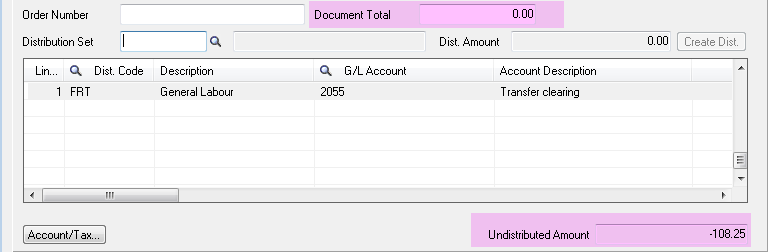
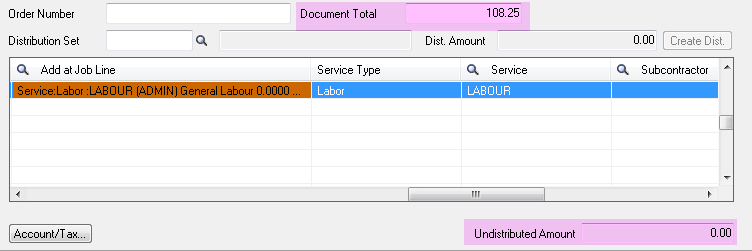
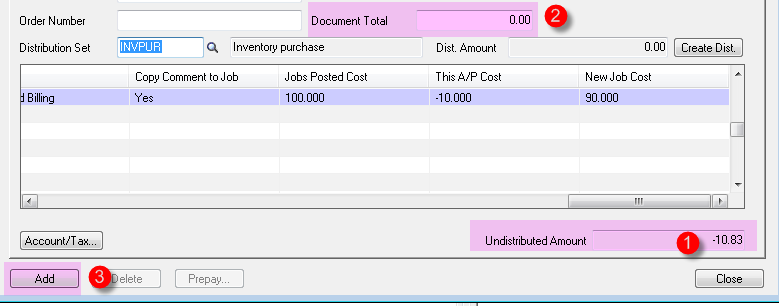
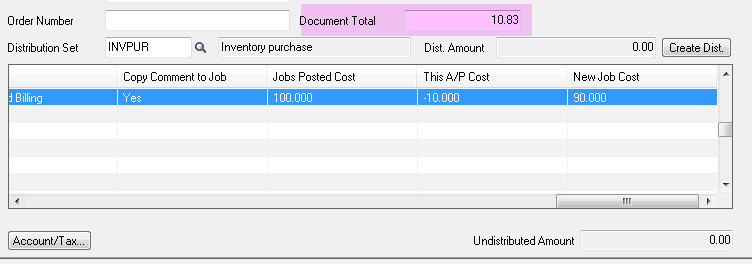
Document Total
Before adding an entry to the AP batch check that the Document Total equals the Undistributed Amount.
If it does not equal the undistributed amount update the Document Total so that the value equals the Undistributed Amount.
This is a standard AP transaction requirement.
Add
Select “Add” to add the AP entry once all fields on all tabs have been checked and the entry is ready to be added.

Save and Close the form when all entries in the batch have been added.
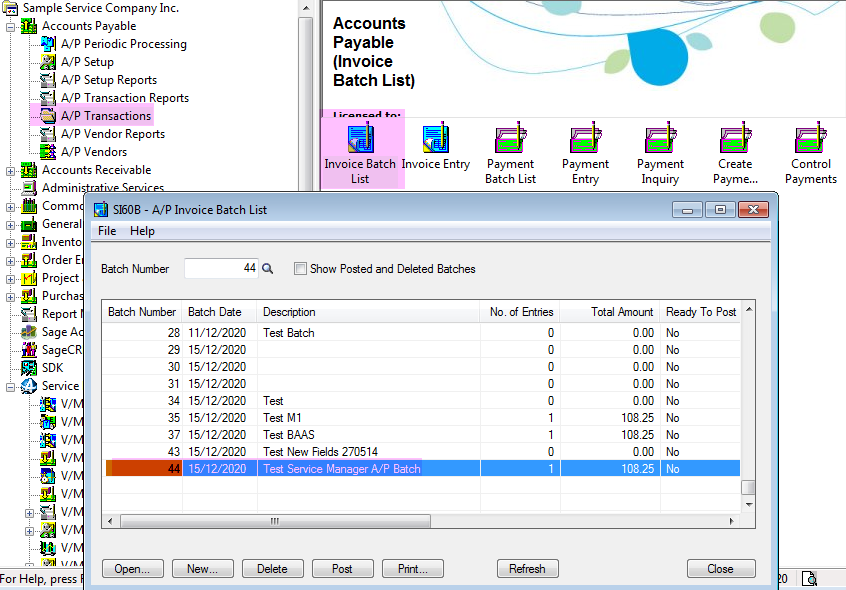
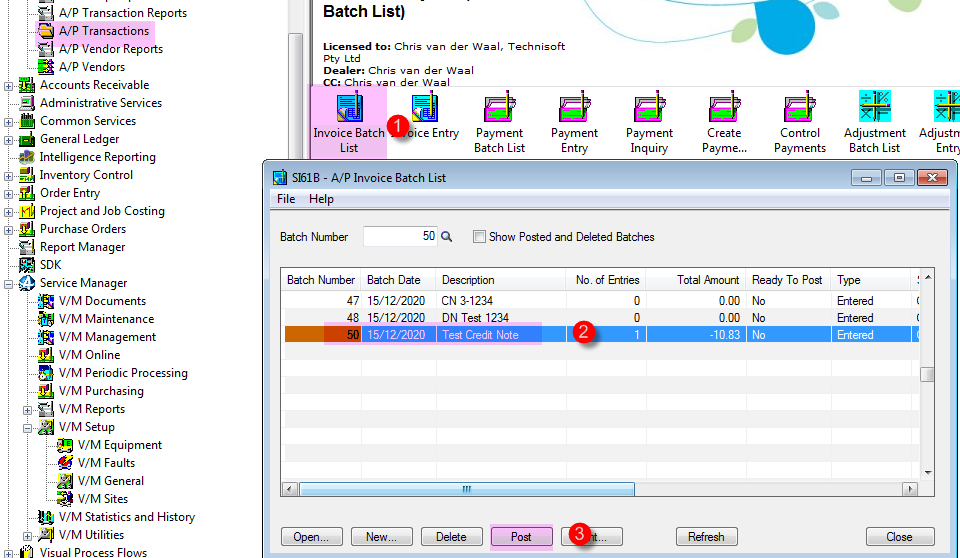
A/P Invoice Batch List
Post an AP Batch
Select Accounts Payable, A/P Transactions, Invoice Batch List.
Open the Invoice Batch List program by double clicking the icon.
Remember if you open the batch from here it is not possible to see the Service Manager fields in the batch entry lines. To see Service Manager fields it is necessary to open VM AP Batch Entry.
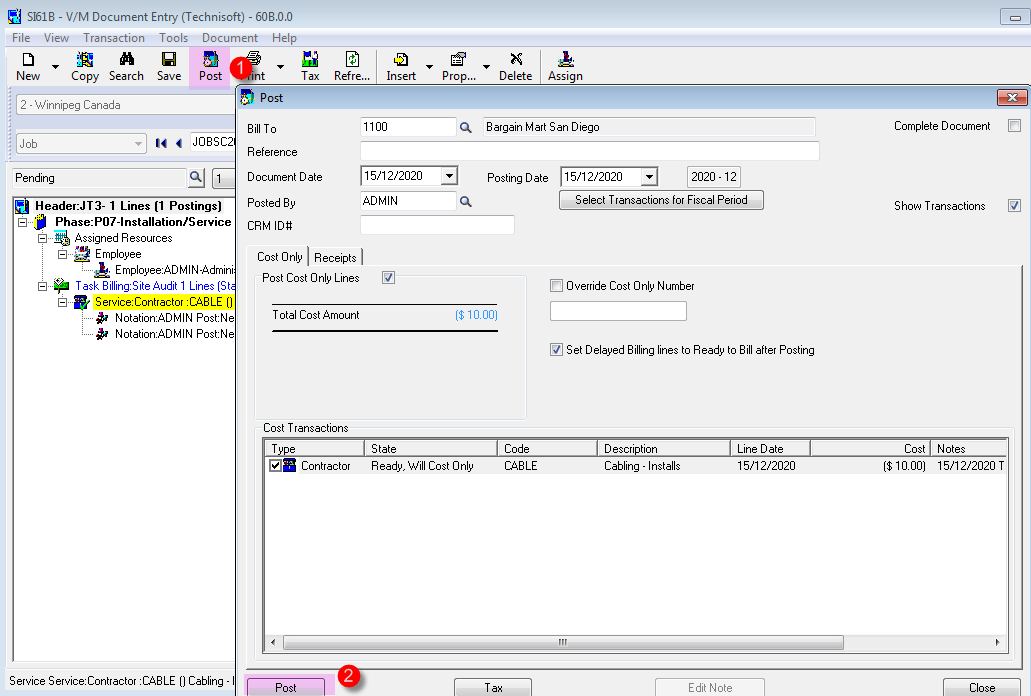
Select Post to post the AP Batch.
Posting the AP Batch will update all jobs with AP entries as applicable and will update Accounts Payable at the same time.
Once the batch has been posted the job will be updated with the AP entry.
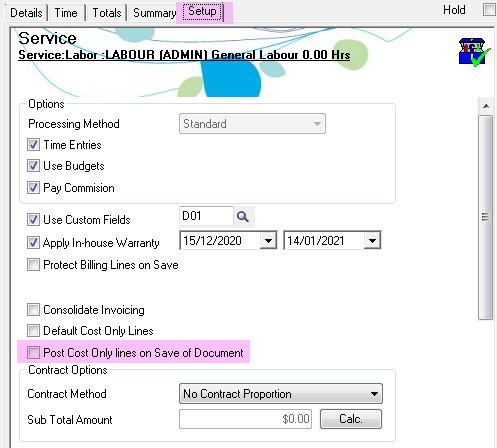
The line is not automatically posted in the job.
To post the line select the POST icon I the top tool bar of the job.
There is a new option in Document Entry called “Post Cost Only lines on Save of Document” which would automatically post the lines when the document is saved if it is necessary to automatically post retrieved costs.
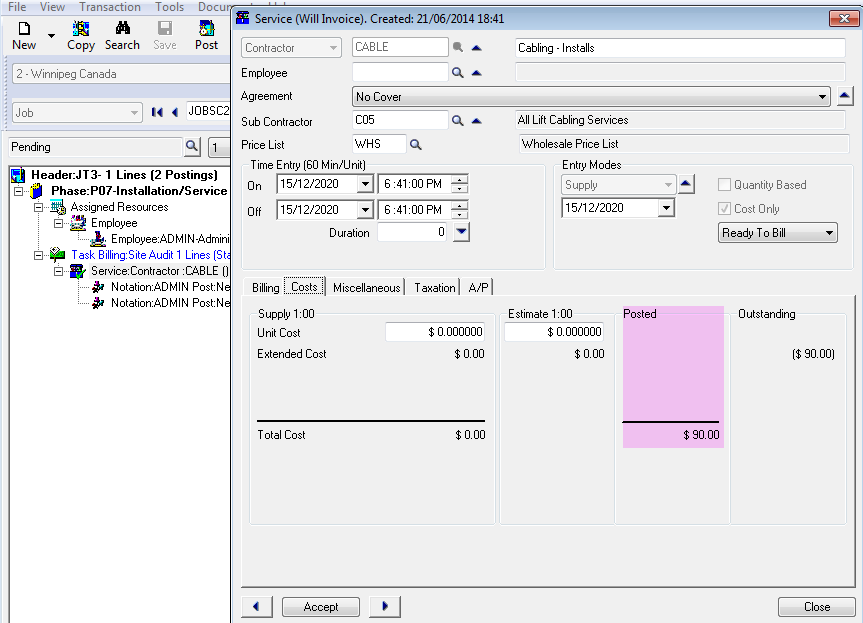
Note in the example below the AP entry was posted to an existing line that had already been posted.
The Entry Mode is set to Cost Debit Adj. and the line will be updated by $20.
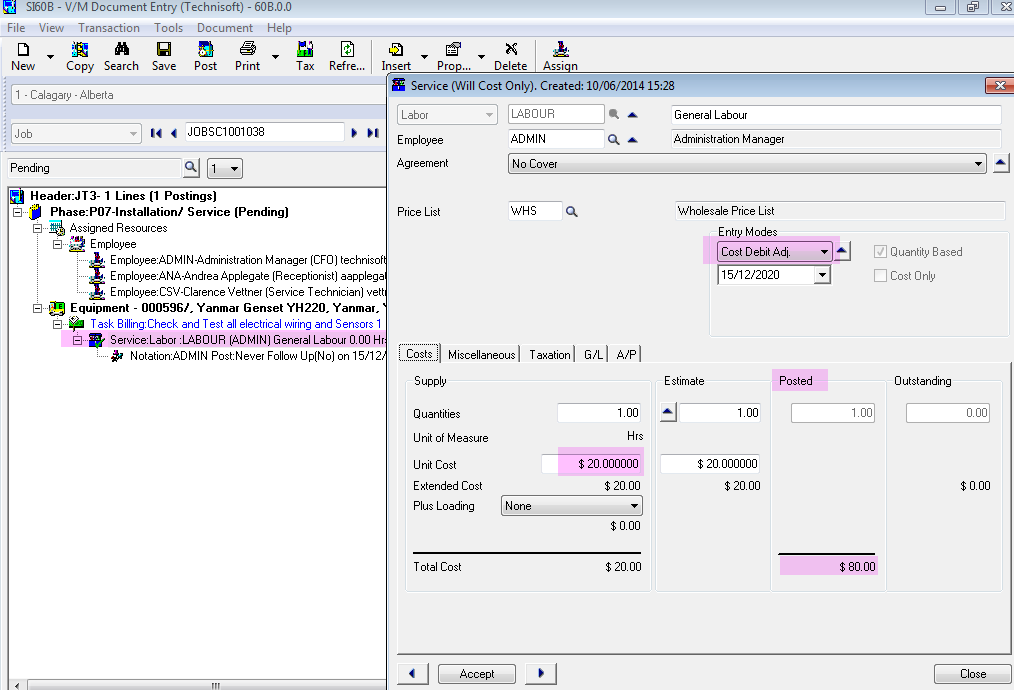
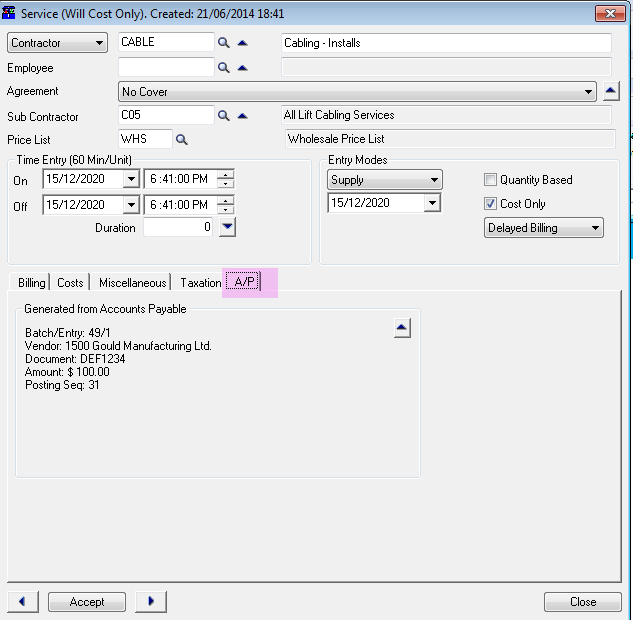
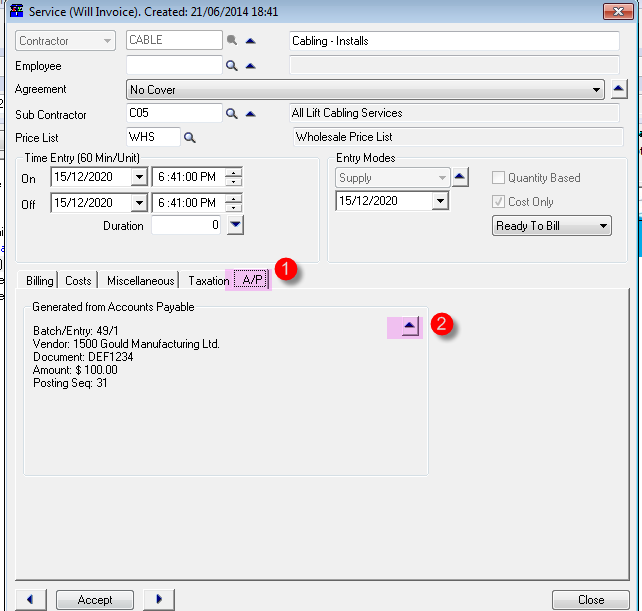
An A/P tab has been added to the detail line in the job.
Click the A/P tab to see details of the Accounts Payable transaction posted to the job.
Select the drill button (up arrow) to drill down to the A/P batch that generated the transaction.
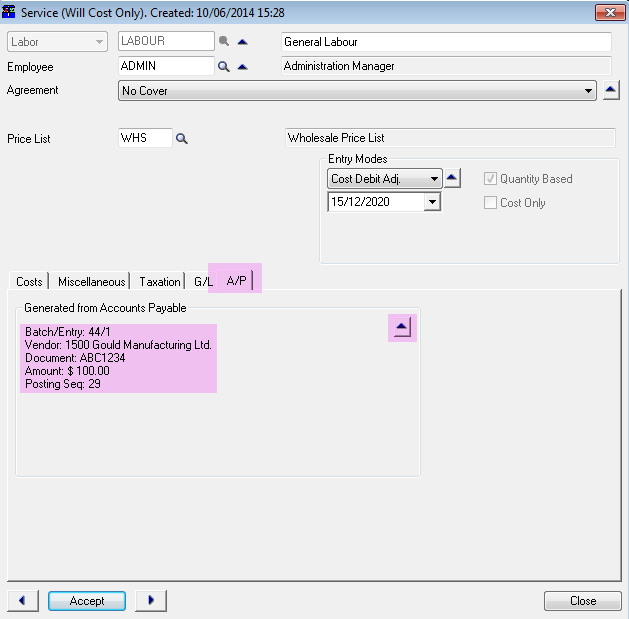
Original A/P Batch Entry
A/P Debit/Credit Note
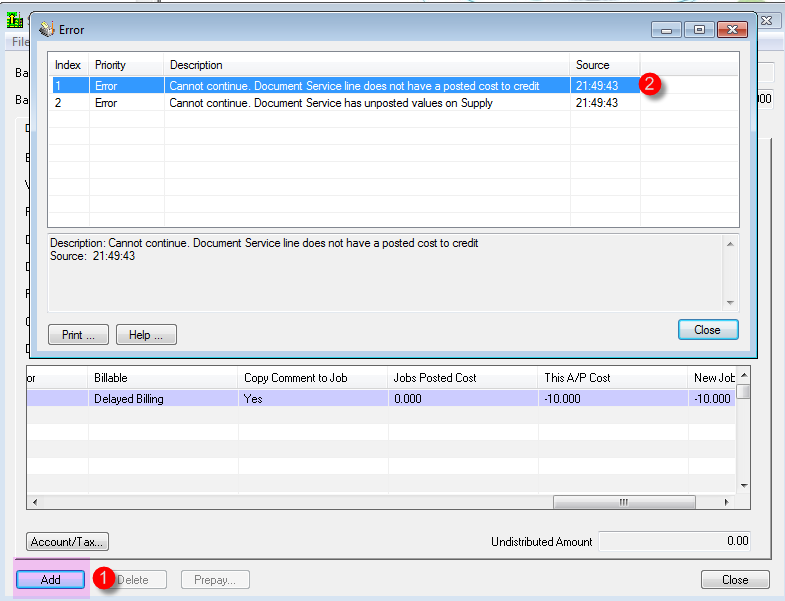
It is not possible to pass an AP Credit/Debit Note to an existing AP line in a job if the original AP detail line in the job has not yet been posted.
i.e. Make sure that the AP lines cost has been posted before associating a Credit/Debit Note to an existing line.
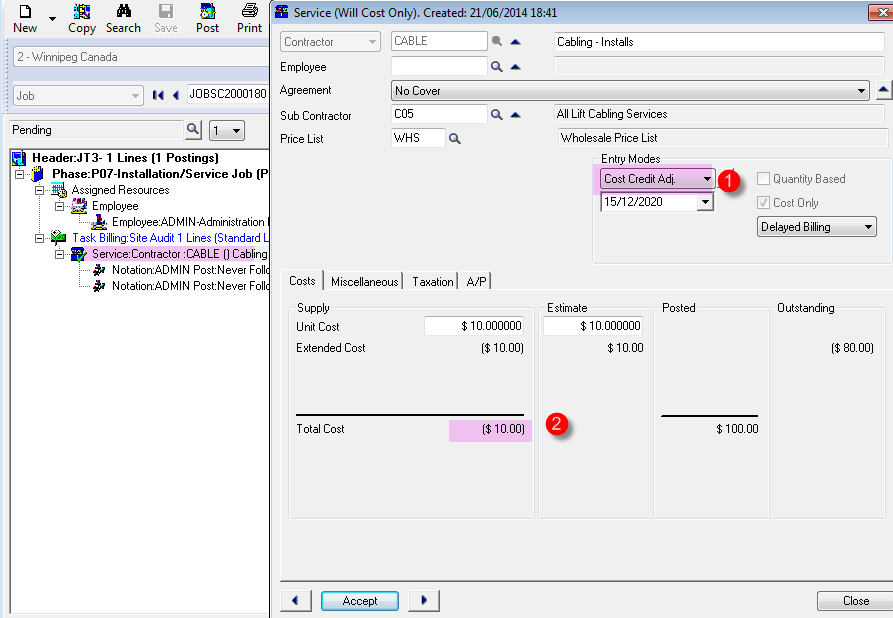
The screen below depicts an AP transaction that has been posted to a job but the line in the job has not yet been posted.
The AP line in the job has not yet been posted in the job. i.e. The cost has not yet been taken up.

The next screen depicts an AP Credit Note being allocated to the AP line above that has not yet been posted in the job.
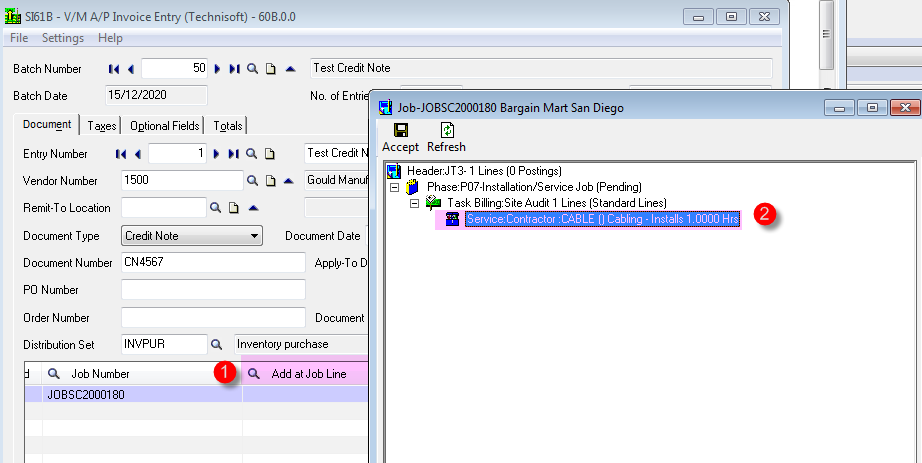
The Credit Note can not be posted because the service line does not have a posted cost to credit.
A Credit / Debit note can be posted to an existing “posted” AP line in a job or to a new line.
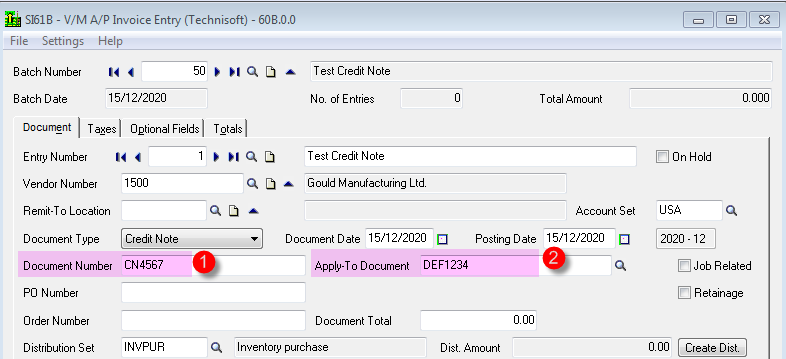
Select the Document Type Credit Note or Debit Note if passing a debit.
In this Example Credit note has been selected
Enter the "Document Number" and locate using the finder the "Apply-to Document Number" as applicable.
Click the grid to enter a new AP Entry line.

Enter the amount to be credited or debited.
If a message pops warning that there is no GL account selected ignore that. When the service code is selected the GL account will be populated automatically.

Add a comment and select the drill icon (up arrow) to add optional fields if applicable.

Set the field V/M Job Related to Yes and select the job to be credited/debited.
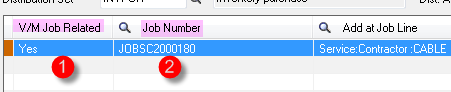
Choose the “Add at Job Line” Finder and select the line to be Credited/Debited and select the Accept icon in the top tool bar.
Only a line that has an AP line that has already been posted in the job can be selected or a new line can be added by selecting a Phase or existing Billing Group.
If an existing AP line that has already been posted is selected the Service Type, Service Code and contractor will be populated.
If adding a new line select the Service Type, Service Code and Subcontractor.

Specify if the line is Billable, Non Billable or Delayed Billing.
Specify if the comment is to be copied to the job.

If an existing posted line is selected details of the original posted amount are shown in the “Job Posted Cost” field.
The field “This A/P Cost” displays the total of the current credit/debit note.
The field “New Job Cost” displays the cost on the job after the credit/debit is posted.

Set the Document Total to the Undistributed Amount and select the “Add” button to add the line to the batch.
Note that although the sign +/- on the Undistributed Amount is not used when entering the Document Total.
The AP program is smart enough to know it is a Credit or Debit note.
The Undistributed Amount should be zero if the correct Document Total is added.
Close the Batch and select Accounts Payable, A/P Transactions, and launch Invoice Batch.
Select the AP Batch to post and select the Post button at the bottom of the form to post the batch.
This will post the AP batch and update AP Control, whilst at the same time Post the AP Credit Note to the Job.
Open the job and select the AP line just posted to the job.
Note the “Entry Mode” is set to “Cost Credit Adjm.” and the lines value is set to the credit value posted.
Select the Post icon in the top tool bar to launch the Post form.
Select the Post button in the bottom left corner of the form to post the cost on the job.
Open the Properties on the posted line by double clicking or right click and select Properties.
Note the lines new value after the credit note.
Select the A/P tab to view details of the A/P posting.
Select the Drill icon (up arrow) to drill into the original A/P posting.
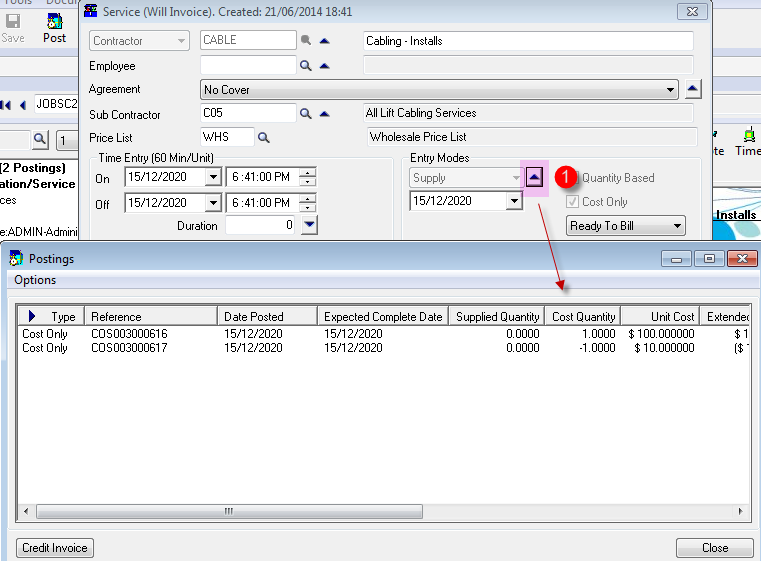
Select the drill button on the Entry Mode to view all postings for the selected line.
The process is identical to that above for a Debit Note.
The only difference between a Credit and Debit Note is a Credit Note is a negative adjustment whilst a Debit Note is a positive adjustment.
A Debit Note will set the line to a “Cost Debit Adj.”
AP Reporting
A new AP reconciliation report has been added to V/M Reports, V/M Transactions.
This report can be printed by date range and compares AP Batch totals to postings in jobs.
Unposted entries in a job can then be easily identified and used to help reconcile balances in the AP Clearing Account by period if necessary.