G/L Integration

Contents
 »
»  »
» 
Overview
All G/L related company-wide options are set in G/L Integration. This brings Service Manager in line with the Sage 300 standard regarding G/L Integration. All other company-wide Service Manager options are set in Company Options.
Note:
Prior to Service Manager 5.5A, G/L related company-wide options used to be set in Company Options.
Related Topics
General tab
Service Manager incorporates full Subledger accounting, and produces general ledger transactions from postings of Invoices, Credit Notes, Adjustments and Cost Only entries.
During the Day End process in Service Manager, batches are created in Accounts Receivable and in General Ledger.
Enter the required information and then click [Save]. Select the WIP tab.
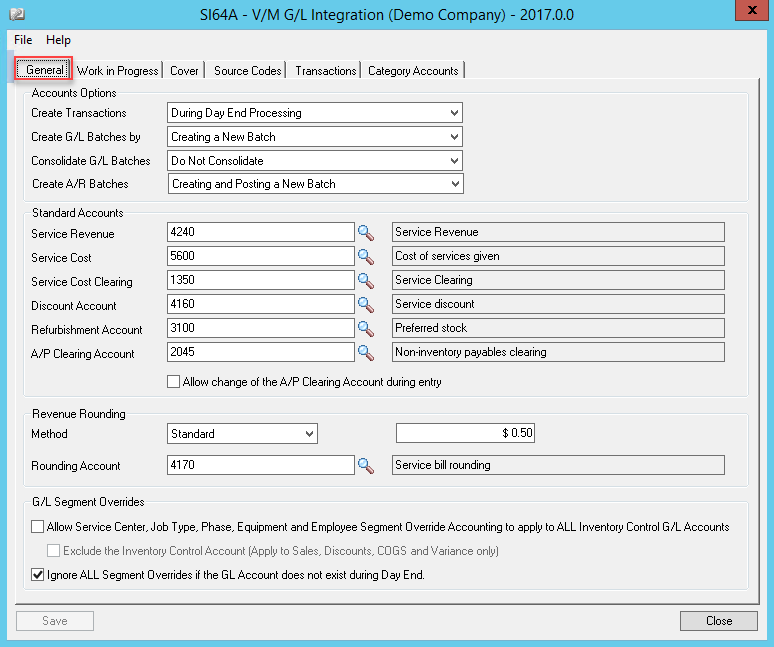
Accounts Options |
|
Create Transactions |
Defer G/L Posting and Consolidation options have been introduced if G/L Subledger Services (GP) has been activated for the Company. This brings two new icons to the desktop: These functions operate in exactly the same way most other Subledgers manage this facility. Day End Processing will create the resultant A/R batch if the first option is selected. To create G/L batches manually, select On Request Using Create G/L Batch Icon. |
You can add new transactions to an existing G/L batch or create a new one (and optionally post it directly to G/L accounts). |
|
Consolidate G/L Batches |
Select the G/L Consolidation method required. |
Create and Posting a New Batch will create and post a new A/R batch. To add the A/R batch to an existing batch, select the Add to an Existing Batch option. |
|
Standard Accounts |
|
Service Revenue |
Enter the default Service Revenue G/L Account to be credited in the absence of a specified revenue account in the Service master record. Note: You can change the account code selected at any time. The change will only affect new detail lines entered on a Document. |
Service Cost |
Enter the default Service Cost G/L Account to be debited in the absence of a specified cost account in the Service Master record. Note: You can change the account code selected at any time. The change will only affect new detail lines entered on a Document. If the Service Cost and Service Cost Clearing accounts are blank, cost entries will not be posted to the General Ledger by the Day End Processing function. They will still be available within the Service Manager system however. |
Service Cost Clearing |
Enter the Cost Clearing G/L Account you wish to default in the absence of a specified cost clearing account in the Service Master record. Clearing Accounts are just suspense accounts that get cleared when the equivalent entry in the relevant Subledger module (e.g., Accounts Payable, Payroll) is posted to the general ledger. Clearing Accounts avoid double posting to the General Ledger when Service Manager is interfaced with other Sage 300 modules. Note: You can change the account code selected at any time. The change will only affect new detail lines entered on a Document. |
Enter the Discount G/L Account you wish to use when applying discounts in Service Manager. Note: All discounts get posted to this account. You can change the account code selected at any time. The change will only affect new detail lines entered on a Document. This is a Company wide discount account. |
|
Refurbishment Account |
Enter the default Refurbishment G/L Account you wish to use when posting Refurbishments. |
A/P Clearing Account |
Enter the A/P Clearing G/L Account to use for all A/P Batches posted to Service Manager. See Accounts Payable Integration for more information. |
This check box allow users to change or override the A/P details account code to a value other than what is specified in GL Integration during entry. |
|
Revenue Rounding |
|
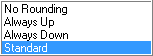
Method |
This option allows you to apply a rounding mechanism to every Document entered in Service Manager. If you select a Rounding option, an adjustment journal will be posted for the rounding debit or credit to the account specified. No Rounding: Choose this option to turn Rounding off. Always Up: Choose this option to Round all Documents up to the nominated nearest value. Always Down: Choose this option to Round all Documents down to the nominated nearest value. Standard: Choose this option to automatically Round all Documents up or down to the closest nominated value. |
Amount |
This value determines at what point you wish to round the Net total amount of all invoices depending on the Method chosen. If you wish to round to the nearest $5.00, you would specify 5.00 in this field. |
Rounding Account |
A rounding amount journal will be posted by Day End processing to the General Ledger. |
|
|
Allow Job Type, Phase and Employee Segment Override Accounting to apply to ALL Inventory Control G/L Accounts Check Box - Tick this check box to apply G/L segment overrides to all Inventory Control accounts. You can set up the segment overrides in each of the respective Setup programs. Exclude the Inventory Control Account (Apply to Sales, Discounts, COGS and Variance only) Check Box - Tick this check box if you do not want the Inventory Control Account overridden. Ignore ALL Segment Overrides if the GL Account does not exist during Day End Check Box - Tick this check box to not apply G/L Segment Overrides when the GL account does not exist. |
|

Enter the required information and then click [Save]. Select the WIP tab.
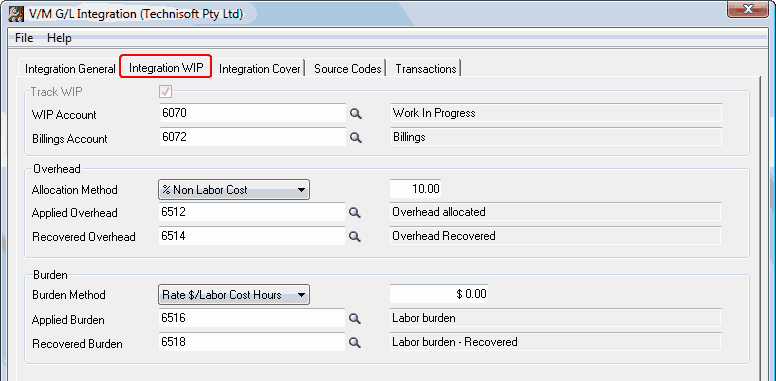
Integration WIP tab
Work in Progress/Billings
Service Manager incorporates full Subledger accounting, and produces general ledger transactions from postings of Invoices, Credit Notes, Adjustments and Cost Only entries.
Work in Progress is debited during this process and Inventory Control or Service Cost Clearing is credited. When Day End processes an invoice, Accounts Receivable is debited and Billings is credited.
When an expense is recognized during Day End Processing, Service Manager generates general ledger entries crediting the Work in Progress account and debiting the relevant Cost of Sales account. When revenue is recognized, Service Manager debits the Billings account and credits the relevant Revenue account.
Remember that Job Types can override expense and revenue default accounts set up here.
Note:
Once WIP is turned on in Options, it cannot be turned off, so be careful using this function. You can still turn WIP off in the Job Header if necessary. If you are not using WIP, revenue and expenses are recognized immediately an Invoice, Credit Note, Adjustment, or Cost Only entry is processed by the Day End function.
Please refer to the full examples shown in Accounting and Integration for a more detailed explanation.
Overhead and Burden
Overhead and Burden can be applied to a WIP Job, but cannot be applied separately to specific Phases or Billing Groups within that Job. Overhead is calculated for the entire Job based on the calculation method selected. The Job Totals screen includes Overhead and Burden calculations providing a "Net Profit Before Commission (NPBC)" figure for profitability evaluation purposes. The Day End process posts these entries on Job completion.
WIP and Billings entries are posted to these A/R and G/L batches by the Day End process also. The first pass of a Day End process reads posted Invoices, Credit Notes and Cost Only entries. A/R batch entry detail lines are created debiting A/R Control and crediting the Billings Account. Costs are not posted to the G/L at this time during the Day End process because detail lines could have multiple posting entries.
Once all Invoices, Credit Notes and Cost Only entries have been processed, the Day End process then does a second pass reading all Documents containing WIP entries and creates an aggregate G/L batch detail line debiting WIP and crediting the relevant Service Cost Clearing accounts or I/C control accounts.
Each time WIP entries are posted, Service Manager recognizes only those entries (+/-) posted to the job since the function was last run.
Enter the required information and then click [Save]. Select the Integration Cover tab.
Track WIP |
Check Box - Tick this check box if your Company uses Work in Progress (WIP). Note: Once WIP is turned on in Options, it cannot be turned off, so be careful using this function. You can still turn WIP off at Document level in the Setup tab of the Job Header. During Day End Processing, transactions are created for Accounts Receivable and General Ledger batches. These batches can be sent to A/R or G/L directly by the Day End process or on request using the Create G/L Batch icon. You can edit and/or post transactions in these batches from within A/R or G/L modules respectively. |
WIP Account |
Enter the WIP G/L Account you wish to for the (asset) control account debited with the sum of costs accumulated and credited when the costs are expensed. The account you enter here will default, but can be overridden by a WIP account specified in a Job Types master record. You can also use the Finder Note: WIP accounts in the General Ledger are Balance Sheet accounts used in substitution of cost accounts when Work in Progress accounting is used. The Work in Progress account is debited when you post cost transactions and credited (reversed) when you Recognize the Expense. You can change the account code selected at any time. The change will only affect new detail lines entered on a Document. |
Billings Account |
Enter the Billings G/L Account to credit when an invoice is posted in Accounts Receivable and debit when revenue is recognized. The account you enter here will default, but can be overridden by a Billings account specified in Job Types master record. Note: The Billings accounts in the General Ledger are Balance Sheet accounts used in substitution of revenue accounts when Work in Progress accounting is used. Values in these accounts are reversed at a specified time (often % Job Completion) to their individual detail line revenue accounts. You can change the account code selected at any time. The change will only affect new detail lines entered on a Document. |
Overhead |
|
Allocation Method |
There are six methods of applying Overhead to a WIP Job. Choose the Allocation Method your company uses and then type the applicable % or $ rate that applies. Never - No automatic method of overhead allocation is applied to the job overall. % Non-Labor Cost - Overhead is calculated as a fixed percentage of all non-labor charges (material) dollar charged to a job. Includes all Non Labor Services and Inventory. % Labor Cost - Overhead is calculated as a fixed percentage of each labor dollar charged to a job. Flat Rate $/Labor Cost Hr - Overhead is calculated as a flat dollar amount for each labor hour charged to a job. Flat % of Total Cost - Overhead is calculated as a fixed percentage of the total Job cost. Flat % of Total Revenue - Overhead is calculated as a fixed percentage of the total Job revenue. Note: The % or $ amount cannot be negative. |
Applied Overhead |
Enter the Applied Overhead G/L Account for the expense account to be debited with overhead allocated from a Job, using the Overhead calculation method chosen. You can also use the Finder Note: All Applied Overhead is posted to this account. You can change the account code selected at any time. The change will only affect new detail lines entered on a Document. |
Recovered Overhead |
Enter the Recovered Overhead G/L Account for the expense account to be credited with overhead allocated from a Job, using the Overhead calculation method chosen. You can also use the Finder Note: All recovered Overhead is posted to this account. You can change the account code selected at any time. The change will only affect new detail lines entered on a Document. |
Burden |
|
Burden Method |
There are six methods of applying Burden (Labor Overhead) to a WIP Job. Choose the Allocation Method your company uses and then type the applicable % or $ rate that applies. Never - No automatic method of overhead allocation is applied to the job overall. % Non-Labor Cost - Overhead is calculated as a fixed percentage of all non-labor charges (material) dollar charged to a job. Includes all non-labor Services and Inventory. % Labor Cost - Overhead is calculated as a fixed percentage of each labor dollar charged to a job. Flat Rate $/Labor Cost Hr - Overhead is calculated as a flat dollar amount for each labor hour charged to a job. Flat % of Total Cost - Overhead is calculated as a fixed percentage of the total job cost. Flat % of Total Revenue - Overhead is calculated as a fixed percentage of the total job revenue. Note: The % or $ amount cannot be negative. |
Applied Burden |
Enter the Applied Burden G/L Account for the expense account to be debited with Burden allocated from a Job, using the Burden calculation method chosen. You can also use the Finder Note: All Burden is posted to this account. You can change the account code selected at any time. The change will only affect new detail lines entered on a Document. |
Recovered Burden |
Enter the Recovered Burden G/L Account for the expense account to be credited with Burden allocated from a Job, using the Burden calculation method chosen. You can also use the Finder |

Integration Cover tab
General
Service Manager incorporates full Subledger accounting, and produces general ledger transactions from postings of Invoices, Credit Notes, Adjustments and Cost Only entries.
During the Day End process in Service Manager, transactions are created for Accounts Receivable and General Ledger batches. These batches can be sent to A/R or G/L directly by the Day End process or on request using the "Create G/L Batch Icon". You can edit and/or post transactions in these batches from within A/R or G/L modules respectively.
Agreement Revenue and Coverage Accounting
Service Manager uses a process called "Coverage Accounting", when taking up agreement revenue applied to a Service or Inventory detail line in a Job that has been covered by an agreement.
You can specify the (%) cover required for Labor or Contractor Services, as well as General Services and Inventory Items when creating an Agreement Master Document.
There are two basic Types of Agreements. Site Level, where all detail lines whether equipment related or not are covered, and Equipment Level, where detail lines relating to specific Equipment (specified in an agreement), are covered.
If a Detail line is entered on a Job that is covered by an Agreement, any billing will be automatically covered to the percentage specified in that Agreement. This will be shown in the Billing tab of the Detail line, Less % Cover field.
The amount being covered is debited or credited respectively to the Coverage G/L Account when an Invoice or Credit Note is posted. Service Manager accounts for Coverage on a Gross basis and does not net off the transaction to the GL.
Review the examples given in Accounting and Integration.
If WIP is active, the Billings account is debited at Day End, and when WIP is recognized, Billings is credited and the Coverage account is debited.

Enter the required information and then click [Save]. Select the Source Codes tab.
Agreement G/L Accounts |
|
Revenue |
All revenue covered by an Agreement is credited to this account on the posting of an Invoice and debited on the posting of a Credit Note. |
Coverage |
This is the debit account that Cover revenue is posted to when a Job is carried out that is covered by a prepaid agreement. |
Unearned Inc. |
You can select to amortize the original invoice that was raised for the Agreement/Contract according to a specified amortization schedule over the life of the agreement. That is, you can invoice a client for the agreement, receipt the funds, but charge the revenue to your general ledger using a standing entry to take up the revenue over time, and thereby match costs on an accrual basis. The Unearned Income account is used for this process. Review the examples given in Accounting and Integration. |
Warranty G/L Accounts |
|
Warranty Claims Control |
When Equipment is entered onto a Job, all Warranty Agreements covering that Equipment will be available for selection. This Agreement will be chosen automatically for you and will apply as default when you enter a Service or Item detail line (you can manually override the agreement selected if the line is not covered by Warranty). If the detail line is covered by warranty, when you run the Day End process, a balance sheet Warranty Claims (suspense) account will be debited, and a transaction will be created in the Warranty Claims file for subsequent invoicing and reconciliation. When the Manufacturer either pays the Warranty claim or the item is canceled, the Warranty Claims G/L account is credited and the transaction is complete. Review the examples given in Accounting and Integration. |
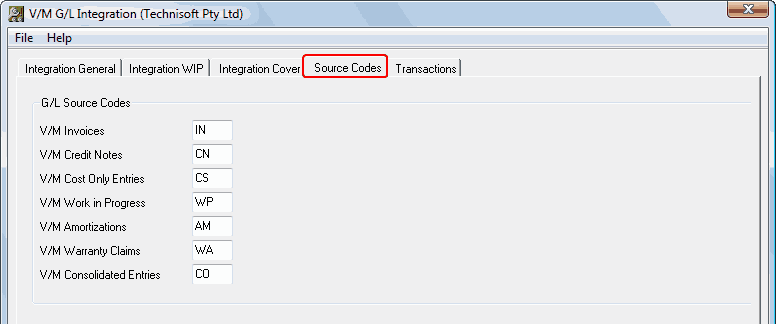
Source Codes tab
G/L Source Codes for Service Manager are set in the Source Codes tab. The default G/L Source Codes are shown below. Change these if you require different codes.
Enter the required information and then click [Save]. Select the Transactions tab.
Transactions tab
This is a collection of records that allows you to specify what fields will flow through to the four possible fields in the G/L batch:
•G/L Entry Description
•G/L Detail Reference
•G/L Detail Description
•G/L Detail Comment
![]()
Double-click an entry to edit the segments for that Transaction Type. The G/L Integration Detail window will be displayed.
![]()
Include or Exclude segments as required and then click [Accept].
Category Accounts Tab
Use this tab to set up I/C Category Accounts for Service Manager.
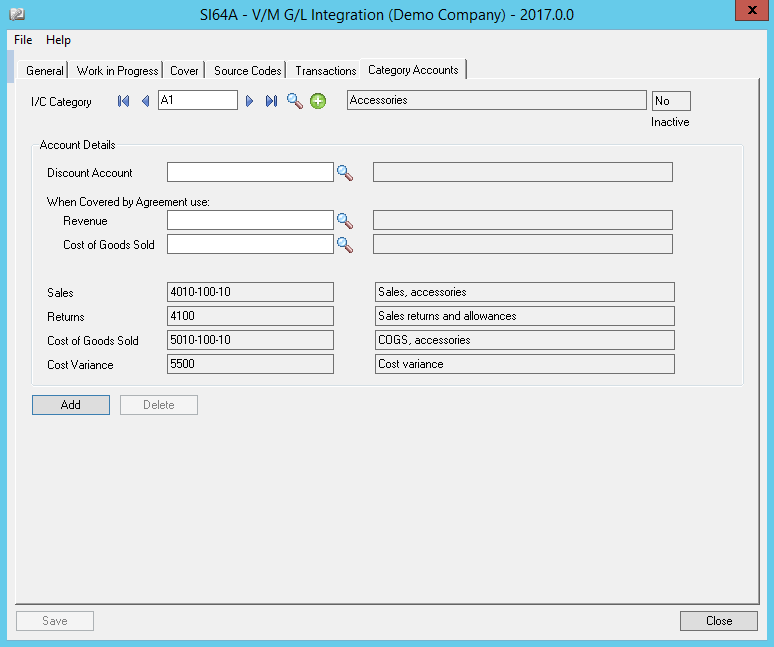
Select the I/C Category to edit.
Change any of the Service Manager Accounts.
Click [Save] or [Add].