Receipts

Contents
Applying a Receipt to an Invoice
Service Manager has been designed to integrate with A/R for remittance purposes. Service Manager will create a cash batch and an invoice batch to be processed by Day End.
Other features include a prepayment option. This allows a payment to be made to an existing Job prior to any invoices being generated. Upon generating invoices, an option to apply the invoice to the payment will create a separate cash batch to be processed by A/R Day End.
Example: A current Service is inserted into a Job and the customer is waiting to pay the invoice.
Click the Pay icon on the toolbar.
![]()
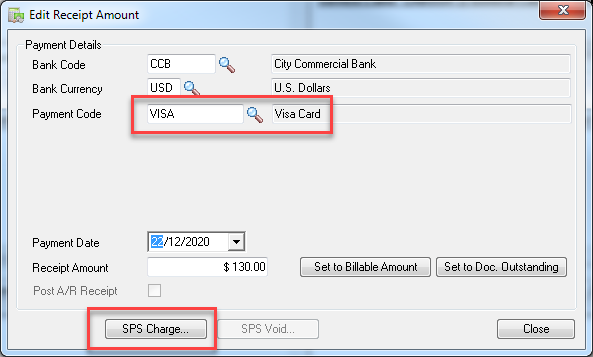
The Edit Receipt Amount window will open.

This is where the payment details are entered and includes the type of payment, check details and the amount paid.
Check

Credit Card
Sage Payment Services Integration
Service Manager integrates with Sage Payment Services (SPS). By selecting the Payment Code linked to SPS, a new button appears in the Edit Receipt Window to specify the SPS Charge.
The Sage Process Credit Card window then appears where details can be entered and payment processed. Refer to Sage Payment Processing help for further information about this window or any other SPS configuration advice.
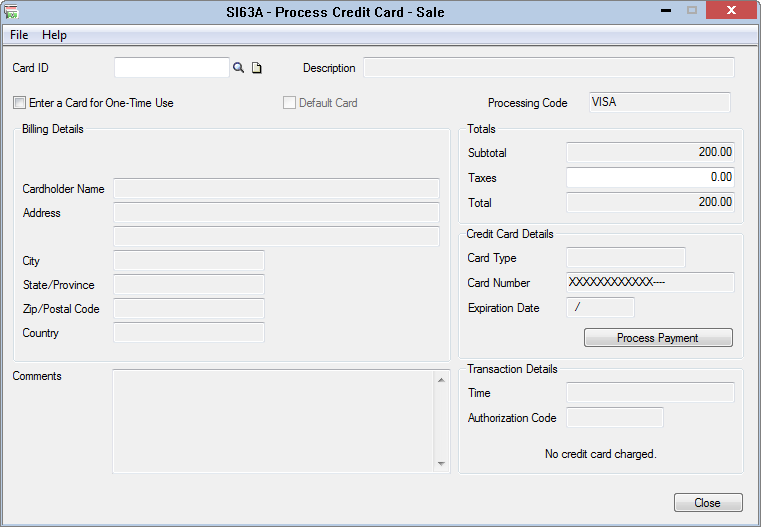
The following screen shot shows a Credit Card payment in Accounts Receivable.
Enter the payment details and amount.
Click [Set to Billable Amount] to set Receipt Amount to the Billable total.
Click [Set to Doc. Outstanding] to set Receipt Amount to the Billable total plus all other outstanding Invoice totals for this Job/Customer.
Tick the Post A/R Receipt check box to post the Receipt to A/R.
Click [Accept] to enter the receipt.
The Payments window will display where this and any other payments which exist can be viewed.
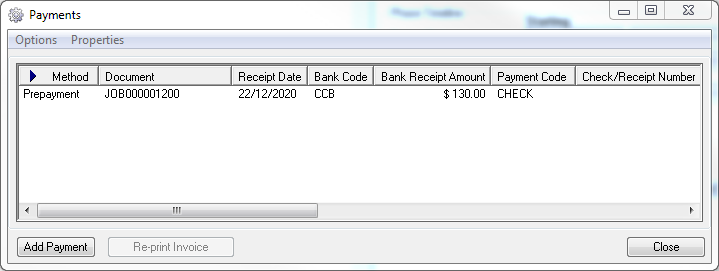
You can also display payments by right-clicking on the Document Header in Document Entry and selecting View Payments.
Post the Invoice
Click the Post icon on the toolbar.
![]()
The Post window will be displayed.
Click [Preview] to preview the invoice.
Click [Post] to post the invoice. A Warning message will be displayed.
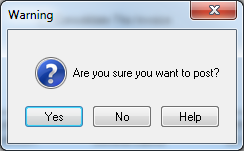
Click [Yes] to continue. A second Warning message will be displayed that shows the Invoice No. of the invoice generated.
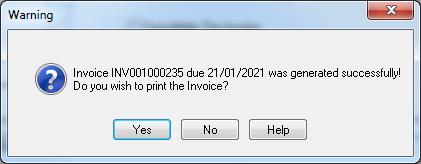
Click [Yes] to print the invoice.
The Payment taken for the invoice will be automatically applied and the Total Due on the document set to 0.00
After printing the Invoice, the system will return to the Job in Document Entry.