Assigning / Unassigning Resources

Contents
Assigning Resources
Assigning resources to Phases of a Job can be carried out in 3 ways
1. Within the Assigned Resources Window of Job List View - Left click then right click on a phase and select Add Resource. Choose the resource type which will display the Add Resource Window, with the chosen Resource Type pre-selected.
2. A Resource can be found and selected from the Available Resources Bar and dragged and dropped under the Appointment phase in the tree of the Assigned Resources Bar. A Confirmation Required window will appear to create Appointments for the selected resource that match the assigned phase estimates. If yes is chosen in the Confirmation Window then the Resource will be added to the phase by default.
3. Within the Job Tree flyout, right click on the Phase line and select Add Resource. Select the type of Resource to Add and then select the Resource from the List to add to the Job.
4. Open the Resources / Work Groups or Skills Filter flyouts, select the individual Resource, Work Group or Skills from the list and drag and drop under the phase in the tree of the Assigned Resources Bar. All Resources belonging to the selected Work Group or Skill will be assigned to the phase upon confirmation.
An Appointment can be re-assigned to another resource by selecting the time entry and dragging it to the new Resource. Use CTRL or SHIFT to select multiple entries, then drag.
If a Resource is dragged and dropped under the Job Header in Job List View, they will automatically be assigned to every phase of the Job.
In Calendar Views dragging the appointment and dropping it onto a different Resource will re-assign the time entry to the new resource for the new time but will keep all other Job details the same.
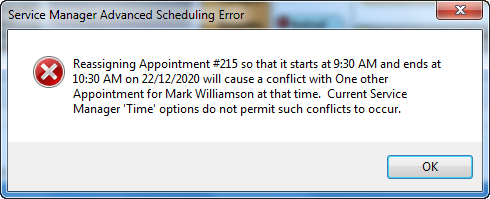
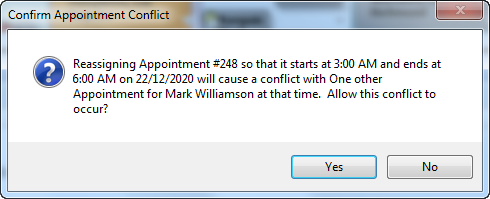
Options can be set to modify the handling of time entry conflicts.
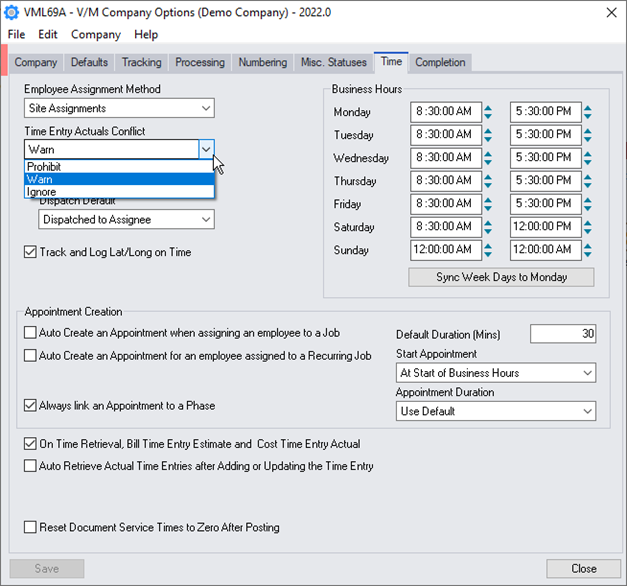
•Prohibit - Conflicts are not allowed and the user will be required to modify the time entry details
•Warn - A message pops up to notify the user of the conflict and asks if they wish to continue
•Ignore - Conflicts are allowed and no message will be displayed to advise of conflicts
Unassigning Resources
Unassigning Resources from Phases of a Job can be carried out in 3 ways
1. Resources can be Unassigned from a phase by left clicking then right clicking on the phase within Job List View and selecting unassign all Resources. An unassign Phase Resources box will appear to confirm the removal of all Resources and any existing Time Entries.
2. Resources can also be Unassigned from a phase by left clicking then right clicking on the Resource name within Job List View and selecting unassign from Current Phase or unassign from Entire Job. An unassign Resource box will appear to confirm the removal of all the Resource from the Phase/s and delete any existing Time Entries.
3. Within the Job Tree flyout, right click on the resource to unassign and select unassign from current phase or unassign from entire Job.
4.Drag a time entry to another Resource to re-schedule the Appointment. CTRL + SHIFT to select multiple Appointments, then drag if a large number of Appointments are to be Rescheduled to a different Resource. The Unassign confirmation window will be displayed