SQL Connection Creation

Contents
Advanced Scheduling SQL Direct mode connection settings must be established through the SQL Direct Settings Manager or by applying to individual databases.
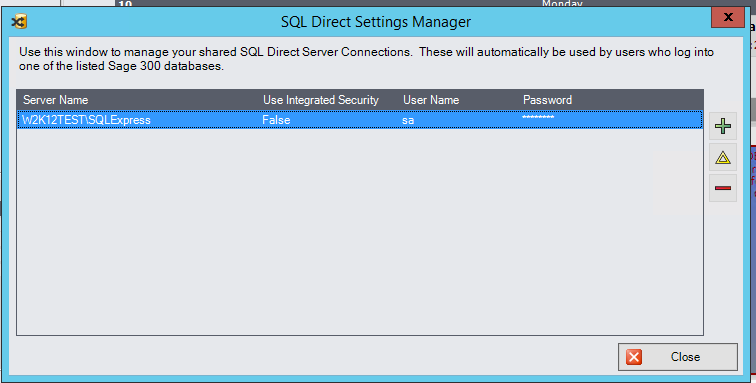
SQL Direct Settings Manager
A global SQL management tool is available from the Advanced Scheduling Add-On Tools menu > SQL Direct Settings Manager option which will apply the SQL Settings for all users who log into the nominated Sage 300 databases.
This setting needs to be applied on each workstation with Advanced Scheduling installed.
Alternatively, you can watch this video for detailed instructions on how to configure SQL Direct settings.
The steps to set up SQL Direct mode for all users logging into the Sage 300 database are:
1.Launch Technisoft Service Manager Advanced Scheduling
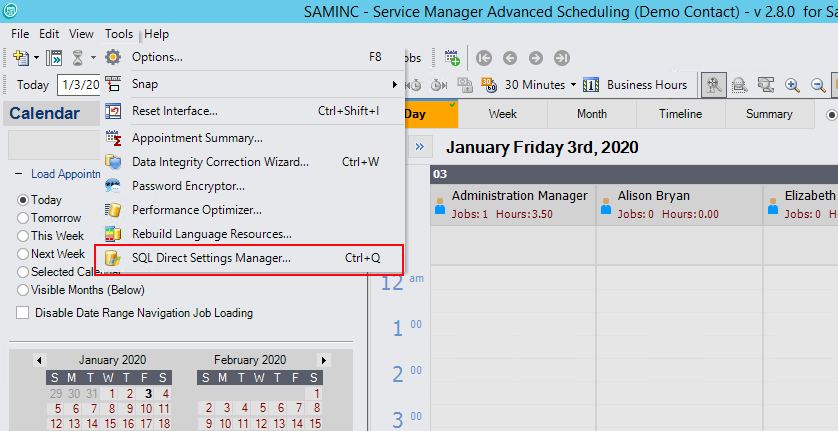
2.Open the SQL Direct Settings Manager window via the Tools > SQL Direct Settings Manager menu
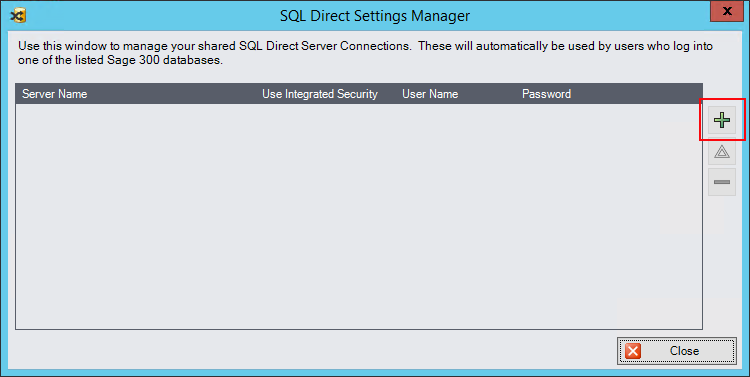
3.Click the Green plus button to open the 'Select Data Source' window.
4.Enter the Server Name and option for logging on to the server using Windows or SQL Server Authentication.
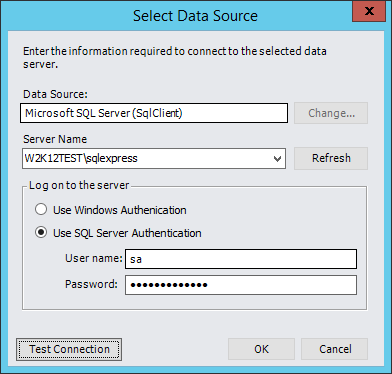
Security Notice: Technisoft do not recommend that you use the SQL ‘sa’ user for your SQL Server Authentication credentials, but rather a new custom user – e.g. VMDataReader – with a strong password, and who is a member of the ‘public’ server role. This new dedicated SQL user should then also be granted the ‘db_datareader’ and ‘public’ membership roles within each Sage 300 database which Advanced Scheduling is to access.
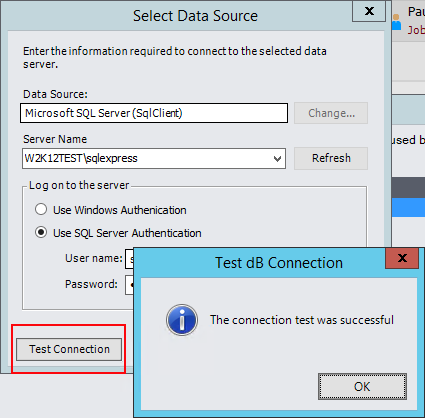
5.Select the Test Connection Button and ensure the connection test is successful
6. The SQL Connection will show in the list of the SQL Direct Settings Manager window
Individual SQL Database Connections
Connection setup for SQL Direct mode on individual workstations is done through the Advanced Scheduling Options window as shown in figure 1.

Figure 1 – Accessing the Add Connection window
The steps to set up SQL Direct mode for a single Sage 300 database are:
6.Launch Technisoft Service Manager Advanced Scheduling
7.Open the Options window via the Tools > Options menu
8.Select the Data tab
9.Tick the Use SQL Direct dB Querying check box
10.Click the Add Connection button (green plus-sign button)
11.Select the appropriate Sage 300 Database from the drop down selection
12.Enter the Database Version
13.Enter the name of the SQL Database and the name of the Server on which the compliant Sage 300 database is stored (or press the Data Source finder button to the right of the SQL Database Name text box, to ultimately achieve the same result)
14.Either -
a.Tick the Use Windows Integrated Security check box if Integrated Security has already been established for the Windows Domain Account under which Advanced Scheduling is being run, or
b.Un-tick the Use Windows Integrated Security check box if already ticked and then enter the User ID and Password of the SQL Server Account under which SQL Direct connections will be made
15.Press the Test Connection button to validate the SQL Direct credentials that have been entered. A small confirmation window stating “The connection test was successful” should be displayed, as shown in figure 2. If this message fails to display then review all steps from step 6 inclusive.

Figure 2 – The Test Connection confirmation window
16.Press the OK button to close the Add Connection window and then the OK button on the Options window to save the connection for future use.
17.Exit Advanced Scheduling and re-open for SQL settings to take effect.
18.From that point on, whenever Advanced Scheduling is logged in to a SQL Direct mode configured database, an icon will appear in the Advanced Scheduling Status Bar indicating that SQL Direct mode is active (see figure 3).

Figure 3 – The SQL Direct mode Status Bar Icon