Managing Worksheets

Contents
 »
» 
Worksheets are created when Maintenance Periods are Posted.
The Worksheet Manager allows you to view and manage all Worksheets, a single Worksheet, or Worksheets for a particular Maintenance Calendar, Maintenance Period or Worksheet Group. You can display Unposted Worksheets, Posted Worksheets, Completed Worksheets and/or Canceled Worksheets.
Using Worksheet Manager
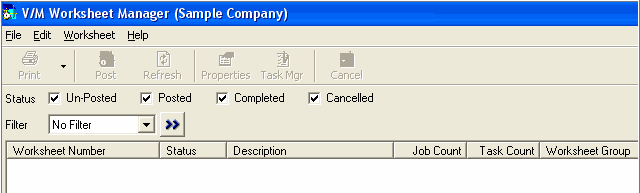
You would typically only want to display Worksheets for a particular Maintenance Calendar, Maintenance Period or Worksheet Group and of those you may only want to display the Posted and/or Unposted Worksheets.
Worksheet Status
Un-Posted
When a Maintenance Period is Posted, all resultant Worksheets will have an Un-Posted Status.
Posted
When a Worksheet is Posted to the Job System, the Status of the Worksheet will change to Posted.
Completed
When all the Maintenance Tasks in a Worksheet have been completed, the Status of the Worksheet will be changed to Completed when the Worksheet is refreshed. Refer Refreshing Statistics, Totals and Status values.
Canceled
If you cancel a Worksheet, the Status will change to Canceled. You can only cancel an Un-Posted Worksheet. If you uncancel a Canceled worksheet then the Status of the Worksheet will revert to Un-Posted.
Note:
You cannot un-cancel a Worksheet if a Worksheet in a later Maintenance Period has been Posted.
Only those Worksheets with the selected Status will be listed.
Note:
If you clear all the Status check boxes, then all Worksheets will be listed.
Filter
Note:
The Filter is applied in conjunction with the Worksheet Status selection.
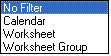
No Filter
List all Worksheets.
Calendar
![]()
Select the required Maintenance Calendar using the Calendar Finder![]() . Leave the Maintenance Period blank to display all the Worksheets for the Maintenance Calendar Period. To restrict the display to a particular Maintenance Period, select the required period using the Period Finder
. Leave the Maintenance Period blank to display all the Worksheets for the Maintenance Calendar Period. To restrict the display to a particular Maintenance Period, select the required period using the Period Finder![]() or the navigational arrows.
or the navigational arrows.
Worksheet
![]()
Select the required Worksheet using the Worksheet Finder![]() or the navigational arrows.
or the navigational arrows.
Worksheet Group
![]()
Select the required Worksheet Group using the Worksheet Finder![]() or the navigational arrows.
or the navigational arrows.
Once you have selected the required Worksheet Status and Filter, click Go ![]() . The Worksheets that match the selected criteria will be displayed. In the example below, all Worksheets for Maintenance Calendar 2010 have been displayed.
. The Worksheets that match the selected criteria will be displayed. In the example below, all Worksheets for Maintenance Calendar 2010 have been displayed.
Note the color coding of the Worksheet icons:
![]() Un-Posted (cyan)
Un-Posted (cyan)
![]() Posted (green)
Posted (green)
![]() Completed (red)
Completed (red)
![]() Canceled (yellow)
Canceled (yellow)
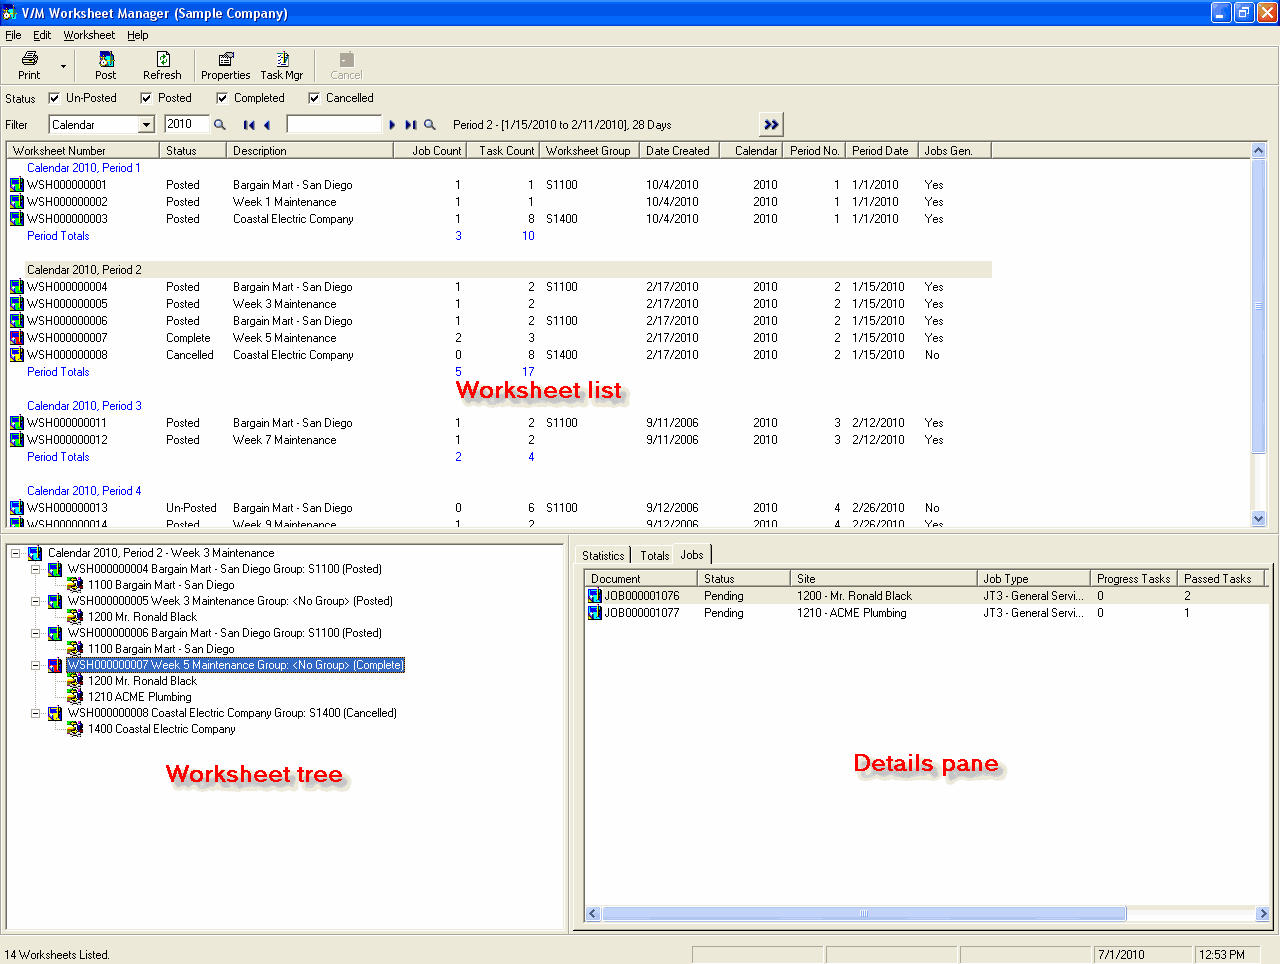
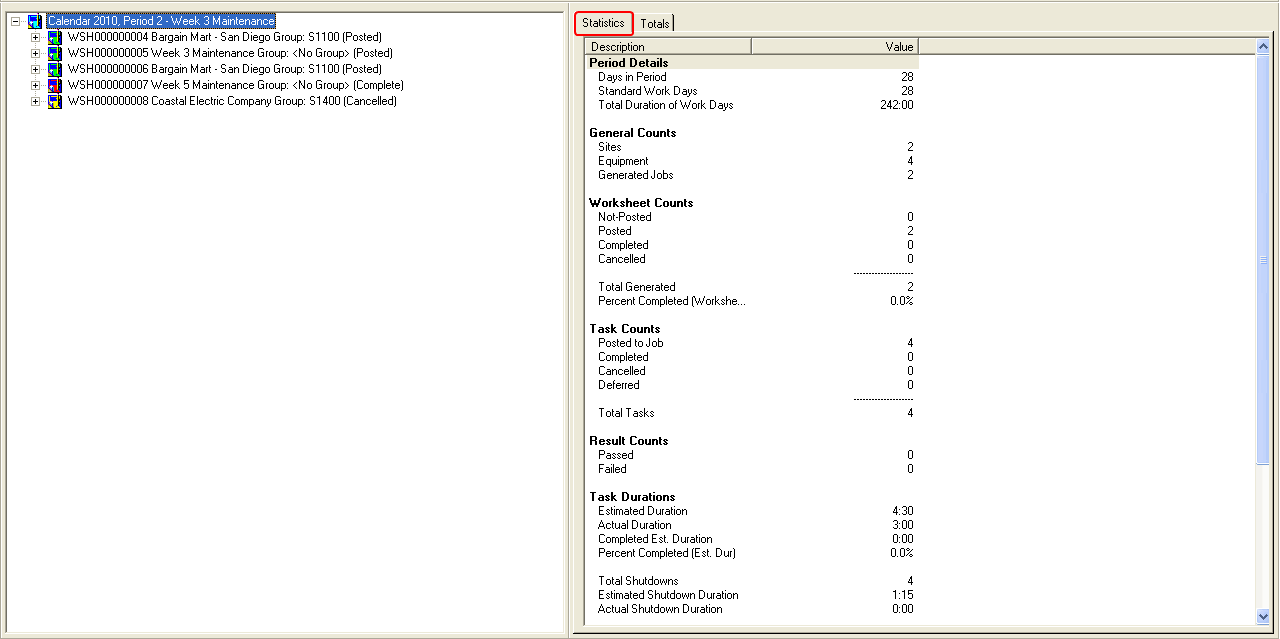
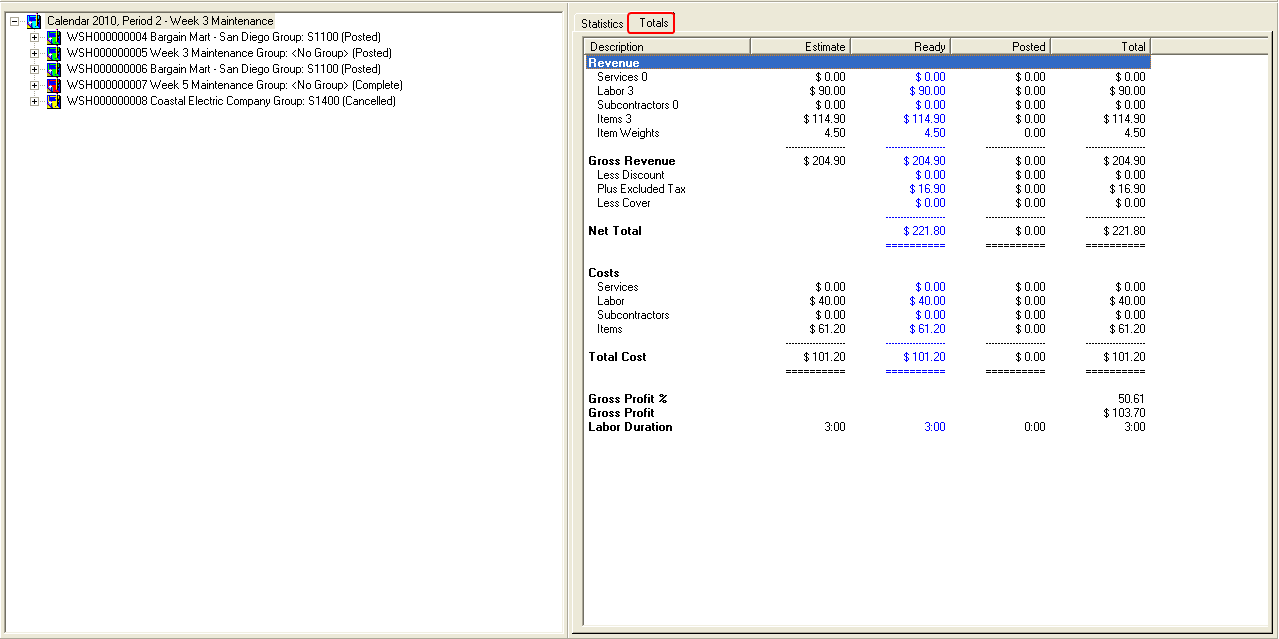
The Worksheet Manager screen has three panes: the Worksheet list; the Worksheet tree and the Details pane - where Jobs, Tasks, Statistics and Totals are displayed.
Worksheets in the Worksheet list are grouped and totalled by Calendar Period.
Worksheets in the Worksheet tree are grouped by Worksheet and Site.
Note:
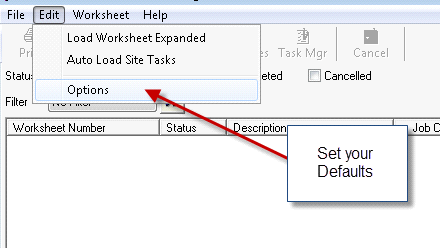
To load the tree with all Worksheets expanded, select Load Worksheet Expanded.
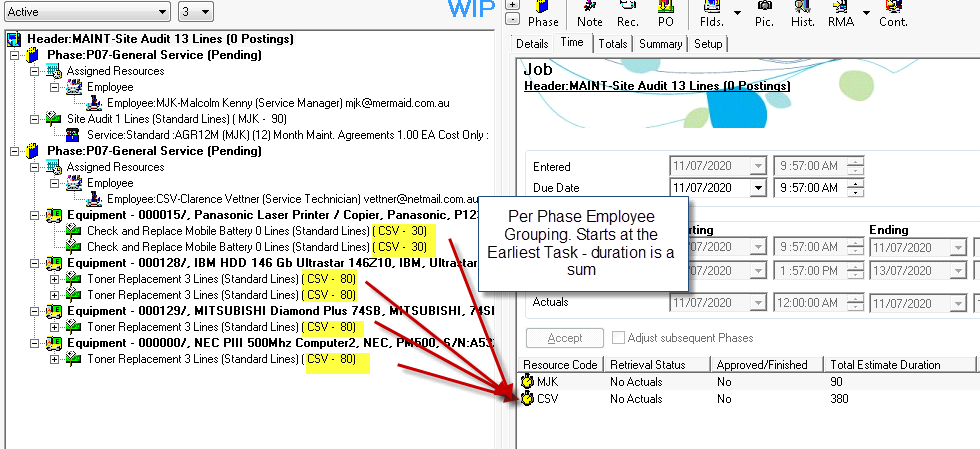
If you highlight a Maintenance Period or Worksheet in the Worksheet list, then the selected Maintenance Period or Worksheet will be displayed in a tree structure in the Worksheet tree. The example above shows the result of selecting Calendar 2010, Period 2, in the Worksheet list, expanding that Maintenance Period in the Worksheet tree, expanding Worksheet WSH000000007 in the Worksheet tree and then clicking the Jobs tab in the Details pane. This particular Worksheet posted Maintenance Tasks to two Jobs.
Examples
Statistics and Totals
When a Maintenance Period node is selected, only the Statistics and Totals tabs are available.
Jobs
When a Worksheet node is selected, the Jobs tab is also available. This will show all Jobs created for the selected Worksheet. If you also open Document Entry, you can drag the Job to and open it in Document Entry. You can also double-click the Job to open it in Document Entry.

Tasks
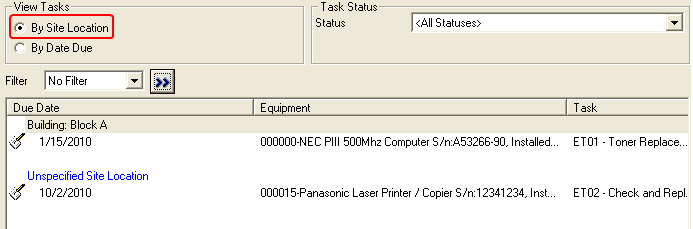
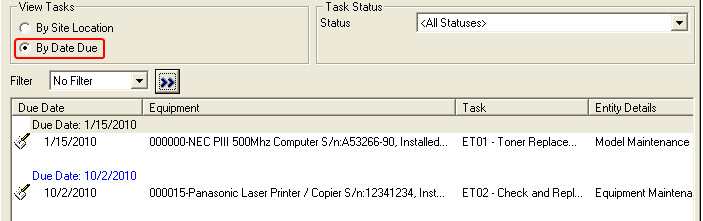
When a Site node is selected, the Tasks tab is also available. You can view Tasks by Site Location or Date Due. You can filter the Task list by Task Status and/or Equipment, Model, Model Group or Due Date. Click Go ![]() to display the matching Tasks.
to display the matching Tasks.
Note:
To load Site Tasks automatically, select Auto Load Site Tasks.

By Site Location:
By Due Date:
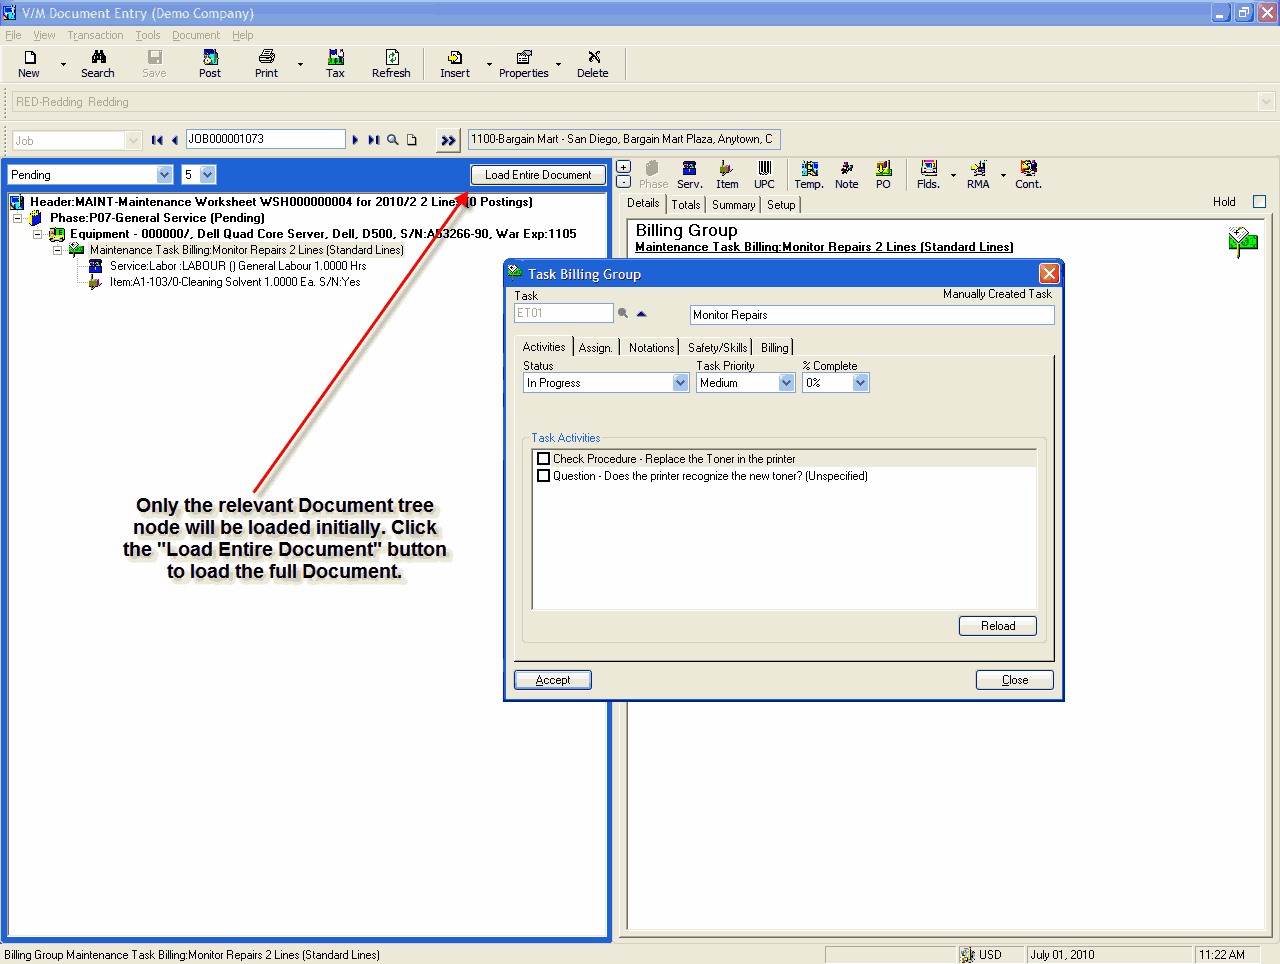
If you also open Document Entry, you can drag the Task to and open it in Document Entry. You can also double-click the Task to open it in Document Entry.
Note:
When loading Documents into Document Entry with Drill or Drag mode of loading, only the relevant Document tree node will be loaded. Click [Load Entire Document] to load the full Document.
Change the Task details as required - complete Activities, complete the Task, change Assignments, and so on.

Click [Accept] to save the changes. Also save the Job and then close Document Entry to return to the Worksheet Manager.
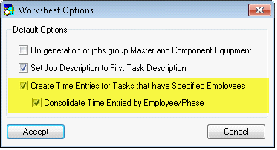
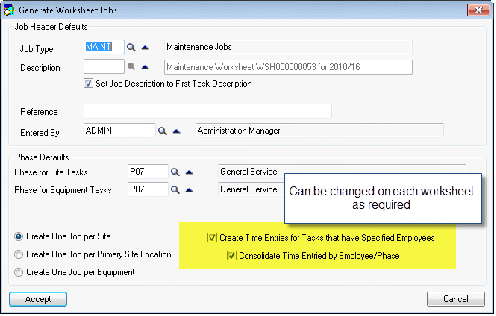
Time Entry Creation (New Feature in 60A with Pu2.6)
New worksheet options have been included allowing Time Entries to be created for tasks that have specified Employees and to consolidate these Time Entries by Employee/Phase.