Customer Return Authorization (CRA)

Contents
 »
»  » Customer RA
Overview
The Customer Return process in its simplest form is as follows:
•A CRA is created for the Equipment requiring repair
•A copy of the CRA is faxed or emailed to the Customer
•The Customer will send the Equipment to your Service Company with a copy of the CRA attached for reference
•You Receipt and Resolve (if required) the Equipment when it arrives
•You Post the Equipment to a Job or a Quotation
•The Equipment is repaired
•You bill the Customer if the Equipment is not covered under Warranty or Agreement, adding the cost of Labor, Items, etc.
•You Return the Equipment to the Customer
More complex scenarios include the following:
•The Equipment may not be repairable and may be scrapped
•The Equipment may be replaced on a permanent basis
•The Equipment may be replaced on a temporary basis, for example, while it is being repaired
CRAs can be maintained from Document Entry or directly from the desktop using the Return Authorizations program.
Creating a CRA using the Return Authorizations Desktop Program
Step 1: Enter Customer Site information
Click the Return Authorizations desktop icon.
The Return Authorization window will be displayed.

Select Customer RA.
![]()
Click the Go ![]() button. The fields will be opened for entry.
button. The fields will be opened for entry.

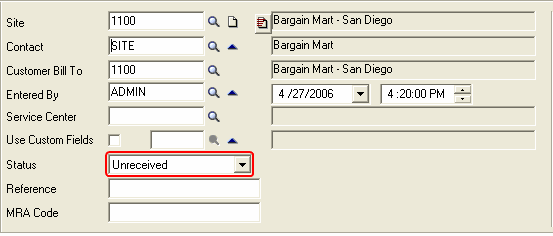
Enter the required details, in particular the Site Number. Press Tab. Site, Bill To and Entered By information will be displayed.
Note:
The CRA Status is set to Unreceived.
Step 2: Add Customer Equipment to the CRA
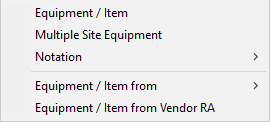
You now need to add the Equipment requiring service to the CRA. To do this, click the Insert icon on the toolbar. Alternatively, click the arrow ![]() to the right of the
to the right of the ![]() icon and then select Equipment / Item.
icon and then select Equipment / Item.
The RA Equipment window will be displayed.
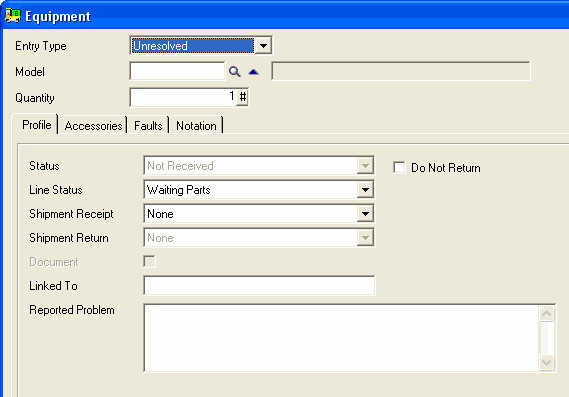
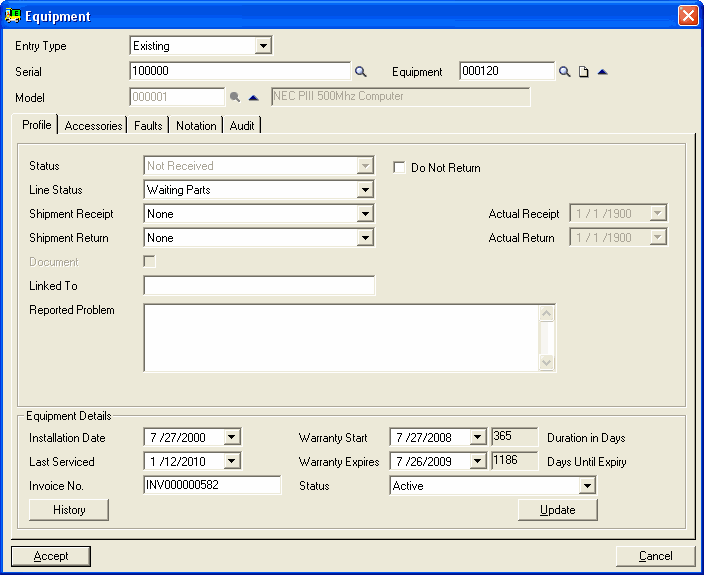
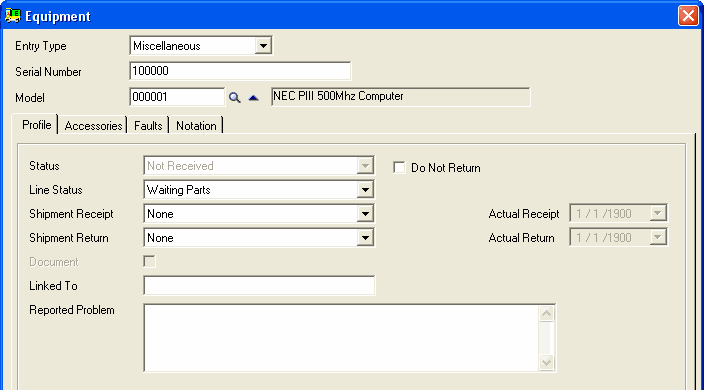
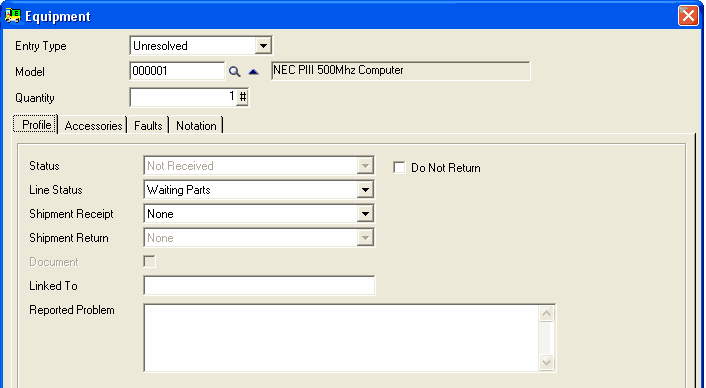
Entry Type
Select the Entry Type.
Existing
Select Existing if the Equipment already exists as a Site/Equipment record within the Service Manager data. Enter the Equipment Number or Serial Number. The Equipment Details will be displayed in the lower part of the window.
Miscellaneous
Select Miscellaneous if there are no details on the item to be returned, but an RA Number is required for tracking and shipping purposes. Non standard items may also fall into this category. Enter the Model Number, and Serial Number if known.
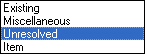
Unresolved
Select Unresolved If there are no details on the Equipment, but the Model can be identified and the Equipment details will be "resolved" when the RA is "receipted". Enter the Model Number and Quantity of that Model.
Item
Select Item if the item exists as part of your Inventory Control data.
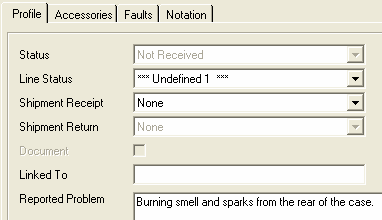
Profile tab
The Profile tab displays Status, Line Status, Shipment Receipt and Shipment Return.
Enter details of the Reported Problem.
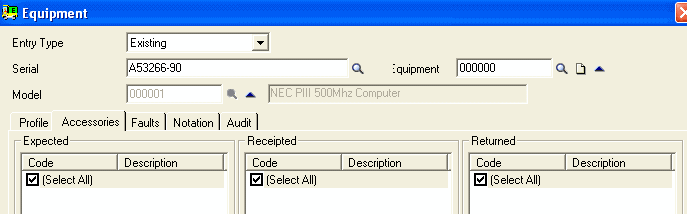
Accessories tab
The Accessories tab tracks any Accessory being returned with the Equipment.
The Accessories tab allows individual Model Accessories to be marked as Expected, Receipted, or Returned. This tab is available for Existing, Miscellaneous, and Unresolved Lines. The presence of the Expected list is determined by the value of the Expect Accessories check box on the General tab in RA Options. When an Unresolved line is resolved, any Accessory information is copied to each new RA Line created.
Faults tab
The Faults tab permits you to enter details into the system utilizing the Fault Analyzer and Solution Finder.
Details regarding common or recurring problems can easily be identified. This allows for fast turnaround and efficient repairs.
Typically, enter the Symptom first, then the Fault Analyzer will resolve as part of the Job process.
The Faults tab allows Fault Registrations to be stored against RA Lines. This tab is visible for all RA Line Types. Symptoms, Faults, Solutions, and Billing Templates can be specified. Fault Registrations can be inserted, edited, and deleted using the [Insert], [Properties] and [Delete] buttons, respectively. If a default Fault is configured on the Faults tab in RA Options, the Fault will automatically be added to this list when the RA Line is created. This default Fault may be edited or deleted like any other Fault Registration.

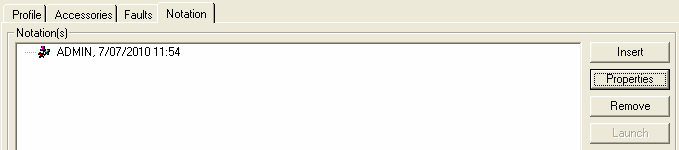
Notation tab
The Notation tab allows Notations to be stored against RA Lines. This tab is visible for all RA Line Types. The process for creating, editing, and deleting RA Line Notations is identical to the equivalent processes for other Notation types. Insert a Follow-Up if required.
Audit tab
The Audit tab is only available for Existing RA Lines. The Audit tab displays a list of prior RAs for the associated piece of Equipment. No details can be edited on this form – it is purely documentary.
Click [Accept]. The Equipment will be displayed in the Equipment pane.

Add further Equipment if applicable.
Non-Existent Equipment
If the Equipment record does not exist, it is possible to create a new Equipment record "on the fly" and add it to the RA.
Select the Existing option from the drop-down menu, and then click the Create New Equipment record icon located to the right of the Equipment Number field.

The V/M Equipment window will be displayed.
Enter the Equipment details and add the new Equipment record. Return to the RA Equipment window.
Note:
Multi Select Equipment features a Quick Create program which also allows the creation of new Equipment records "on the fly".

Step 3: Save the RA
Click the Save icon on the toolbar to continue.
![]()
The RA is allocated the next available number based on the numbering rules in Company Options » Numbering tab.
![]()
Step 4: Enter Return Shipment Information
Click the Returns icon on the toolbar at any time to enter Return Shipment information.
![]()
The Return Shipment window will be displayed.
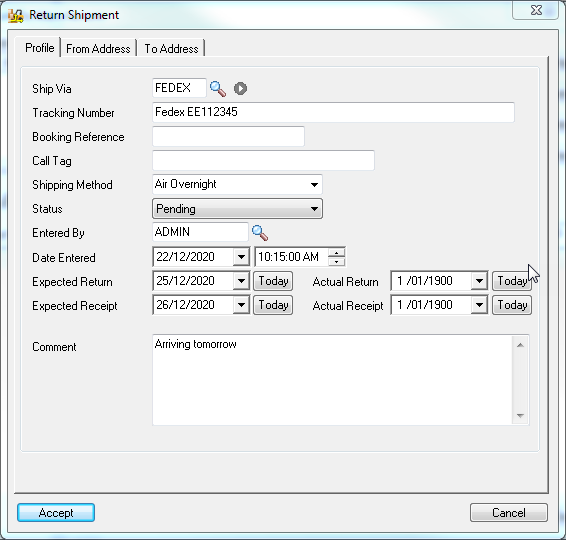
Specify the predefined Ship Via method
Enter the Tracking Number / Consignment Note Number, etc.
Enter the redefined Shipping Method.
Click the From Address tab to verify pick-up details.
Click the To Address tab in case the goods are to be sent to an office other than the operator's company address.
Details can be left blank at this time if the customer is responsible for organizing the return shipment details.
Click [Accept] to continue. The Return Authorization window will be displayed.
Now wait until the goods are received.
Receipt of Goods
Step 1: Display the Receipt from Customer window
Click the Receipts icon on the Return Authorization window toolbar.
![]()
The Receipt from Customer window will be displayed.
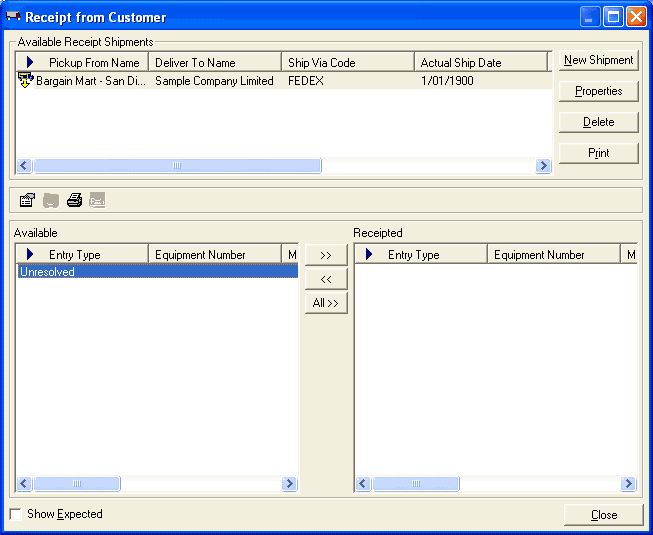
In this example, the Equipment being received is Unresolved. It could be an existing Equipment or Miscellaneous.
Step 2: Resolve Unresolved items
In the lower half of the form, notice the Available and Receipted panes.
Highlight the Unresolved item and then click the Move to Receipted icon ![]() to begin the receipt process.
to begin the receipt process.
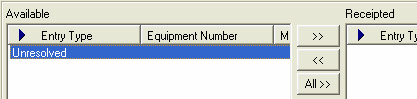
As the item is Unresolved, the first part of this process is to resolve the equipment.
The Resolve Equipment window will be displayed.
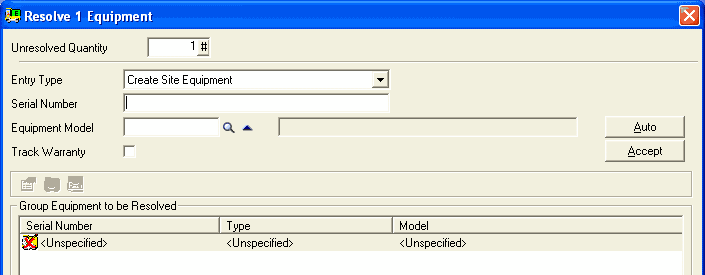
The Resolve Equipment window has two main functions:
1.It may be used to resolve Unresolved RA Lines.
This process generates one or more Existing or Miscellaneous RA Lines to replace or partially replace the Unresolved RA Line. The number of RA Lines generated depends on the Quantity field of the Unresolved RA Line, and how the form is completed. It is possible to partially resolve an Unresolved RA Line, producing new RA Lines and updating the Unresolved RA Line's Quantity value in the process.
To launch the Resolve Form for use in this manner, select an Unresolved RA Line from the list on the main Return Authorization window and then click the ![]() icon on the toolbar (select Tools » Resolve).
icon on the toolbar (select Tools » Resolve).
2.It may be used is as a "quick entry" form to enter Existing and Miscellaneous RA Lines.
To launch the Resolve Form for use in this manner, ensure that an Unresolved RA Line is not selected in the list on the main Return Authorization window and then click the ![]() icon on the toolbar (select Tools » Resolve).
icon on the toolbar (select Tools » Resolve).
On the Resolve Equipment window, new RA Lines can be generated by filling out the appropriate details and using the [Accept] and/or [Post] buttons. No Unresolved RA Lines are affected during this process.
Entry Type
Choose the appropriate Entry Type from the drop-down list and various fields will be displayed according to the selection.
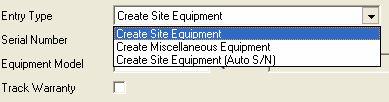
The value of the Entry Type field determines what type of RA Line or Lines are created upon accepting (Immediate) or posting (Batch).
Create Site Equipment |
This option is always available. When an entry of this type is accepted / posted, a piece of Equipment and an Existing RA Line are created. The new Equipment uses the value of the Model field as its Model, and the value of the RA Site field (entered on the Main Form) as its Site. Valid values must be provided for Serial and Model fields. |
Create Miscellaneous Equipment |
This option is always available. When an entry of this type is accepted / posted, a new Miscellaneous RA Line is created. Values for the Serial and Model fields are optional. |
Create Site Equipment (Auto S/N) |
This option is always available. When an entry of this type is accepted / posted, a piece of Equipment and an Existing RA Line are created. The new Equipment uses the value of the Model field as its Model, and the value of the RA Site field (entered on the Main Form) as its Site. The Serial is generated from the Equipment Number of the newly created piece of Equipment. A prefix for this Serial may be entered on the Auto SN tab under RA Options. A valid value must be provided for the Model field. |
Existing Site Equipment |
This option is not generally available for selection. Instead, when a Serial Number is matched against that of en existing piece of Site Equipment, this option is added to the list of available options and is automatically selected. During this process, model information will be loaded from the Equipment record, and displayed in the Model field. A label will appear, containing the phrase "Existing Site X Equipment", where "X" is the Site Number of the Site the Equipment presently belongs to. When the entry is accepted / posted, a new Existing RA Line will be created, and will reference this existing piece of Equipment. |
Transfer Equipment |
This option functions in a similar fashion to "Existing Site Equipment". When the Serial Number of a piece of Equipment is recognized as that of an existing piece, but belongs to a Site other than that specified in the Site field on the Main Form, the "Transfer Equipment" option will appear and is automatically selected. A label will appear, containing the phrase "Transfer from Site X", where "X" is the Site the Equipment is presently assigned to. When the entry is accepted / posted the piece of Equipment is transferred to the Site specified in the Site field on the Main Form and a new Existing RA Line is created, referencing this piece of Equipment. |
Serial Number / Equipment Model
Enter a Serial Number. If it exists, the Equipment details will populate. If the Equipment does not exist, enter an Equipment Model.
Use the Equipment Model Finder![]() to locate the Equipment if it exists in the system.
to locate the Equipment if it exists in the system.
Track Warranty
Tick this check box to track (apply) a manufacturer Warranty period that will be used in the new RA Line created when the entry is posted / accepted. The value in this check box is defaulted from the relevant Equipment / Model record.
Auto Increment Serial Numbers
If the Unresolved Quantity is greater than one (1), you may click [Auto] to increment the Serial Numbers for subsequent Equipment records to be created.
Click [Accept] once the Equipment Serial Numbers and details are correct.
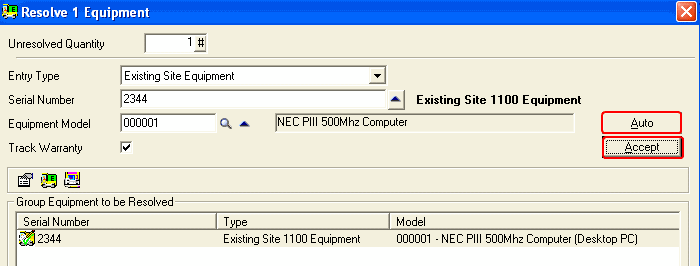
When you tab off the Serial Number, the Equipment details will be updated. You are able to view extra information on the Equipment via the mini toolbar located in the middle of the page.
Mini Toolbar
The mini toolbar is located between the Track Warranty field and the list of entries. There are three buttons on the toolbar. Below is a description of each button, from left to right.
Line Properties |
View the individual line Equipment profile as created within the RA Manager. This button is only available when the Resolve Method is set to "Immediate", and an entry that has already been resolved is selected in the list. When clicked, the RA Line Properties form will appear, allowing the details of this RA Line to be viewed and edited. |
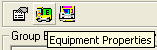
Equipment Properties |
View the Equipment Properties for this record. This button will be available whenever working with "Existing Site Equipment" and "Transfer Equipment" entries (irrespective of the Resolve Method). It will also be available when the Resolve Method is set to "Immediate", and an entry that has already been resolved is selected. When clicked, the Equipment Setup form is displayed, allowing the properties of the Equipment itself to be viewed and edited. |
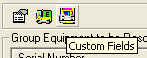
Custom Fields |
View Custom Fields associated with the Equipment record. This button will be available whenever the "Equipment Properties" button is available, providing that the piece of Equipment is set up to use Custom Fields. |
Click [Close] to continue.
Post RA Equipment records to a Job
To add an RA to a Job, open the required RA and then click the ![]() icon on the toolbar.
icon on the toolbar.
Alternatively, select Tools » Post to Document.
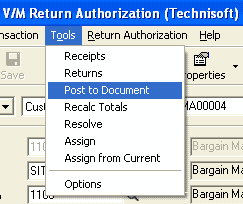
The Post Equipment To Document window will be displayed.
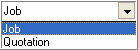
Select the type of document you require, as it is possible to move the RA items directly to a Job or a Quotation.
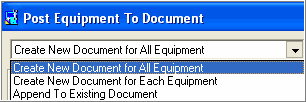
Select the required method of posting:
All Equipment on the RA is to be moved to single Job/Quotation
or
Each piece of Equipment is to be moved to its own individual Job/Quotation
or
Add the Equipment on the RA to an existing Job/Quotation in the system.
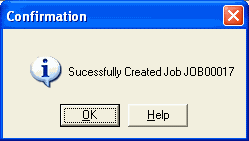
Upon successful posting, a Confirmation message will appear with the details of the Job or Quotation created.
You will also notice that upon returning to the Return Authorization window, the RA Status has been updated.

Displaying the RA in Document Entry
The example below shows the RA in the Document Entry document tree.
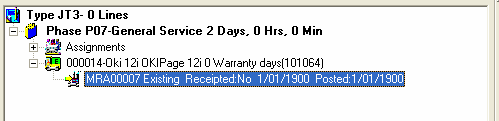
Double-click the RA to view the RA details.

Creating a CRA from Document Entry
You can create RAs directly from within a Job or Quotation in Document Entry.
Select the Equipment node.
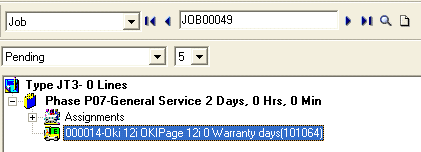
Click the drop-down list arrow to the right of the Return Authorization for Equipment ![]() fast icon.
fast icon.
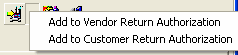
Select Add to Customer Return Authorization.
The Find Items and Equipment for Job window will be displayed.
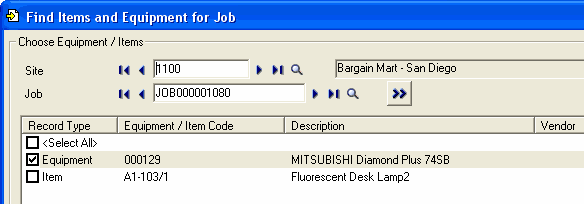
All Equipment and Items associated with the Job will be listed. If an Equipment or Item node was selected in the document tree, the check box for that record will be ticked.
Tick the check box of each Equipment or Item record to be added to the RA.
Click [Accept].
The Equipment will be listed in the lower pane of the Return Authorization window.

Continue as per the instructions above.