Document Entry

Contents
Requisitions or Purchase Orders can be added to Inventory, Standard, Labor or Subcontractor Service detail lines in a Job or Sales Order.
This provides the flexibility to order anything from an existing inventory item (stock or non stock), to a miscellaneous service or part, as well as a subcontractor service.
The number of Requisitions or Purchase Orders that can be added to a Job or Sale Order is unlimited.
New nodes appear in the tree of the Document under the detail line selected (Item or Service), when a Requisition or Purchase Order is created.
Adding a Requisition or Purchase Order in Document Entry
To add a Requisition or Purchase Order (depending on the security level you have), open an existing Job or Sales Order in Document Entry or create a new Job or Sales Order. For the purpose of this User Guide, reference will be made to Jobs only, but the functions described apply equally to Sales Orders.
If you are creating a new Job, add a Phase and a Billing Group. Then add a Labor Service, Contractor Service and an Inventory detail line. If using an existing Job, add these three types of detail lines if they are not in your existing Job for the purposes of this example.
Creating an Item Requisition/Purchase Order
When you select an Item detail line, the New Purchase Requisition ![]() fast icon will become active.
fast icon will become active.
To create an Item Requisition/Purchase Order:
•click ![]()
OR
•right-click the Item and select Insert » Purchase Requisition
OR
•click shortcut key Ctrl+Q
OR
•from the Insert icon on the toolbar, select Purchase Requisition.
It is a matter of personal preference as to which method you use.
The Create/Manage Purchase Requisitions window will be displayed.
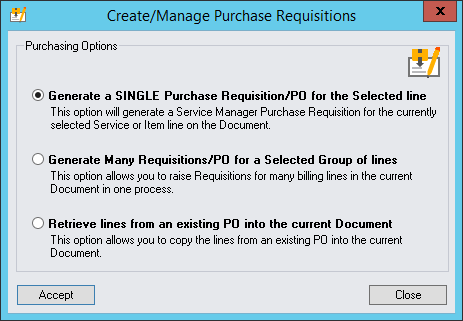
Select Generate a SINGLE Purchase Requisition/PO for the Selected line.
Click [Accept]. The Service Manager Purchase Request window will be displayed.
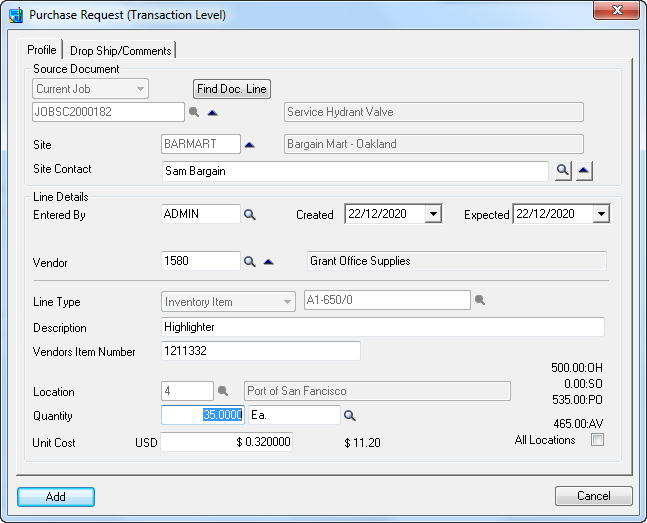
Profile tab
Note: It is not necessary at this point to decide whether you are adding a Requisition or Purchase Order. Your security clearance will determine this on the final screen when you add the Service Manager Purchase Request. Depending on your security clearance, you will be able to choose to either add a Requisition or Purchase Order at that time.
Since you have chained from the Job, the Site, Job, Entered By person and Date Created details, will automatically be loaded and the cursor will be flashing in the Quantity field.
The Quantity will default to Item Supply Quantity. You can change this if you need to order more of these items.
The Item Code and Item Description will also be loaded from the Item detail line. If you change the Item Description, this will be reflected in the description in the Requisition and/or Purchase Order.
The default Vendor code will appear if one exists, but you can change this to a different Vendor if, for example, a better price has been obtained from an alternative supplier. The Unit Cost will be displayed in the Vendor's currency and the extended cost is displayed to the right of the unit cost.
The default Unit of Measure, e.g., "Ea.", will be displayed by default. If you choose a different unit of measure, the Unit Cost will adjust according to your Inventory Conversion Factor settings.
The Ship To Location will be loaded from the Item line and cannot be changed. The Location is sourced from Inventory Control Locations.
To the far right of the Service Manager Purchase Request window, the stock available at the location selected is displayed. i.e., Stock On Hand (OH), On Sales Order (SO), On Purchase Order (PO) and the Quantity Available (QA). Select All Locations to view quantities at all locations.
The Expected Receipt Date field can be set to indicate the vendor's expected delivery date, or you can use this date for the customer's expected delivery date. The actual Receipt Date is stored with the receipt.
Click the Drop Ship/Comments tab or click [Add] if no further detail is required.
Drop Ship/Comments tab
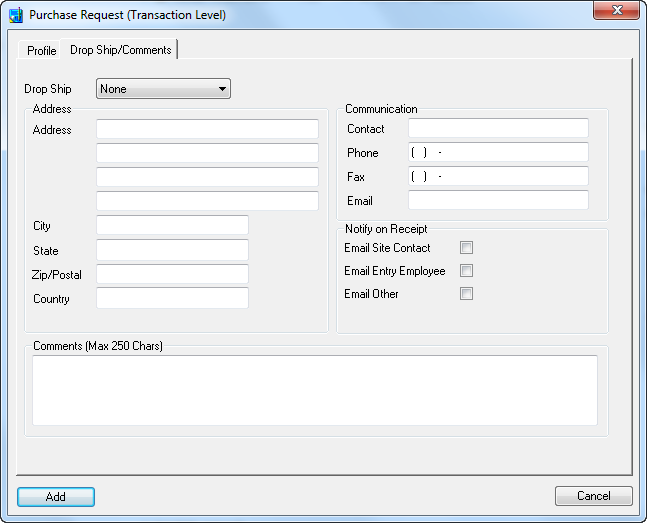
Drop Ship: Use these options to instruct your supplier to ship the order to a different geographic location.
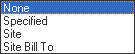
None - ship to your location
Specified - ship to the specified location, entered in the Address fields
Site - automatically load the address details for the Site
Site Bill To - automatically load details from the customer's Accounts Receivable Bill To record.
There is a space at the footer of this form for Comments. These comments do not get transferred to the Requisition or Purchase Order. They are stored with the Service Manager Purchase Request in the Job only.
Notify on Receipt: When a receipt is posted in Purchase Orders, the Job is automatically updated with the receipt status. It is possible to generate emails on receipt. Select any of:
Email Site Contact
Email Entry Employee
Email Other
If you select Email Other, you will need to type an email address. The email addresses for Site Contact and Entry (Entered By) Employee are derived from the respective Site and Employee records. If no email addresses exist in these files, no email will not be generated. You can of course use Email Other to specify an email address if necessary.
To action the auto Email function, use Requisition Manager. Make sure the Partially Receipted and/or Fully Receipted check boxes are ticked. Click Go ![]() to load Jobs that match the criteria chosen and then click the Email icon on the toolbar to generate emails for receipted Purchase Orders.
to load Jobs that match the criteria chosen and then click the Email icon on the toolbar to generate emails for receipted Purchase Orders.
If your company uses multicurrency accounting, click the Currency Rates tab. Otherwise, click [Add].
Currency Rates tab
Note: This tab will only be displayed if your company uses multicurrency accounting.
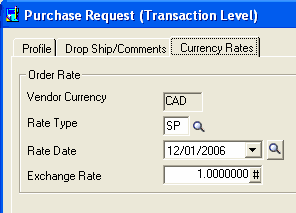
The default Rate Type, (Latest) Rate Date and Exchange Rate will load. These can be manually changed if required.
Click [Add].
Creating a Service Requisition/Purchase Order
Service Requisitions/Purchase Orders can be created in exactly the same way as Item Requisitions/Purchase Orders.
There are three types of Service: Standard, Labor and Subcontractor, and Requisitions/Purchase Orders can be created for all three types.
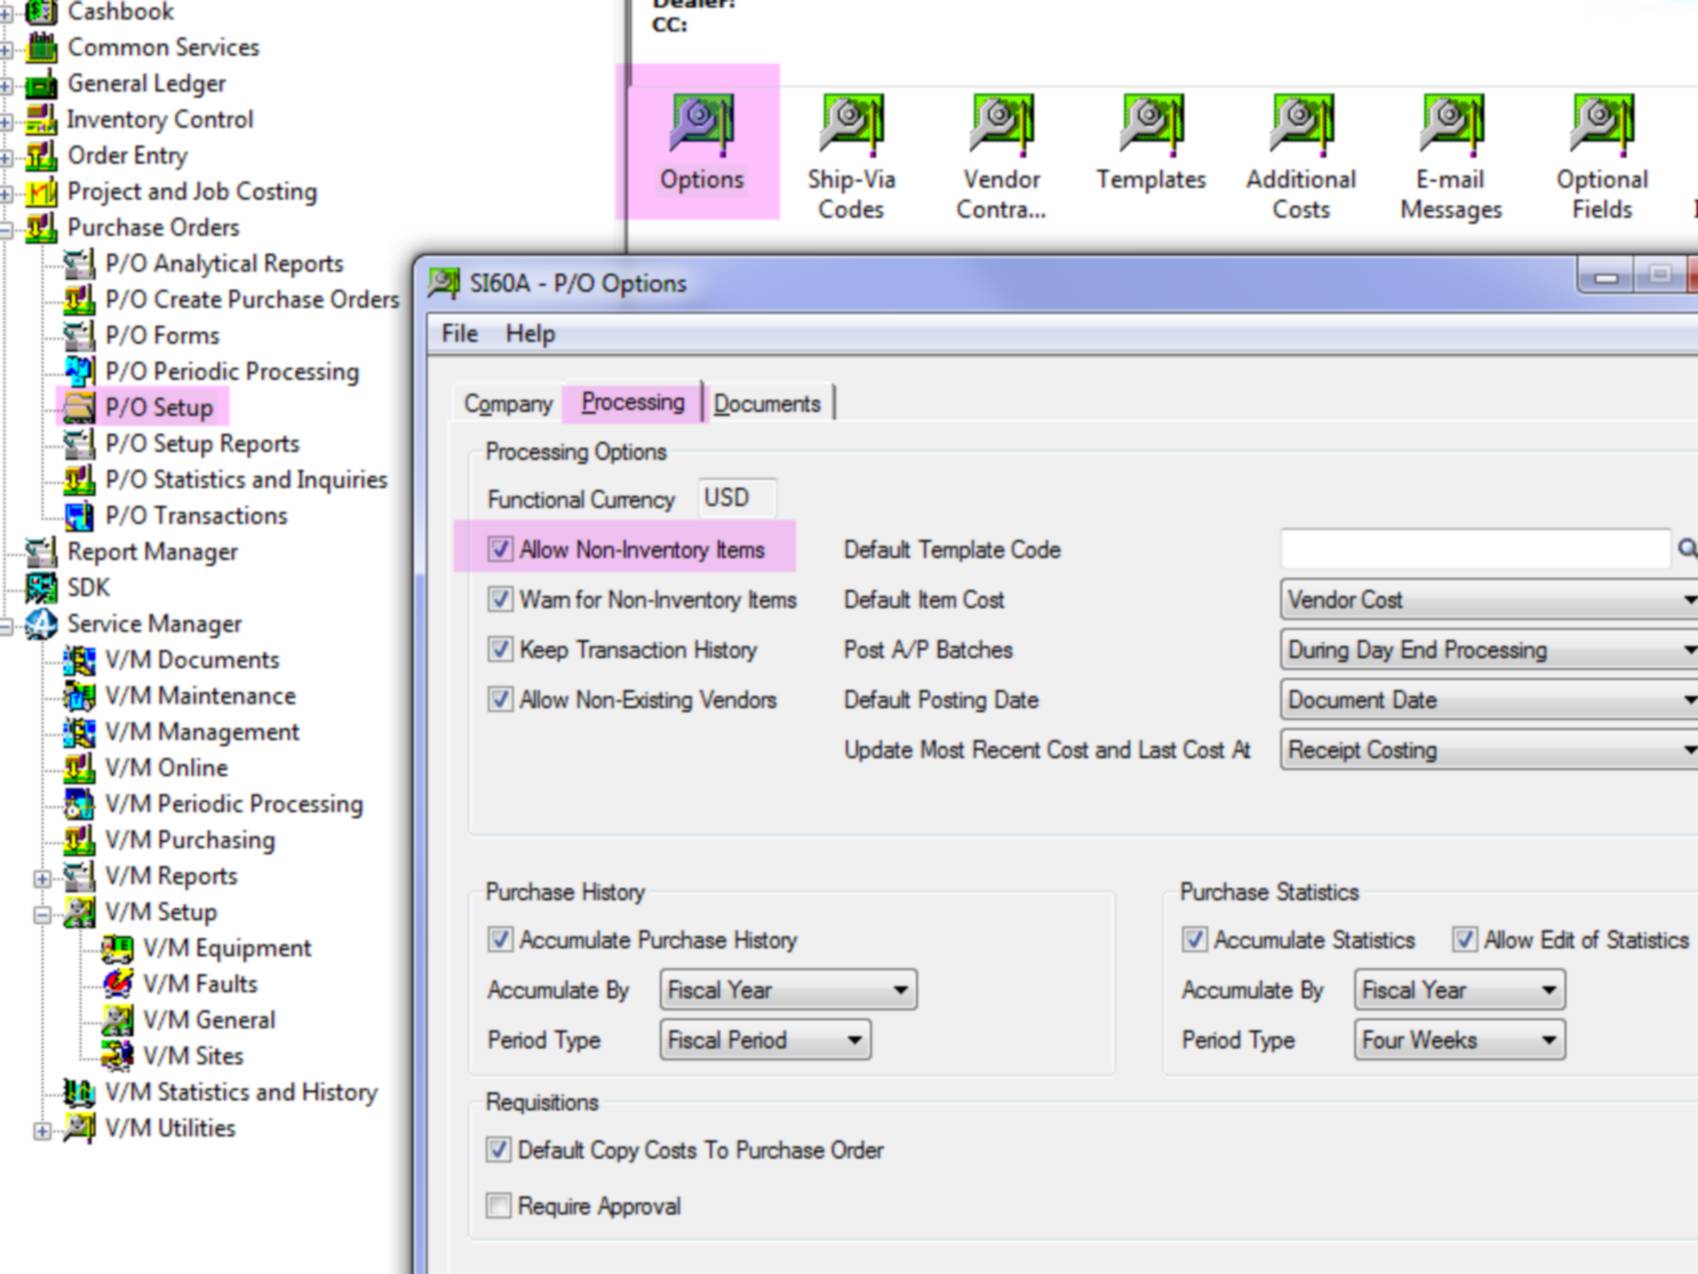
Ensure that P/O Setup Options for Allow Non-Inventory Items is checked on in the P/O Options Processing Tab.
Ensure that I/C Setup Options for Allow Receipt of Non-stock Items are checked on in the I/C Options Processing Tab.

To create a Requisition/Purchase Order for a Service, focus on the Service detail line and then click the New Purchase Requisition ![]() fast icon.
fast icon.
All procedures are identical to creating an Item Requisition/Purchase Order, except for the following:
•No Location fields or Location Stock Quantity information fields will be displayed
•When a Requisition/Purchase Order is created, the General Ledger Expense field in the detail line is automatically populated with the Service Cost Clearing account in the Service detail line in the Job.
In every other respect, including the supply of receipted Services, the process is the same.
It is important to understand that a Vendor must entered to raise a Requisition/Purchase Order for a Service, even if the Purchase Order is for a Miscellaneous Service.
Posting Purchase Orders

Depending on your security clearance you will be able to choose to create a Requisition or Purchase Order.
Create As:
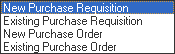
If you select Existing Purchase Requisition or Existing Purchase Order, you will need to select an existing Requisition or Purchase Order using the Finder ![]() so you can add the current Service Manager Purchase Request to it.
so you can add the current Service Manager Purchase Request to it.
If you select New Purchase Requisition or New Purchase Order, a new Requisition or Purchase Order will automatically be created after you click [Post].
Click [Set to Document Number] to set the Reference to the Document Number.
Click [Set to Site] to set the Comments to the Site Name.
Note: Optional Fields from the Sage 300 Purchase Orders module will be displayed on this window if applicable. If those fields require validation you will not be able to click [Post] until they have been populated.
Click [Post] to post the Requisition or Purchase Order.
Purchase Requisition node
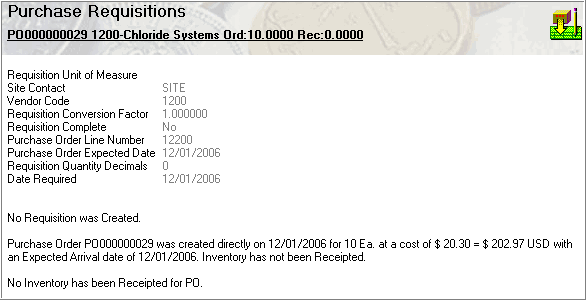
A new Service Manager Purchase Requisition node will be added beneath the Item detail line in the Job tree. If you click on this node, under the Details tab on the right of the window, a summary of the Requisition or Purchase Order details will be displayed.
Note that like all nodes in the Document tree, you can customize the node text, and Include, Exclude and change the order of fields displayed on the Details tab. To do this, select Tools » Options and then select Purchase Requisitions from the drop-down list.
Note that if you select Properties on the Service Manager Purchase Request and drill into the Requisition or Purchase Order, the originating Job or Sales Order Number will appear in the detail section of each transaction line in the Requisition or Purchase Order in the Order Number field.
Additional Requisitions or Purchase Orders can be added to an existing item detail line at any time by repeating the process above. Therefore you can add to an existing Requisition or Purchase Order as described or create a new separate transaction.
When a receipt has been posted in Purchase Orders the receipt status will also appear in the custom fields section under the Details tab when you click on the Service Manager Purchase Request node.
If focused on the Service Manager Purchase Request node you can right-click and select View P/O Requisition, View P/O Purchase Order, or View P/O Receipt as applicable at any time during the process. Options will be grayed out if a document does not exist for them. For example, if you have a Requisition, but no Purchase Order created yet, you can View P/O Requisition, but View P/O Purchase Order will be grayed out.
If you followed the above procedures and have added a Requisition or Purchase Order, right-click on the Service Manager Purchase Request node under the detail line and select Properties to display the details of the particular Service Manager Purchase Request. A new tab appears on the Purchase Request called Posting Status. There are two sections to this form: Status and Supply Details.
In the Status section, details of the Requisition, Purchase Order or Receipt will be listed. Click the drill-to arrow ![]() to display details of the original Document.
to display details of the original Document.
The Supply Details section includes reconciliation of what is on Purchase Order, what has been receipted to date, what has been supplied to the document, and what is remaining to be supplied.
It is important to note that the cost originally ordered may be different to that receipted and that the Job will be updated with the actual cost receipted at all times.
Supplying Receipted Items to a Job
You can auto supply items that have been receipted in Purchase Orders to detail lines in the Job. Refer Auto Create Requisitions.
To manually supply a receipted Service or Item to a Job, right-click on the relevant Requisition line and select Supply Receipted Item(s). The Supply Purchase Order window will be displayed.
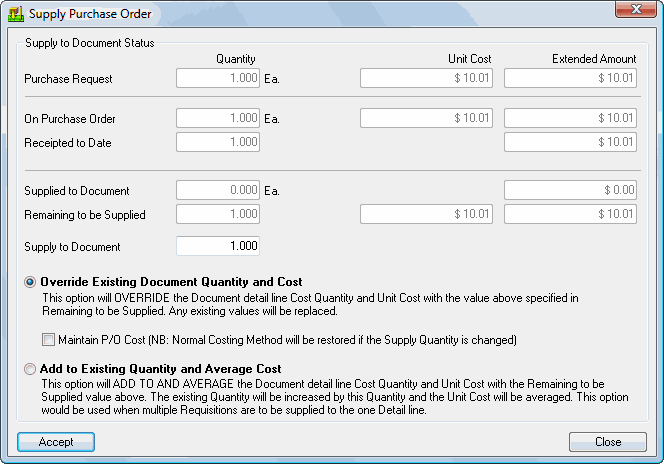
The original Service Manager Purchase Request Quantity, Unit Cost and Extended Amount are displayed first and are grayed out.
The On Purchase Order Quantity, Unit Cost and Extended Amount are displayed next.
The Receipted to Date Quantity and Extended Amount are displayed next.
The Supplied to Document Quantity and Extended Amount are displayed next followed by the Remaining to be Supplied Quantity, Unit Cost and Extended Amount.
Note that the receipted cost may be different to the original cost requested or the Purchase Ordered cost, and it is the receipted cost that is supplied to the Job.
The Supply to Document Quantity can be changed manually prior to retrieving the line. This can be useful where more items were ordered than were actually needed for the Job.
There are two Supply methods:
1. Override Existing Document Quantity
This option will override the Document detail line "Bill To" and "Cost" quantity and "Unit Cost" with the value in the "Remaining to be Supplied" fields. Any existing values in the service or item detail line will be overridden or replaced.
2. Add to Existing Quantity and Average Cost
This option is particularly useful where more than one Service Manager Purchase Request exists for a service or item detail line and multiple Receipts are to be supplied to that line.
The total cost on all Service Manager Purchase Requests is averaged across the quantity being supplied to that detail line.
Example
Assume there are two purchase requisitions that have been receipted under a subcontractor service detail line in a Job. Supply the first line using Override Existing Document Quantity and Cost.
Then supply the second line using Add to Existing Quantity and Average Cost. The first line will override the quantity and the cost in the detail line, and the second line will then add to the existing quantity and average the unit cost on that detail line.
Subcontractor Service
Line (1) Qty = 1 Cost = $100
Line (2) Qty = 2 Cost = $ 85
When supplying the first line using the Override Existing Document Quantity and Cost method, the first line would override existing quantities and cost and put a 1 in the bill to and cost quantity fields, and $100.00 in the unit cost field. Note that if a cost only service is used, only the cost quantity will be updated.
Supplying the second line using Add to Existing Quantity and Average Cost would add two (2) to the existing quantity of one (1) totaling three (3). The unit cost would be averaged giving ((100) + (85*2))/3 = $90.
Note: When using Add to Existing Quantity and Average Cost, if a supply quantity already exists in the detail line in the Job, this method will add to that quantity. i.e., it is not overwritten before supply. You may need to first check that the supply quantity in the detail line is set to zero or retrieve the first line using Override Existing Document Quantity and Cost and then use the option Add to Existing Quantity and Average Cost.
Reversing a Previously Supplied Quantity
If a line has been supplied in error, it is possible to cancel and resupply that line.
Right-click on the grayed out Service Manager Purchase Request directly beneath the Service or Item detail line and select Properties. In the "Supply Details" area, reduce the quantity in the "Supplied to Document" field or set the value to zero and then press Tab. This will reset the "Remaining to be supplied" quantity as applicable. You can then choose the Override Existing Document Quantity and Cost option and resupply the detail line.
General
In Document Entry if you select Tools » Options » General tab, there is an option there to Automatically Gather PO status on Document Load. If this is ticked, then whenever a Job or Sales Order is loaded, the status of Requisitions, Purchase Orders and/or Receipts will automatically be updated or refreshed in the Document.
Note: This option is useful, but remember that if the Load Documents when Scrolling check box is also ticked, then the Purchase Order status will be refreshed every time you scroll a Job or Sales Order in Document Entry, and this has the potential to slow or delay the scrolling process.
Requisition Manager can be launched from inside Document Entry - select Tools » Requisition Manager. If you are inside a Job focused on a Service Manager Purchase Request node then when you select this option, Requisition Manager will load with the Job details preset.
If creating a Requisition from a Service Manager Purchase Request rather than going direct to a Purchase Order, you can then only raise a Purchase Order for that Requisition using the Sage 300 Purchase Orders program. To create a Purchase Order from a Requisition, go to the Sage 300 Purchase Orders node on the desktop. Open the Purchase Order Entry program, choose a Vendor and then tick the From Requisition check box. Select the drill-to icon and then click the Requisition Finder![]() to select the Requisition you wish to create a Purchase Order for. Post the Purchase Order or make modifications as necessary. The Job will be automatically updated with the Purchase Order details in the background.
to select the Requisition you wish to create a Purchase Order for. Post the Purchase Order or make modifications as necessary. The Job will be automatically updated with the Purchase Order details in the background.
It is possible to use Requisition Manager to bulk post Purchase Orders from Service Manager Purchase Requests.
Note that if adding to existing Requisitions or Purchase Orders you must use the same Vendor Code.