Requisition Manager

Contents
 »
» 
The Requisition Manager program allows you to view the status of existing Requisitions, Purchase Orders and Receipts. It also allows you to create/raise new Purchase Orders from existing Requisitions in batch entry mode, as well as allowing you to Supply any number of Receipted Purchase Orders to a Job or Sale.
Using Requisition Manager
Open Requisition Manager and then select Requisition » Options.
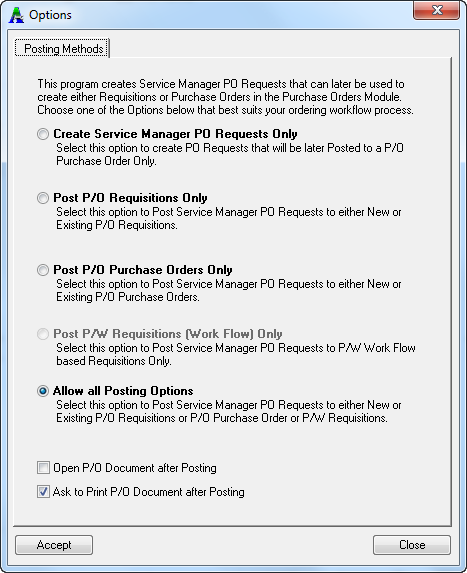
Posting Methods
Select one of the four Posting Methods.
Create Service Manager PO Requests Only
Select this option to create Service Manager Purchase Requests that will later be posted to a Purchase Requisition or Purchase Order. i.e., Service Manager Purchase Requests are not created in the Sage 300 Purchase Orders module. They are added to Document Entry below the detail item or service line only.
This option can be useful if security requirements are very high or where Sage 300 Requisitions are not required.
The major advantage of this option is that you can post Requisitions or Purchase Orders (depending on security) from Requisition Manager in "Batch" format. This allows you to post a single Purchase Order for the Vendor for Items and Services from many Documents rather than a single Purchase Order for the Document or individual line.
Post P/O Requisitions Only
Select this option to post Service Manager Purchase Requests to either a "New" or "Existing" Purchase Requisition in the Sage 300 Purchase Orders module. When you insert a Service Manager Purchase Request and select "Add", you are presented with the Post Purchase Orders form, and if this option is selected, then you will only be presented with New Purchase Requisition or Existing Purchase Requisition in the "Create As" drop-down list.
This option is recommended where the Purchase Order function is demarcated to the Purchasing department and only those with Purchase Order security rights can create new Purchase Orders. i.e., if Post P/O Requisitions Only is selected you will not be presented with an option to post a Purchase Order from within Service Manager.
Requisition Manager does not allow you to convert Requisitions to Purchase Orders. You must go into the Sage 300 Purchase Orders module to create Purchase Orders from existing Requisitions.
Post P/O Purchase Orders Only
Select this option to post Service Manager Purchase Requests directly to either "New" or "Existing" Purchase Orders in the Sage 300 Purchase Orders module. When you insert a Service Manager Purchase Request and select "Add", you are presented with the Post Purchase Orders form. You then have the option to post to a "New Purchase Order" or "Existing Purchase Order" in the Create As drop-down list.
This option is recommended where operators have permission to enter Purchase Orders directly and formal Requisitions are not required. This speeds up data input greatly and is a recommended setting.
Post Either P/O Requisitions or P/O Purchase Orders
This method is a combination of both "Post P/O Requisitions Only", and "Post P/O Purchase Orders Only" methods.
The Post Purchase Orders form presents all four options, New Requisition, Existing Purchase Requisition, New Purchase Order or Existing Purchase Order in the "Create As", drop-down list. This option provides the best of both worlds so to speak by providing additional flexibility.
Open P/O Document after Posting
Tick the Open P/O Document after Posting check box to launch the Requisition or Purchase Order straight after you click [Post]. Otherwise you are returned directly to the Job in Service Manager and a new Service Manager Purchase Request node is created. Ticking this switch can be useful if you need to change Tax Classes before posting the Purchase Order as the Purchase Order is opened in the Sage 300 Purchase Orders module and you can select the "Distribution" button and edit tax classes.
History
When a Job has been completed in Service Manager and the End of Day process moves the Job to History, purchase requisition details are maintained with the Historic Document so that the original order details can be referred to at any time.
Viewing Existing Requisitions, Purchase Orders or Receipts
Sequence
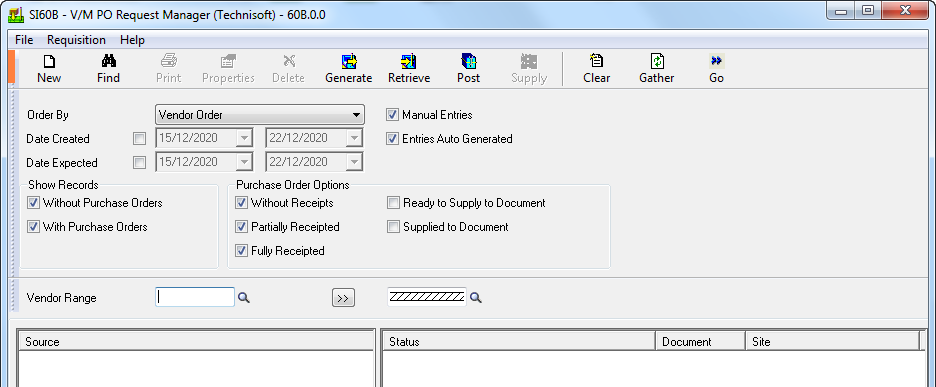
Order By
There are six ways to view Requisitions, Purchase Orders or Receipts in Requisition Manager: Vendor, Document, Site, Employee, Purchase Order Number, or Requisition Number.
Criteria
Date Required
This field allows you to specify a date range to search Requisitions or Purchase Orders in a given period. If the check box is cleared, the Date Required option will be ignored.
Date Expected
This field allows you to specify a date range to search Requisitions or Purchase Orders expected in a given period. If the check box is cleared, the Date Expected option will be ignored.
Manual Entries
Tick this check box to display all entries created from within Document Entry. (This check box is ticked by default.)
Entries Auto Generated
Tick this check box to display entries created using the Auto Create Requisitions program. (This check box is ticked by default).
Show Records Without Purchase Orders
This will display all Service Manager Purchase Requests and Sage 300 Requisitions that have not yet had Purchase Orders created for them. This can be very useful if sorting in Vendor Order per above, as the Post option becomes available for all Service Manager Purchase Requests. Note that Sage 300 Requisitions must be posted from the Sage 300 Purchase Orders module.
Show Records Without Purchase Orders
This can be useful to check and manage Jobs that have Purchase Orders that have not yet been receipted.
Purchase Order Options
These options can also be used to filter information in Requisition Manager.
Without Receipts will display all Purchase Orders that have not yet been receipted.
Partially Receipted will display Purchase Orders that have been partially receipted.
Fully Receipted will display Purchase Orders that have been fully receipted and are complete.
Ready to Supply to Document will display Purchase Orders that have been receipted, but not yet supplied to Documents.
Supplied to Document will display receipted Purchase Orders that have been supplied to Documents.
Set these options as required, and then click Go ![]() . This will populate the Source and Status tables in the bottom of the Requisition Manager form according to the criteria selected.
. This will populate the Source and Status tables in the bottom of the Requisition Manager form according to the criteria selected.
Examples of Useful Queries
Assume Date Required or Date Expected ranges are not set. Assume Manual Entries and Entries Auto Generated are set on.
Example # 1
Vendor Order, Without Purchase Orders – Displays Requisitions that have not had Purchase Orders raised/created yet.
Example # 2
Vendor Order, Without Purchase Orders, With Purchase Orders, Without Receipts – Displays all Requisitions that do not have Purchase Orders and Purchase Orders that have not yet been receipted.
Example # 3
Vendor Order, Without Receipts – Displays Purchase Orders that have not yet been receipted.
Example # 4
Vendor Order, With Purchase Orders, Partially Receipted or Fully Receipted, Ready to Supply to Document – Displays Jobs that have service or items on Purchase Order that have been partially or fully receipted that can be supplied to those Jobs.
Example # 5
Vendor Order, Entries Auto Generated, With Purchase Orders, Without Receipts – Displays Purchase Orders created using the Auto Create Requisitions program that have not been receipted.
Additional Information
You must be in "Vendor Order" to post and create new Requisitions or Purchase Orders from Service Manager Purchase Requests.
Entry to Requisition Manager can be securitized using the security functions in Administration Services.
Creating New Requisitions or Purchase Orders
For simplicity sake, we recommend raising Requisitions from directly within Jobs, however new Requisitions can be created from the Requisition Manager program.
If using the Requisition Manager program to create a Requisition or Purchase Order, a Service Manager Purchase Request must be created by matching it to an existing Service or Item detail line in the Job or Sale Order, or creating a new detail line.
Procedures are much the same as those described in Adding a Requisition or Purchase Order in Document Entry.
To add a new Requisition, click New.
![]()
Select the Source Document type (Job or Sale), then select a Document Number to add the Requisition to.
Next click [Find Doc. Line] to launch the tree of the Document selected, so you can choose a Service or Item detail line to Requisition.
![]()
Click and focus on the relevant Service or Item detail line and then click Accept to choose it.
![]()
This will load that Service or Item into the Purchase Request form. Select any other options as required and then click [Add] to create the purchase request.
If you do not choose a Service or Item detail line, you will not be able to create a Requisition.
If you do not locate an existing Service or Item detail line using [Find Doc. Line], you can create an entirely new detail line and Requisition.
Continue to complete the Requisition form by choosing an Item or Service. Enter quantities and costs as applicable. When you click [Add], the tree of the Document will appear. You must then choose a node in the tree (Phase, Equipment or Billing Group), where you wish to create the new Service or Item detail line and Requisition. This prevents a Requisition from being orphaned in Service Manager. If you do not select a node, it is not possible to create a Requisition.
Supplying Receipted Purchase Orders
Partially or fully receipted Purchase Orders can be supplied in bulk to Jobs using Requisition Manager. That is, you do not have to enter each Job directly to supply the service or item detail line. This can greatly speed up the process of receipting Purchase Orders where there are large numbers of Jobs in the system.
It is effectively like batch supplying receipted Purchase Orders.
Set up a query as follows. Select Vendor Order, With Purchase Orders, Partially Receipted or Fully Receipted, and Ready to Supply to Document.
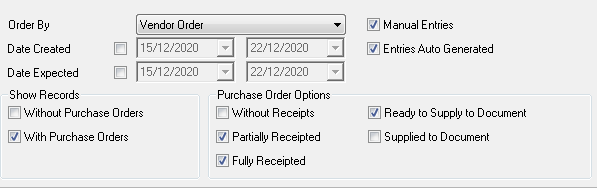
This query will display Jobs that have Services or Items on Purchase Order that have been partially or fully receipted that can be supplied to those Jobs.
Click Go to run the query.
![]()
Click Supply.
![]()
The Supply to Documents window will be displayed. It will list all Purchase Orders with receipts ready to be supplied to their associated Documents.
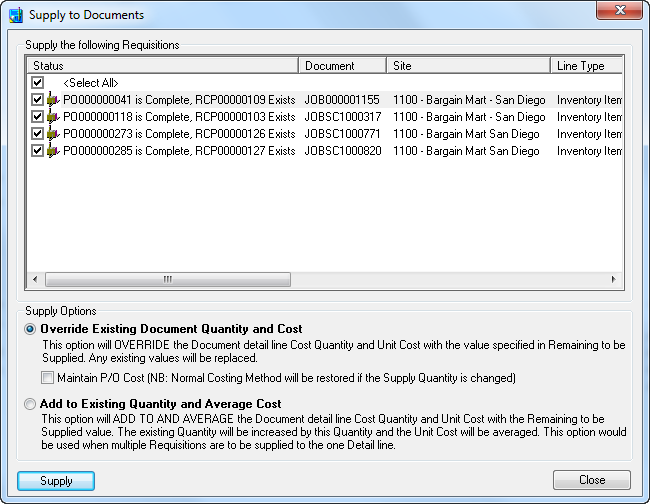
Clear the check box of detail lines you do not wish to supply to Jobs or Sales Orders as applicable.
Choose the method of Supply:
Override Existing Document Quantity and Cost
This option will override the Document detail line Supply Quantity and Unit Cost with the values in the Remaining to be Supplied fields. Any existing values in the Service or Item detail line will be overridden or replaced.
Add to Existing Quantity and Average Cost
Select this option where more than one Purchase Request has been added to the same Service or Item detail line and multiple receipts are to be supplied to that line.
The receipt quantity from the first receipt is added to the Supply Quantity in the Service or Item detail line in the Job or Sales Order. Subsequent receipts are accumulated to the Supply Quantity in those detail lines, and the Unit Cost is averaged across the total quantity.
The values are derived from the Remaining to be Supplied fields in the Service Manager Purchase Request.
Click [Supply] to supply the receipted Services or Items to their respective detail lines in the Jobs or Sales Orders they originated from.
Documents may not be open when using Requisition Manager to supply receipted quantities to detail lines. If a Document is open during this process, you will receive an Error message indicating that the Job or Sales Order is being edited by another user. The detail lines associated with the open Document will not post.