Recurring Postings

Contents
A Recurring Posting allows a Document, e.g., a Job or Agreement, to be posted automatically multiple times based on a schedule or frequency.
Note:
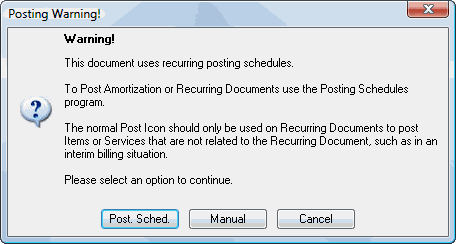
In Document Entry, if you post a Document that uses recurring posting schedules, the Posting Warning! popup will be displayed.
|
Creating Recurring Postings
Recurring Postings can be set up in the Billing Options window as part of the Job creation process or in V/M Documents » Posting Schedules.
On the Billing Options window, select Recurring Postings (Schedules).
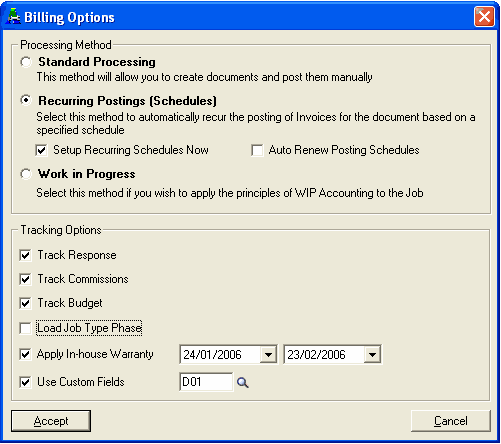
Tick the Setup Recurring Schedules Now check box to set up recurring schedules as part of the document creation process. If you don't want to set up the schedules now, you can set them up in V/M Documents » Posting Schedules.
Tick the Auto Renew Posting Schedules check box to create new schedule entries automatically at the expiry of an existing schedule, based on the last posted schedule. Refer Auto Renewing Recurring Billing or Recurring Jobs.
Note:
Auto Renew will not occur for Agreements if the Specified Period of Cover option is chosen in the Agreement and the cover expiry date has been reached.
Click [Accept].

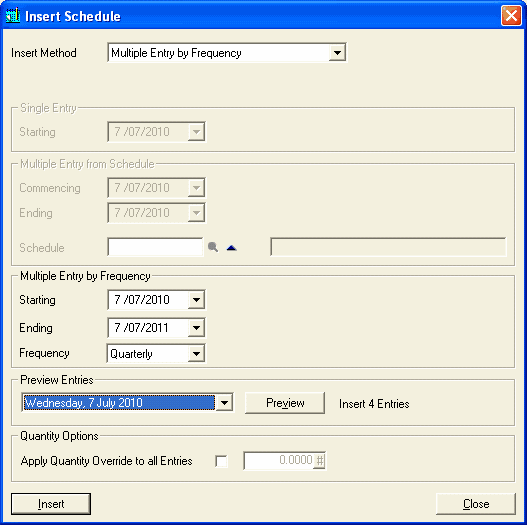
Insert Method
Single Entry - Create a single entry starting at the specified date.
Multiple Entry from Schedule - Create multiple entries commencing and ending on the specified dates based on the selected Schedule.
Multiple Entry by Frequency - Create multiple entries commencing and ending on the specified dates based on the selected Frequency.
Preview Entries
Click [Preview] to view the generated entries. The entries will be listed in the Preview Entries drop-down box.
Apply Quantity Override to all Entries
Tick the Apply Quantity Override to all Entries check box to override the Quantity on all the generated entries.
Refer Overriding Days in Cycle for all Cycle Entries.
Click [Insert] to view and adjust the cycles, if required.
Note:
The Select All check box applies only to those entries that are ready for posting (Due). Pending entries cannot be selected.
Hold Cycle
The Hold Cycle function allows you to hold an entire cycle within a schedule. The held schedule is ignored in the posting cycle.
This can be useful for billing purposes. For example, if using the Apply Cycle Days function, proration can now be specified over a noncontiguous period.
The Apply Cycle Days option uses the days in the period as the Supply/Committed quantity when preparing a detail line for posting. The Hold Cycle function provides the ability to bill a partial period within a cycle.
Example: If a 3-month agreement exists which is to be billed monthly from January to March, but the requirement is to bill only 15 days of February and not the entire 28 days, it is now possible to create two entries for February, one from the 1st to the 14th, hold this line, and then create a second entry from the 15th to 28th (inclusive), and let that line process as normal. When processed by the Posting Schedules program, the quantity billed for February would simply be 15.
To show this feature, create a new Job, Sales Order, Agreement or Recurring Job, and during the setup process, add a Posting Schedule. The example below uses a new Job for the purposes of illustrating this feature.
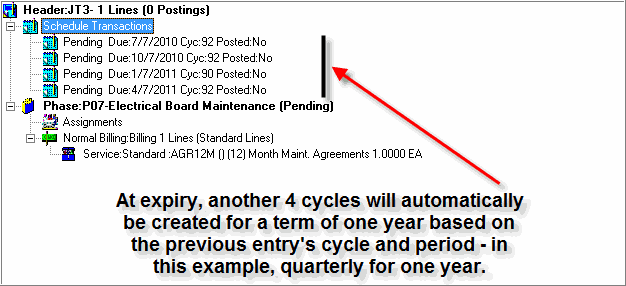
Click [Accept]. Add a Phase. The wizard will help you automatically create a schedule. Select a schedule method, apply a start and end date and frequency. The example below illustrates a one year term, billing quarterly.
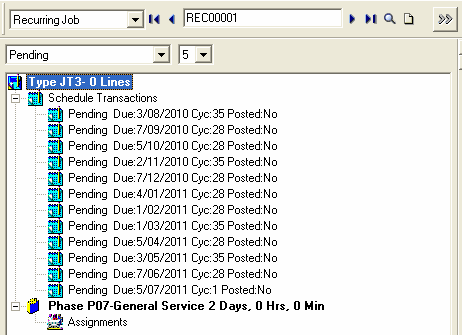
Click [Insert] to create the schedule.
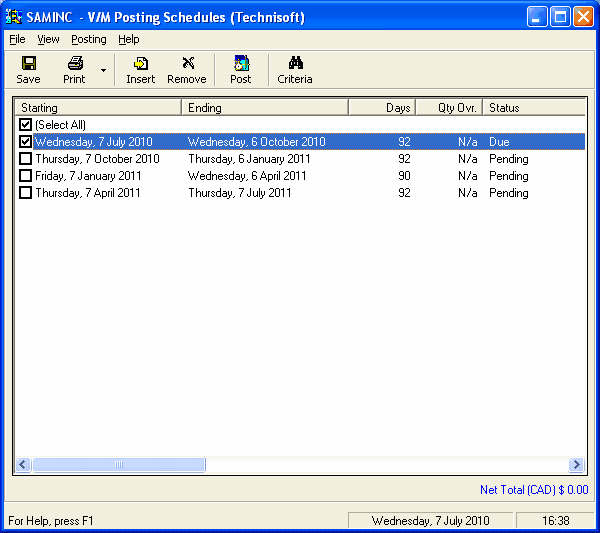
Double-click a Cycle.
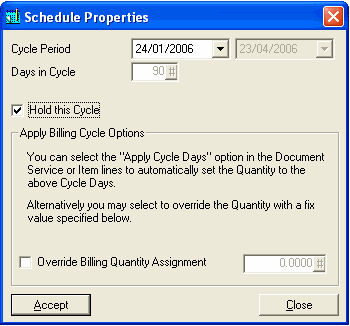
Tick the Hold this Cycle check box to hold a cycle.
Note:
•Inserting a single cycle between periods and then holding that cycle, can force a different number of cycle days to the standard when billing using the Apply Cycle Days function found in the detail line when adding a Service to a document.
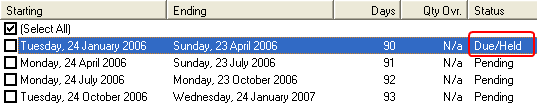
•Note that the Status of the held item is Held. This item will be ignored when the Posting Schedules program is run to determine any billing that is due.
Override Cycle Days
When using the Apply Cycle Days function to a billing schedule, it is now possible to override the actual days in a period so a prorated amount can be specified.
This can be a very useful feature when billing according to a fixed period of days but a proration occurs at the beginning, end or midway through a cycle.
Continuing with the example from the Hold Cycle section above, a Phase, Billing Group and Rental Service have been added to the job.

Note also the Apply Cycle Days switch has been ticked when adding the Rental Service. It is not necessary to populate the Supply Quantity field as this will be overridden with the days in the cycle when the Posting Schedules program updates the posting for billing purposes.

Click [Accept].
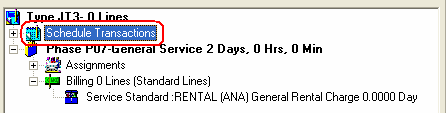
Highlight the Schedule Transactions node or any one of the actual schedules. Double-click to launch the Posting Schedules program.
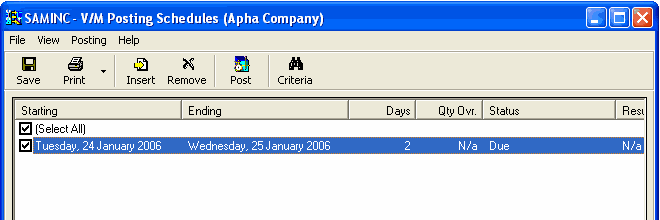
The Posting Schedules window will be displayed.
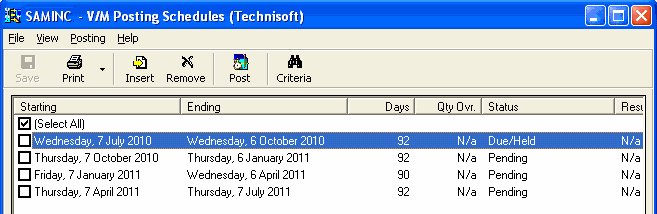
Double-click a cycle to launch the Properties for that cycle. Tick the Override Billing Quantity Assignment check box and type an override quantity. In the example below the cycle days of 92 has been set to 90.
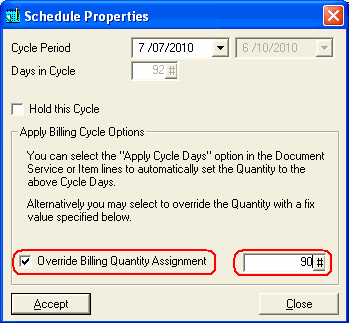
Click [Accept].
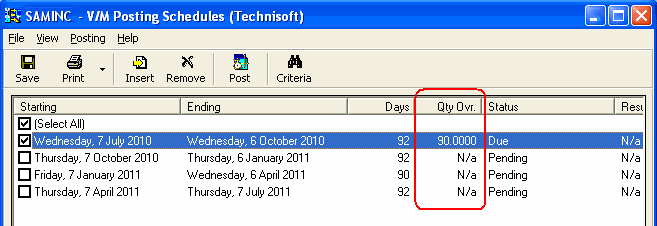
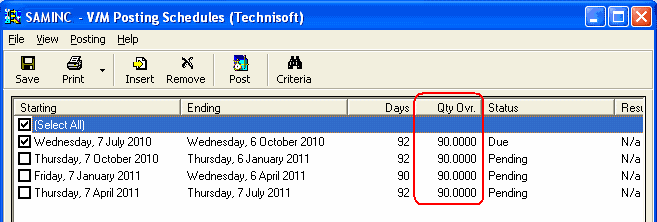
Note that Qty Ovr. (Cycle Days Quantity Override) now displays the override quantity. This quantity will be used by the Posting Schedules program instead of the cycle days when a cycle is due for posting. The override value is written to the Supply quantity field in the Service for billing purposes. In this example, 90 days would be used instead of 92.
A cycle quantity can be adjusted for any number of cycles in a schedule.
Overriding Days in Cycle for all Cycle Entries
When creating a new Schedule it is possible to override all cycle entries at once during the creation process.
When the Posting Schedules program invokes, tick the Apply Quantity Override to all Entries check box and specify a value to be used.
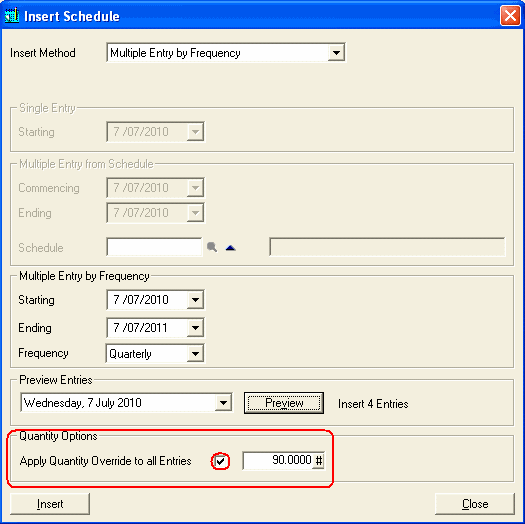
All entries in the schedule will be overridden with the value specified.
When the Posting Schedule program is run and a cycle is due, the Supply Quantity field in that document will be updated with the override value instead of the days in the cycle.
This can be very useful if prorating exact amounts.
Note:
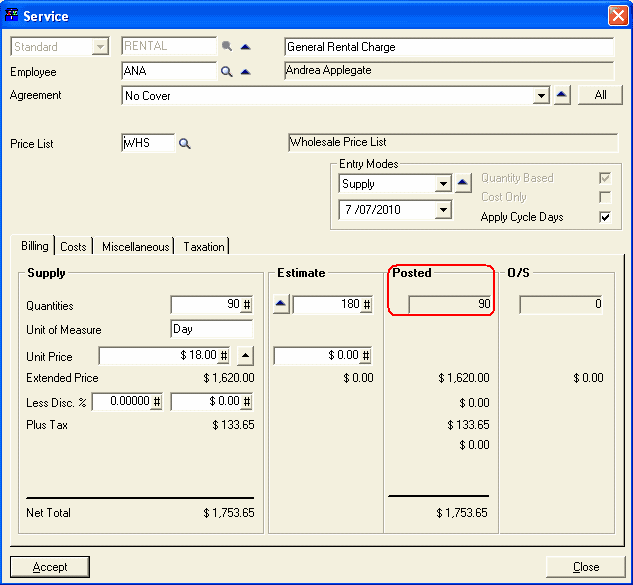
The Unit Price in the Service detail line should be a daily rate.
After running the Posting Schedules program on the example above, the Rental Service code's Supply Quantity field is updated with the 90 day override quantity value, and the invoice has been successfully posted.
Auto Renewing Recurring Billing or Recurring Jobs
The Auto renew Posting Schedules option affects recurring postings (invoicing), recurring jobs and agreement cycle billing (and therefore agreement period of cover, if used in conjunction with the Aligned Cover to Billing Cycle option discussed in the Site Agreements section).
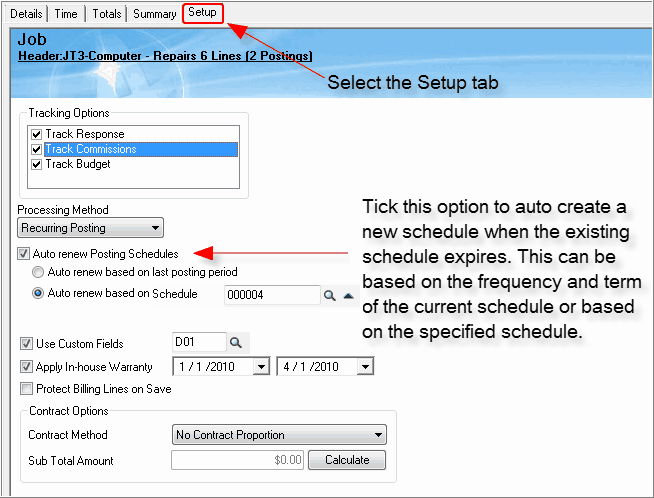
Tick the Auto renew Posting Schedules check box to auto create a new posting schedule when the existing schedule expires. This can be based on the last posting period or on the specified schedule. The new cycle periods are calculated and inserted based on the term and frequency of the previous schedule, extrapolated from the schedule expiry date.
It is no longer necessary to prepare several years of transactions in advance. A single starting point is all that is required and when that entry is posted, the next entry will be generated automatically based on the previous entry's cycle period and length. For example, if billing quarterly and you wish to auto renew the agreement quarterly, just create one scheduled transaction to bill quarterly, and tick the Auto renew Posting Schedules check box.
Recurring Job Schedules from Previous Completion Date
For Recurring Jobs, schedules can automatically update according to the completed date of the last job created by the recurring schedule. i.e., the cycle days in the schedule will be reset according to the date the previous job in the schedule was completed.
Therefore, if a job scheduled for regular maintenance is delayed and the completion date extended, it is possible to move the planned schedule by the change in completion date so work is not performed straight or soon after the completion of the previous job.
An example of this is where maintenance is planned every 30 days on the first Monday of the month for 12 months. During one scheduled job a part is required, but is not in stock. The part is put on backorder, and does not become available until the last week of the month. The job is then completed. The next job (per the schedule) is then due one week later. In some circumstances it would not make sense to perform another job so close to the completion of the previous job, so using the new feature, the next job and subsequent jobs not yet performed, would have their schedules adjusted by the difference between the standard schedule and the previous job's completion date. i.e., the duration between jobs based on Standard is moved by the completion date of the previous job.
This feature is only available for Recurring Job Documents.
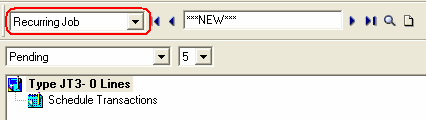
To use this feature, open Document Entry and select Document Type Recurring Job. Select a Site and then click [Accept]. The Billing Options window will be displayed.
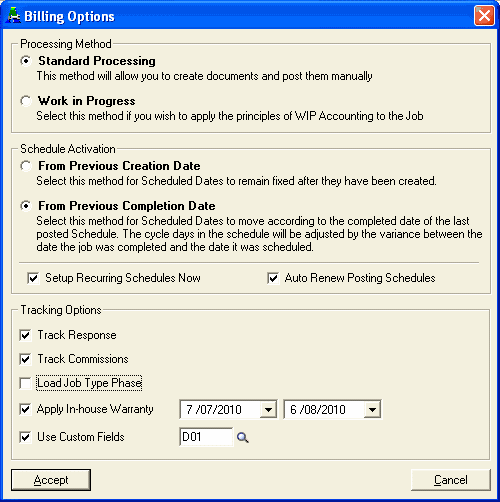
In the Schedule Activation section, the default is set to From Previous Creation Date. Select the other option, From Previous Completion Date.
Now complete the setup of the Recurring Job. It's that simple.
When completing a Document created by this schedule, the Document's Completed Date is compared to the Schedule's Due Date and the difference between the two dates is then reflected in future schedules as they will move by the difference in days.
The table below illustrates how this works:
Schedule # |
Due |
Completed |
Difference |
1 |
25/12/2003 |
29/12/2003 |
4 |
2 (BEFORE) |
25/1/2004 |
- |
- |
2 (AFTER) |
29/1/2004 |
- |
- |
Note:
If a completed Job is later manually uncompleted and then completed again, the schedules will move again accordingly, i.e., by the difference between the old completed date and the current completed date. We recommend that the original completed date be maintained in this case.
If, for example, you reopen a completed job to pass a credit note, the program will maintain the original completion date for you automatically if that job was created from a schedule.
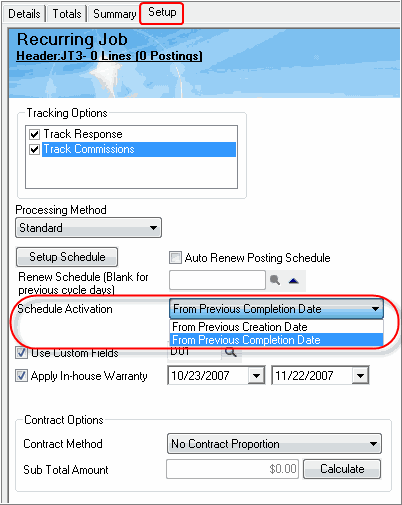
Once the Recurring Document has been created, these options are also available from the Setup tab in case a mistake in selection was made during creation.
Select the Setup tab. Notice the Schedule Activation section – Service Manager offers two options, From Previous Creation Date and From Previous Completion Date.