Creating a Site Agreement

Contents
 »
»  »
» ![]() » Site Agreement
» Site Agreement
Steps
1.Select the Bill To Customer
2.Set up the Agreement Header
3.Set up the Agreement Details
4.Select Cover Levels - cover all or selected Equipment at the Site
5.Publish the Agreement (if covering selected Equipment)
6.Set up a Recurring Billing Schedule if required
7.The Agreement will be displayed in Document Entry
In Document Entry:
1.Set up the Agreement Document for Invoicing
2.Post / Invoice the Agreement Charges
Select Customer
![]()
Enter the Customer Number and then click Go ![]() .
.
If no Agreements exist for the selected Customer, the Insert New Agreement window will be displayed.
If a Customer has existing Agreements, click the New Agreement icon on the toolbar.
![]()
The Insert New Agreement window will be displayed.
Set up Agreement Header
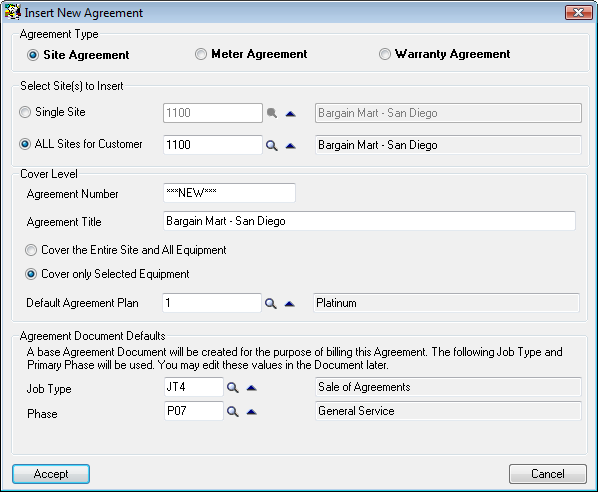
Select Agreement Type: Site Agreement.
Select the Site to be covered by the Agreement. You can specify a Single Site or ALL Sites for Customer. If you specify a Single Site, then additional Sites can be added later. Refer Covering Equipment at Multiple Customer Sites.
The Agreement Number will default to the next available Site Agreement Number when the Agreement is saved. If this is not what you require, enter an Agreement Number.
The Agreement Title defaults to the Customer Name. Change the Agreement Title if required.
All or specific Equipment can be covered at the Site. Select Cover the Entire Site and All Equipment to cover all Equipment at the Site. Select Cover only Selected Equipment to cover specific Equipment at the Site.
Enter or select the Default Agreement Plan for the Agreement. Agreement Plans are set up in V/M Setup » V/M General » Agreement Plans.
Enter or select the default Job Type and Phase to be used in the Agreement Document.
Click [Accept]. The Agreement Setup wizard will be displayed. Step 1 will be highlighted.
Step 1: Set up Agreement Details
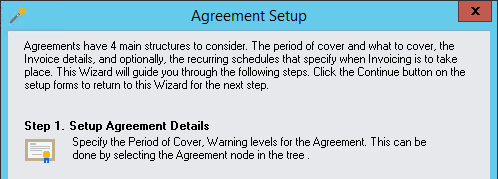
Click [Continue].
The Agreement Setup window will be displayed. The Agreement details are shown in the right-hand pane of the window.
Profile tab
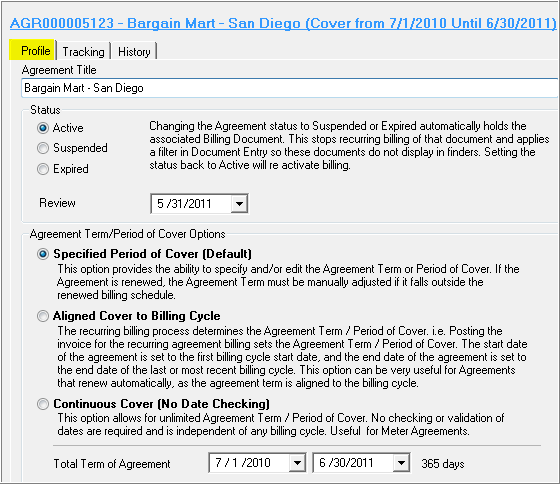
Agreement Title
The Agreement Title as specified on the Insert New Agreement window.
Review Date
Set the Review Date required. The Review Date default is set in Company Options.
Status
The Agreement Status can be Active, Suspended or Expired. Set the Review Date required.
Agreement Term/Period of Cover Options
Specified Period of Cover
This option will allow you to manually state the period of cover for the Agreement. If a billing schedule falls outside the agreement term, the agreement term/period must be manually adjusted to align with the next term or period to be covered.
Aligned Cover to Billing Cycle
This option ties the agreement term/period of cover directly to the billing cycle. When a billing is due and an invoice is posted, the posting automatically updates the term/period of cover at the same time.
The start date of the agreement is set to the first billing cycle start date as set up in the billing schedule. The end date of the agreement is set automatically to the last or most recent billing cycle end date.
This option can therefore be very useful for setting up an automatic agreement renewal based on billing cycle, where the term of the agreement is aligned to the current billing cycle.
This option is only available if the Agreement in Document Entry uses the Recurring Posting method of billing.
To use this option, when creating an agreement, choose Aligned Cover to Billing Cycle and insert a schedule. When posting an invoice that is due using the Posting Schedules program, the cover period for the agreement will be automatically set to that of the end date of the current period cycle. This ensures that the billing cycle and period of cover are always the same.
Continuous (No Date Checking)
This option allows for an unlimited agreement term/period of cover. No checking or validation of dates is required and is independent of the billing cycle. This can be useful when using meter agreements.
Use this option if there is no specific commencement or expiry date checking required and the agreement should always be considered valid.
Total Term of Agreement
By default, the Total Term of Agreement is set to twelve months from the current Sage 300 session date. The number of days in this term is displayed next to the date range.
Tracking tab
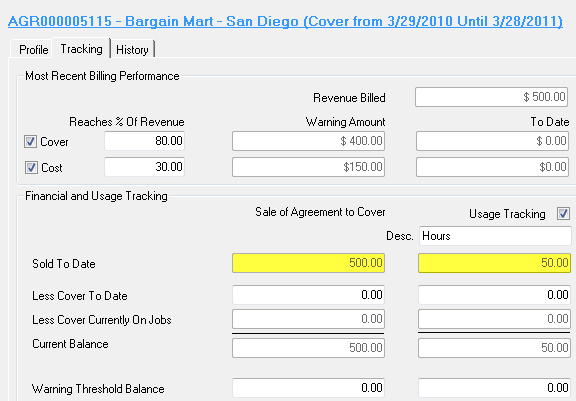
Use the Tracking tab to have the system display Warning messages if, for example, the Cover reaches 80% of Revenue and/or the Cost reaches 30% of Revenue. This is very useful for tracking Cost Only applied to a contract.

Billing Warnings
Revenue Billed
Information only.
Billing Warning based on Cover

In this example, if the Cover reaches 80% of the Revenue, a Warning message will be displayed advising this criteria has been met. This is very useful for tracking coverage to renew or re-bill the agreement when the time arises.
The Revenue Billed Warning Amount and To Date are also displayed. These fields will become populated as the Agreement is used. No data appears until then.
Billing Warning based on Cost

In this example, if the Cost reaches 30% of the Revenue, a Warning message will be displayed advising this criteria has been met. This is very useful for tracking costs to examine the viability of an agreement.
The Revenue Billed Warning Amount and To Date are also displayed. These fields will become populated as the Agreement is used. No data appears until then.
Financial and Usage Tracking

Tick the Usage Tracking check box for Usage based Agreements. The left column of data is always displayed. The right column of data relates to usage based Agreements only. Usage based data is only displayed if the Usage Tracking check box is ticked.
A Usage based Agreement is one where a Customer purchases cover for x Usage Units. The available Usage is decreased when entering Service and Item billing lines on a Document covered by the Usage Agreement.
Example
A Customer purchases 50 hours over a 12-month period at a cost of $500.00. The Usage Units purchased is entered in the Service used to bill the Customer.
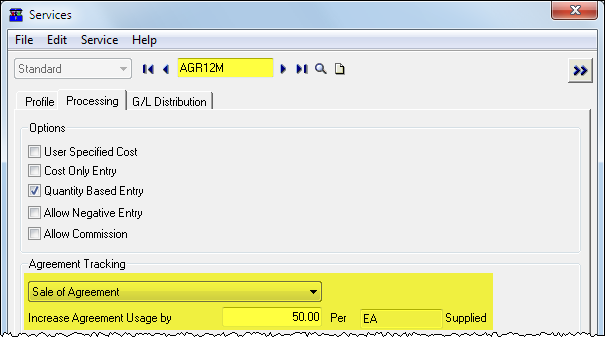
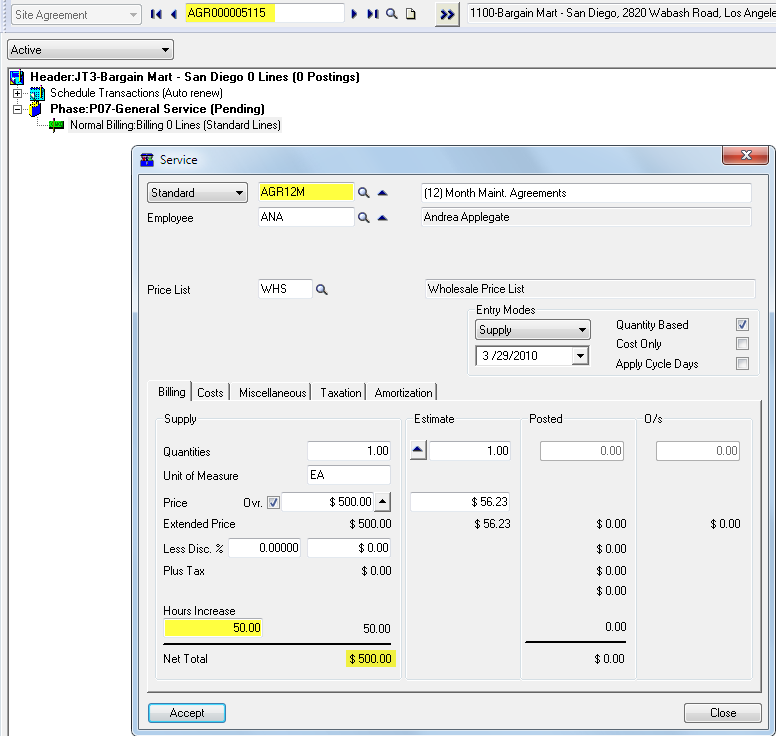
These values are shown in the Agreement once the Agreement document has been posted.
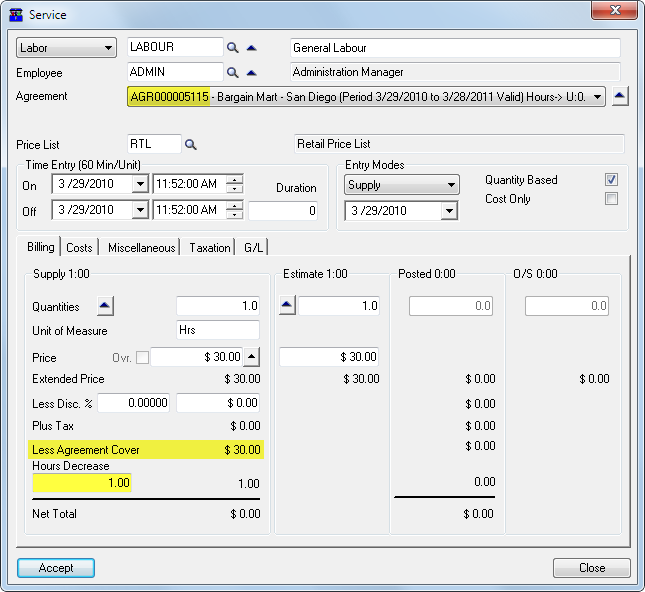
When billing under the Usage Agreement, you must enter the usage applicable to each Service or Item line.
In this example, a one hour labor charge is given a usage value of 1 unit, i.e., for each hour of labor, the available usage balance is reduced by 1.
This Item line is given a usage value of 2 units.
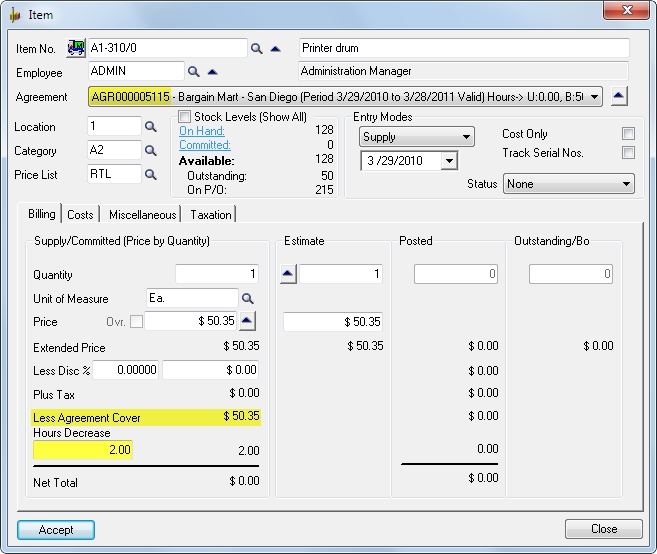
The net result after posting the Service and Item lines is shown below.
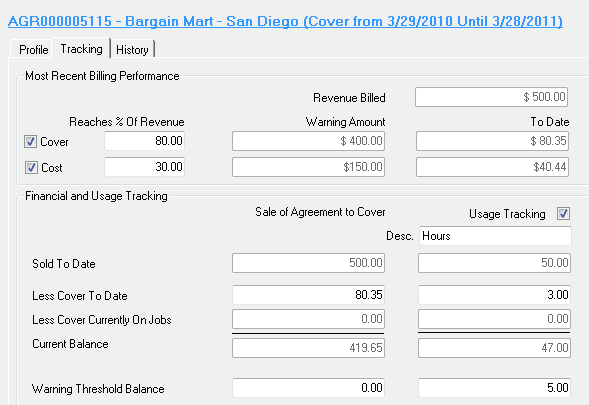
Usage Desc. - Usage Unit Description, e.g., Hours.
Sold to Date - Information only.
Cover to Date - This may be edited if required to take up values from paper based Agreements, for example.
Cover Currently on Jobs - Information only.
Current Balance - Information only.
Warning Threshold Balance - A Warning message can be displayed to advise the operator that the Current Balance has fallen below a set value. This can be used to identify prospective renewals early.
Prevent Job from Posting if current balance falls below Threshold value - Tick this check box to prevent the Job from posting if the Current Balance falls below the Warning Threshold Balance.
Auto Renew Billing if current balance falls below Threshold value (auto inserts new posting schedule) - Tick this check box to automatically renew billing (create a new posting schedule) if the Current Balance falls below the Warning Threshold Balance.
Reset Values After Invoice - Sets all values to zero after Billing.
Outside Business Hours Warning
Service Manager can warn the operator and create a Warning message if the customer requires service outside of normal business hours.
History tab
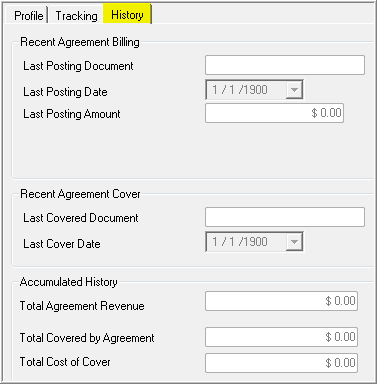
The History tab of each Agreement will display Recent Agreement Billing, Recent Cover and Accumulated History.
Click [Continue] to return to the Agreement Setup wizard. Step 2 will be highlighted.
Step 2: Select Cover Levels

Click [Continue].
In this step you will specify the Equipment to cover by the Agreement and if covering selected Equipment, Publish the Agreement to automatically create a Billing Group with one or more Service lines to bill the Agreement.
Cover all Equipment at the Site
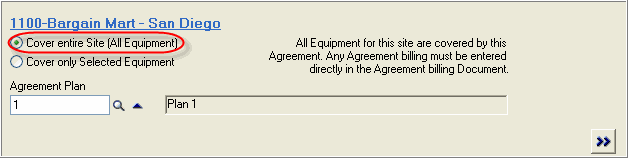
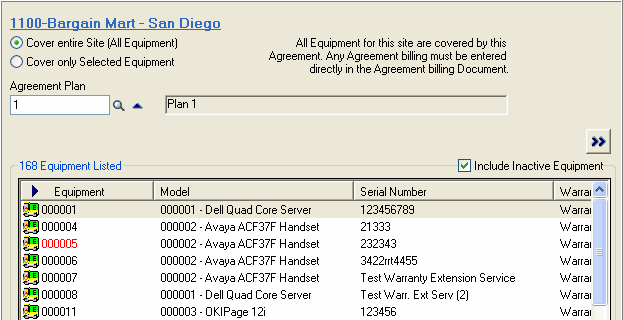
Select Cover entire Site (All Equipment) to cover all Equipment at the Site.
Change the default Agreement Plan if required.
Click Go ![]() to list all the Equipment at the Site. All Active Equipment will be listed. To also list Inactive Equipment, i.e., show all Equipment, tick the Include Inactive Equipment check box. Inactive Equipment will be shown in red.
to list all the Equipment at the Site. All Active Equipment will be listed. To also list Inactive Equipment, i.e., show all Equipment, tick the Include Inactive Equipment check box. Inactive Equipment will be shown in red.
Double-click an Equipment line to view the Equipment properties.
Note:
You will need to create a Billing Group and Service line manually in Document Entry to bill this Agreement.
Click [Continue] to return to the Agreement Setup wizard. Step 3 will be highlighted.
Cover Selected Equipment
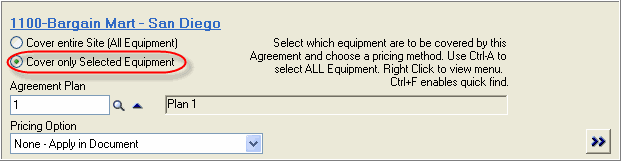
Select Cover only Selected Equipment to cover selected Equipment at the Site.
Change the default Agreement Plan if required.
Select a Pricing Option.
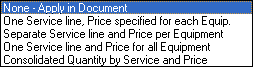
None - Apply in Document
You will need to create a Billing Group and Service line manually in Document Entry to bill this Agreement.
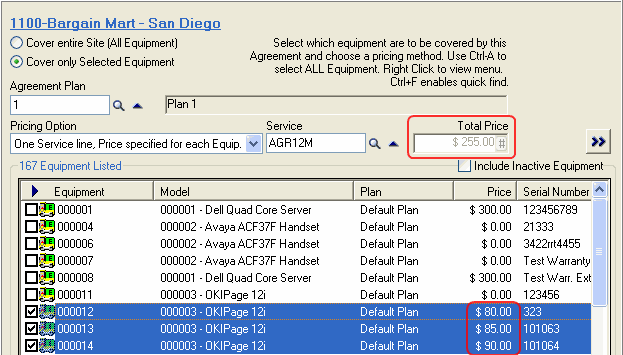
One Service line, Price specified for each Equip.
A Billing Group with one Service line will be created in Document Entry to bill this Agreement.
Enter or select the Service Code to default on the Service line. Click Go ![]() to list all the Equipment at the Site. Click [Yes] if prompted to Save changes.
to list all the Equipment at the Site. Click [Yes] if prompted to Save changes.
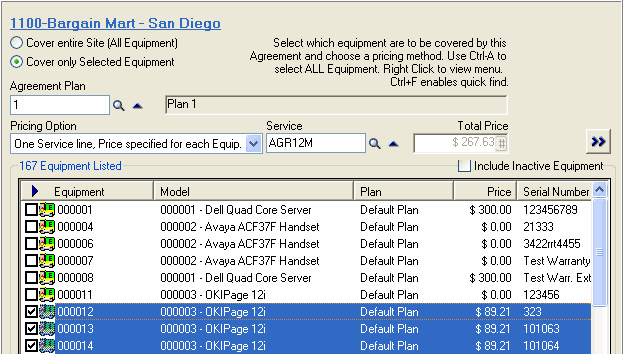
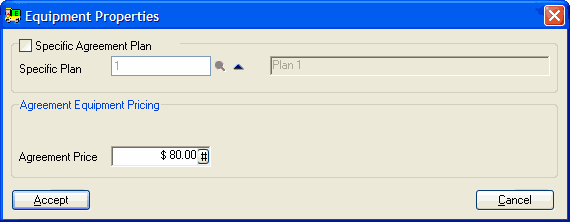
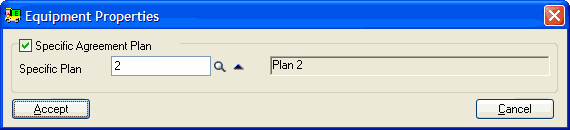
Double-click each Equipment item to be covered by the Agreement to enter the price to cover that piece of Equipment. If the Equipment is to be covered by a plan different to the default plan for the Agreement, tick the Specific Agreement Plan check box and enter or select the Specific Plan number.
Click [Accept].
Note:
You can set the Equipment Properties - Specific Plan and Agreement Price - for multiple pieces of Equipment. To do this, tick and select the Equipment to modify, right-click on the selected Equipment and select Edit All Selected Equipment.
The total price for all Equipment covered by the Agreement is shown in Total Price.
Note:
You will need to Publish the Agreement to create the Billing Group and Service line in Document Entry.
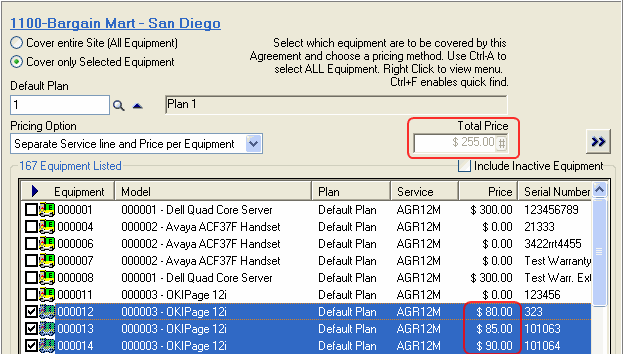
Separate Service line and Price per Equipment
A Billing Group with one Service line for each piece of Equipment covered by the Agreement will be created in Document Entry to bill this Agreement. In the example below, three Service lines will be created.
Click Go ![]() to list all the Equipment at the Site. Click [Yes] if prompted to Save changes.
to list all the Equipment at the Site. Click [Yes] if prompted to Save changes.
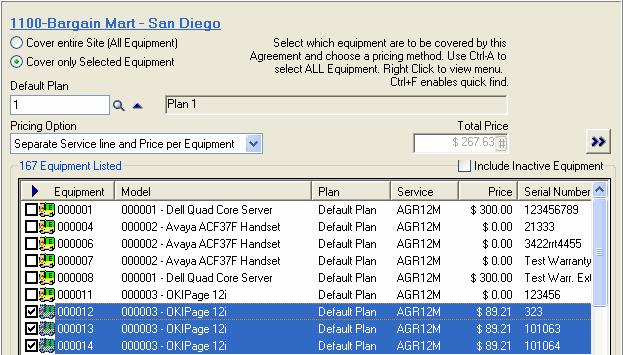
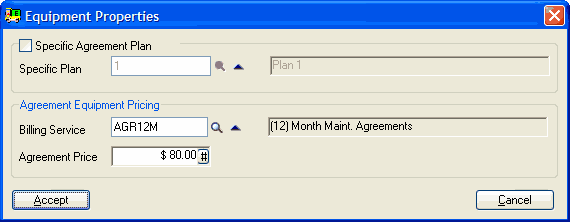
Double-click each Equipment item to be covered by the Agreement to enter the Service Code to default on the Service line and the Price to cover that piece of Equipment. If the Equipment is to be covered by a plan different to the default plan for the Agreement, tick the Specific Agreement Plan check box and enter or select the Specific Plan number.
Click [Accept].
Note:
You can set the Equipment Properties - Specific Plan, Service Code and Agreement Price - for multiple pieces of Equipment. To do this, tick and select the Equipment to modify, right-click on the selected Equipment and select Edit All Selected Equipment.
The total price for all Equipment covered in the Agreement is shown in Total Price.
Note:
You will need to Publish the Agreement to create the Billing Group and Service line(s) in Document Entry.
One Service line and Price for all Equipment
A Billing Group with one Service line will be created in Document Entry to bill this Agreement.
Enter or select the Service to default on the Service line and enter the Total Price of the Agreement. Click Go ![]() to list all the Equipment at the Site. Click [Yes] if prompted to Save changes.
to list all the Equipment at the Site. Click [Yes] if prompted to Save changes.
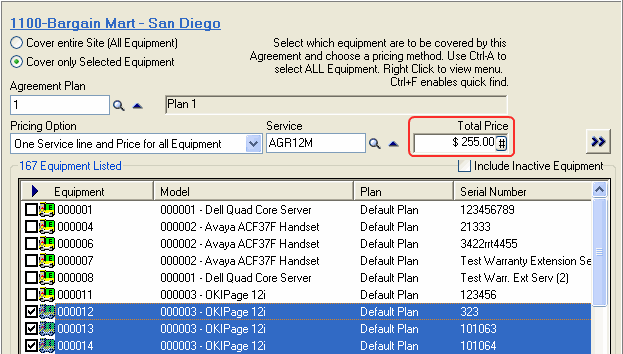
Tick each Equipment item to be covered by the Agreement. If the Equipment is to be covered by a plan different to the default plan for the Agreement, double-click the Equipment item, tick the Specific Agreement Plan check box and enter or select the Specific Plan number.
Click [Accept].
Note:
•You can set the Specific Plan for multiple pieces of Equipment. To do this, tick and select the Equipment to modify, right-click on the selected Equipment and select Edit All Selected Equipment.
•You will need to Publish the Agreement to create the Billing Group and Service line in Document Entry.
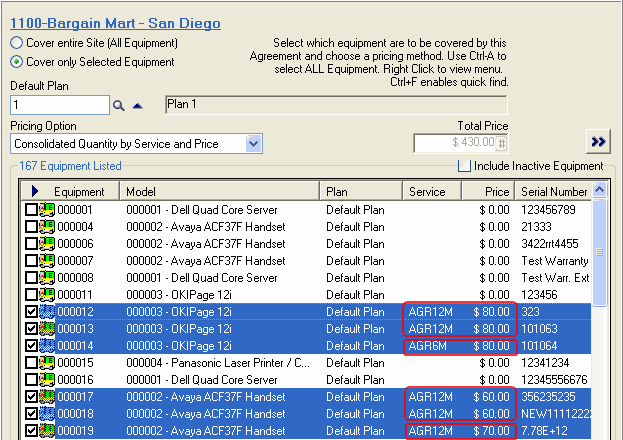
Consolidated Quantity by Service and Price
A Billing Group with one Service line for each unique Service/Price combination will be created in Document Entry to bill this Agreement.
Enter or select the Service Type to default on the Service line and enter the Total Price of the Agreement. Click Go ![]() to list all the Equipment at the Site. Click [Yes] if prompted to Save changes.
to list all the Equipment at the Site. Click [Yes] if prompted to Save changes.
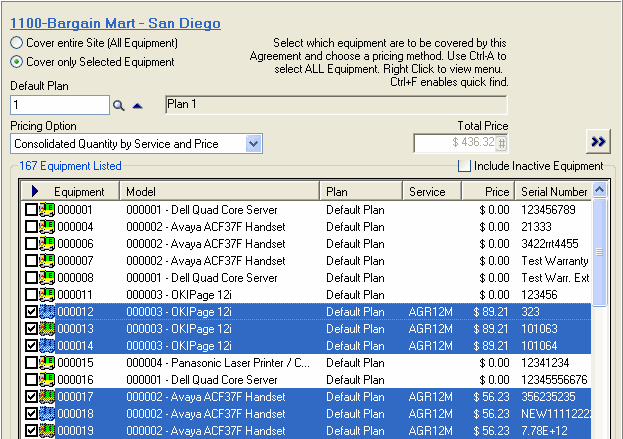
Double-click each Equipment item to be covered by the Agreement to enter the Service Code to default on the Service line and the Price to cover that piece of equipment. If the Equipment is to be covered by a plan different to the default plan for the Agreement, tick the Specific Agreement Plan check box and enter or select the Specific Plan number.
Click [Accept].
Note:
You can set the Equipment Properties - Specific Plan, Service Code and Agreement Price - for multiple pieces of Equipment. To do this, tick and select the Equipment to modify, right-click on the selected Equipment and select Edit All Selected Equipment.
The total price for all Equipment covered in the Agreement is shown in Total Price.
In the example below, four Service lines will be created:
1.Service AGR12M, Price $80.00, Supply Quantity 2.
2.Service AGR6M, Price $80.00, Supply Quantity 1.
3.Service AGR12M, Price $60.00, Supply Quantity 2.
4.Service AGR12M, Price $70.00, Supply Quantity 1.
Note:
You will need to Publish the Agreement to create the Billing Group and Service line(s) in Document Entry.
Click [Accept] to save changes to the equipment covered.
Click [Continue] to return to the Agreement Setup wizard. Step 3 will be highlighted.
Covering Equipment at Multiple Customer Sites
To cover Equipment at an additional site, click the Add Sites icon on the toolbar.
![]()
The Insert Customer/Site window will be displayed.
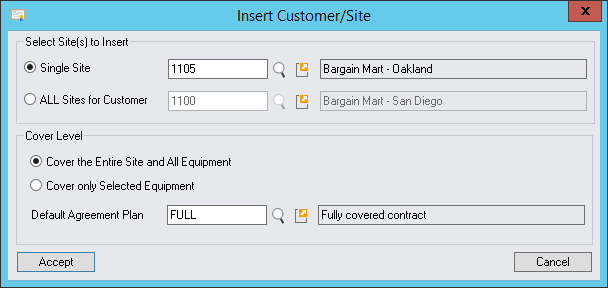
Select the Site (or ALL Sites for Customer), Cover Level and Default Agreement Plan. Click [Accept]. Select the Equipment to cover.
An Agreement that covers Equipment at two Sites is shown below.

Publishing an Agreement
Publishing the Agreement will automatically create the Billing Group and Service line(s) in Document Entry to bill the Agreement.
To Publish an Agreement, click the Publish icon on the toolbar.
![]()
The Publish Agreement Document window will be displayed.
The following example shows a Site Agreement covering three pieces of Equipment, charged separately.
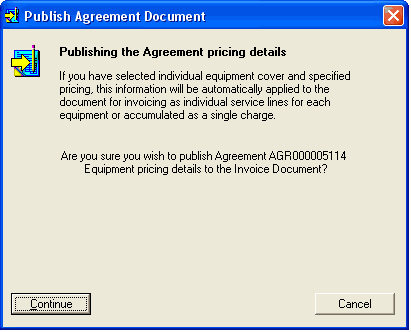
Click [Continue].
A Warning message will be displayed.
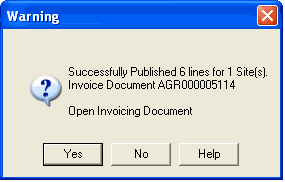
Click [No] to return to the Select Cover Levels pane.
Click [Yes] to display the Agreement in Document Entry.

Close the Document Entry window to return to the Insert New Agreement window.
To return to the Document Entry window from the Insert New Agreement window, click the Invoicing icon on the toolbar.
![]()
Step 3: Set up Recurring Invoice Schedules
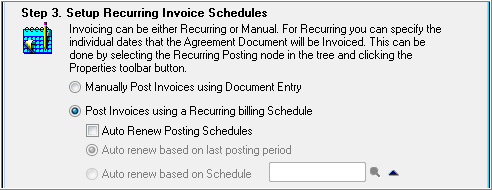
Select Manually Post Invoices using Document Entry or Post Invoices using a Recurring billing Schedule.
Click [Continue].
Manually Post Invoices using Document Entry
Select Manually Post Invoices using Document Entry to post the Agreement invoices manually using Document Entry.
Click [Continue]. The Agreement Setup wizard will remain displayed. Step 4 will be highlighted.
Post Invoices using a Recurring billing Schedule
Refer Recurring Postings for information about setting up recurring billing schedules. Auto renewing billing is covered in the Auto Renewing Recurring Billing or Recurring Jobs section.
Close the Insert Schedule window and Posting Schedules window (if open) to return to the Agreement Setup wizard. Step 4 will be highlighted.
Step 4: Set up the Agreement Document for Invoicing
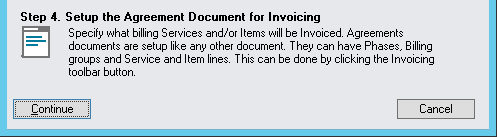
Click [Continue].
The Agreement will be displayed in Document Entry.
Review the Agreement billing. If a Billing Group and Service line(s) were not created automatically as part of the Insert New Agreement process, add them now.
If you require a Recurring Billing schedule for the Agreement, add it now.
Inserting a Billing Group and Service Line Manually
Billing Group
Insert a Billing Group.
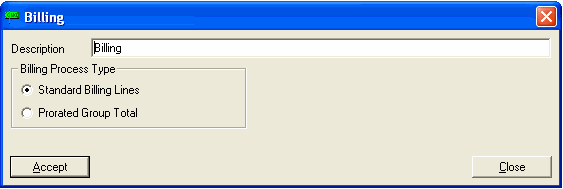
Select Standard Billing Lines and then click [Accept].
Service Line
Add a Service Line to the Billing Group to post an invoice and complete the process.
The Service window will be displayed.
Select Standard and enter AGR12M for the Service Code. Press Tab to refresh the details.
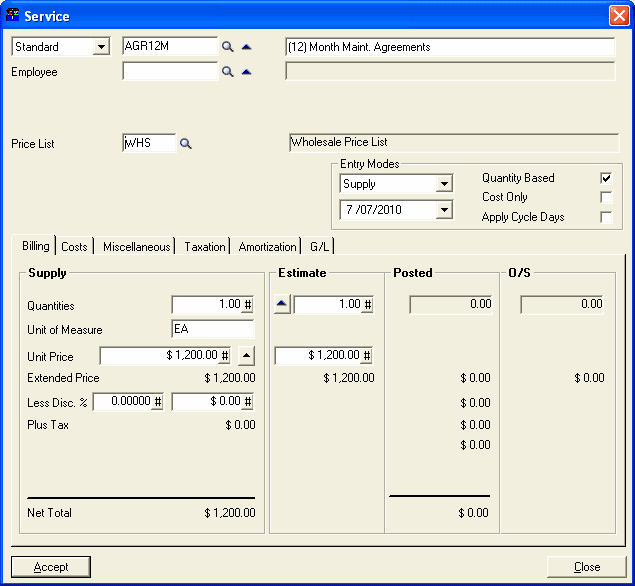
Check that the details are correct. Check that the currency is set correctly if your company uses multicurrency accounting.
Amortization tab
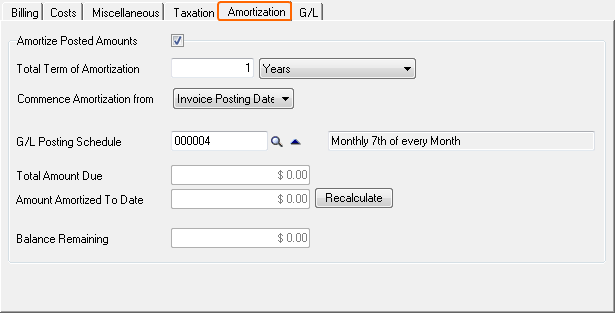
Service Manager provides a tab for amortization processing. When the agreement is sold, it credits an unearned income account on the balance sheet.
Tick the Amortize Posted Amounts check box to enable amortization.
Select the Total Term of Amortization.
Select the start date of the amortization. If you select Specified Date, you must then enter the date.
![]()
Select the G/L Posting Schedule. In the example above, a Monthly Posting Schedule - the 7th day of every Month - has been selected.
Refer also Crediting an Amortization.
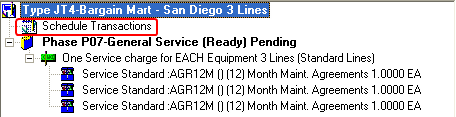
Posting and Invoicing the Agreement Charges
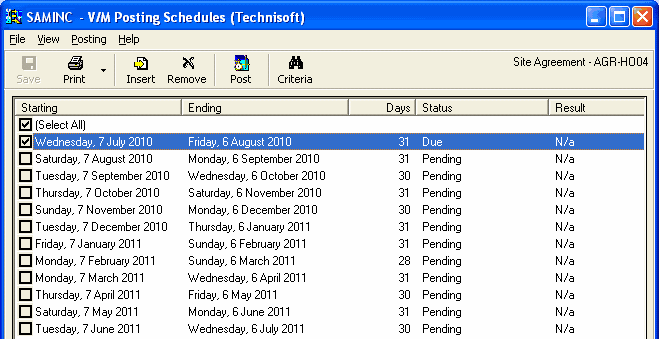
Double-click the Schedule Transactions node in the Document tree.
This will display the Posting Transactions and allow you to post any outstanding billing. Note that the ticked items will post. Click the Post icon on the toolbar to continue.
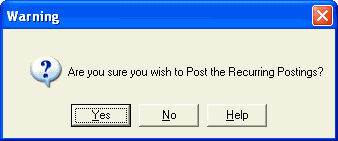
Click [Yes] to post the Recurring Postings.
Click [Yes] to continue.

Click [OK] to continue.
View Postings option from menu
To view the posted document(s), right-click the Service Line and select the View Postings/Credit option from the drop-down list.
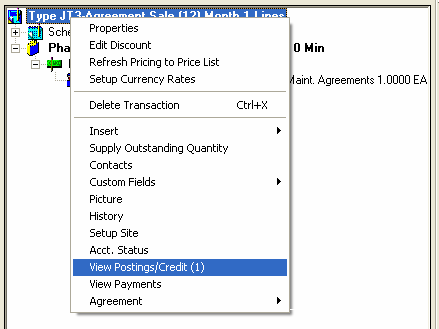
The Posting Inquiry window will be displayed. You can now view and print the Invoice details.

Selecting and viewing Agreements in Document Entry
Agreement pop-up window
When you create a Job for a Site that is covered by an Agreement, the Agreement pop-up window will be displayed showing all details of the cover provided by the Agreement.
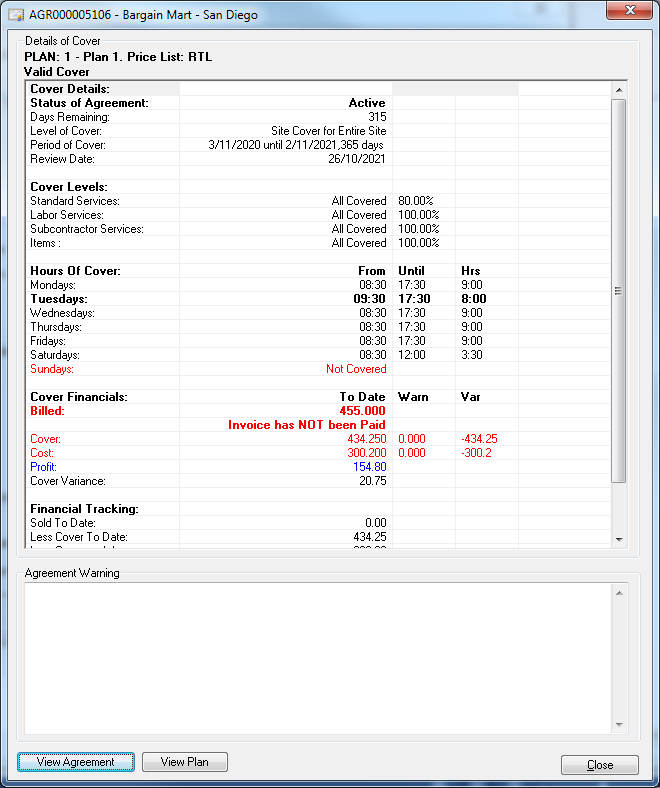
Refer Job Header » Agreement Pop-up Window.
Displaying all Agreements for the Site
The Site Level Agreement Section of the Job Header will list all Agreements for the Site. Only Valid Agreements will be shown when creating a Job.
You can display details of the cover provided by the selected Agreement, show Agreement profitability and display all Agreements for the Site, both Valid and Invalid.
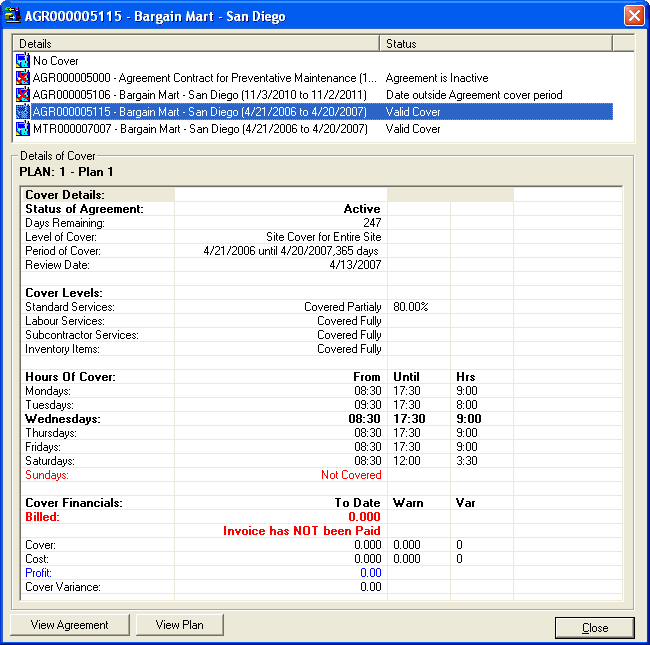
Refer Job Header » Site Level Agreement Cover.
Agreements covering individual Services and Items
Refer Services » Agreement.
Creating a Recurring Billing Schedule from Document Entry
Double-click the Schedule Transactions node.
Set up the required billing schedule. Recurring Billing Schedules are explained in detail in Recurring Postings.