Using the Request Manager with the Customer Web Portal

Contents
 »
» 
IMPORTANT NOTE
If you are not using the optional Service Manager Customer Web Portal, please refer to the Requests help topic.
Note:
If the Service Manager Customer Web Portal is installed, "On-line Customer Web Portal is Installed" will be displayed at the bottom left corner of the screen of the Request Manager window. If the Service Manager Customer Web Portal is not installed, "On-line Customer Web Portal NOT Installed" will be displayed.
Overview
Request Manager is a call center style application that enables requests for break down service or preventative maintenance to be logged and then managed. With Request Manager, support staff can post Requests to Service Manager Jobs and manage both the Request and Job easily from a central point.
Requests can be entered directly into the Request Manager or they can be sourced from the optional Service Manager Customer Web Portal, which enables Customers to use the Web to quickly log and monitor requests.
About the Service Manager Customer Web Portal
The Service Manager Customer Web Portal allows your Customers to access and transact with your business online using a web browser. This speeds up response times providing better customer satisfaction and as an added benefit, business overheads and costs are reduced as less time is spent on telephones logging information or answering questions.
Customers can log new job requests, view the status of existing jobs, check their site and equipment details including billing history, purchase details, total cost of ownership, agreement/contract information, preventative maintenance schedules, and job related tasks and activities. Equipment, model and site searches are also readily available.
In a typical scenario, a service company provides its customers with a link to a secure login page to its Customer Web Portal. Customers log in to the Customer Web Portal and then create and monitor requests and access related information. The service company controls who will be able to access its Customer Web Portal and defines the security rights of each user.
An email notification will be sent automatically to the service company when a request is created in the Customer Web Portal. Support staff can process the request and post it to a Service Manager Job or take other action, as required.
If you are an End User and would like more information about the Service Manager Customer Web Portal, please contact your Sage 300 Solution Provider.
If you are a Business Partner and would like more information about the Service Manager Customer Web Portal, please contact Technisoft at technisoft@technisoft.com.au.
Related Topics
Service Manager Customer Web Portal
Setting Security Rights for Customer Web Portal Users
Starting the Request Manager
Note:
Request Manager and the Request desktop icon will only be available if Request Entry security is set for the user. Refer Service Manager security.
Click the Request desktop icon.
The Request Manager window will be displayed.

Note:
If the Service Manager Customer Web Portal is installed, "On-line Customer Web Portal is Installed" will be displayed at the bottom left corner of the screen. If the Service Manager Customer Web Portal is not installed, "On-line Customer Web Portal NOT Installed" will be displayed.
Reviewing Requests
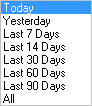
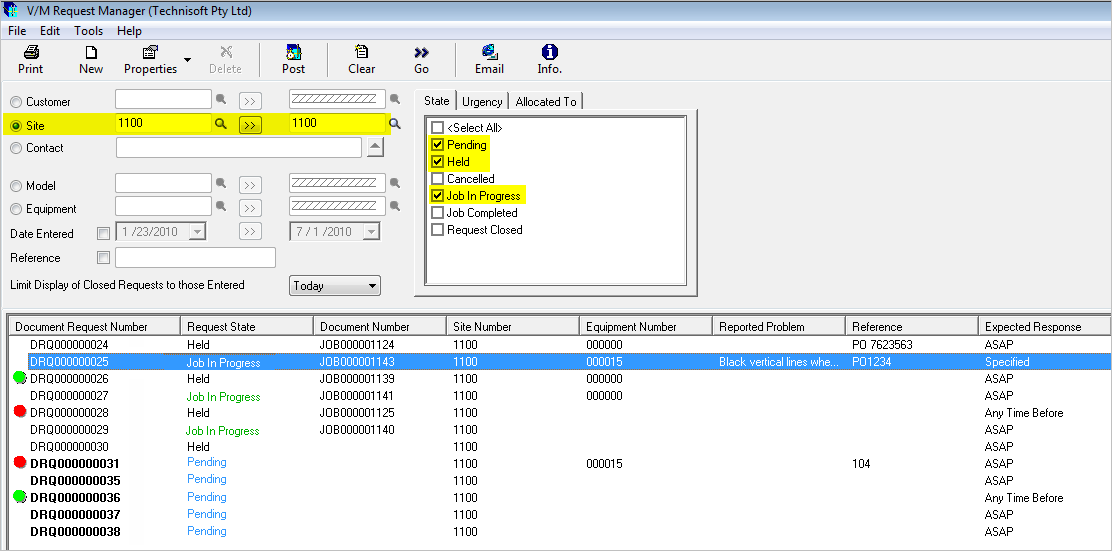
1. Specify the Search Criteria
You would normally review Requests that meet certain criteria, e.g., Requests for a particular Customer, Site, Contact, Model, Equipment, Date Entered, Reference, Request State, Urgency, Source, Workflow and/or Allocated To Employee.
You can limit the display of Closed Requests to those Entered
Note that a "LIKE" (or "contains") match is performed on the Reference field. e.g., typing "76" in the Reference field will return any Request that contains "76" anywhere in the Request Reference field, such as "PO 7623563".
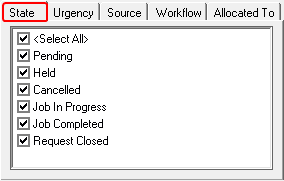
State
Request State |
Description |
Allowable Actions |
Pending |
This Request State is set automatically when Creating or Reactivating a Request.
It indicates that the Request has not yet been posted to a Service Manager Job. |
A Pending Request may be held, canceled or deleted. A Pending Request cannot be reactivated. |
Held |
This Request State is set automatically when Holding a Request using the Hold selected Pending Requests right-click menu item or holding the Request in the Customer Web Portal.
Only Pending Requests can be Held. |
A Held Request may be canceled, reactivated or deleted. Held Requests can be reactivated using the Reactivate selected Requests right-click menu item. A reactivated Request will be set to Pending. |
Canceled |
This Request State is set automatically when deleting the associated Job, Canceling a Request using the Cancel selected Requests right-click menu item or canceling the Request in the Customer Web Portal.
Only Pending or Held Requests can be Canceled. You cannot cancel a Job In Progress Request. |
A Canceled Request may be reactivated or deleted. Canceled Requests can be reactivated using the Reactivate selected Requests right-click menu item. A reactivated Request will be set to Pending. |
Job In Progress |
This Request State is set automatically when the Request is posted to a Service Manager Job. |
The Request State of a Job In Progress Request cannot be changed manually. Service Manager will however set the Request State to Canceled if the associated Job is deleted, or to Job Completed if the associated Job is Completed. |
Job Completed |
This Request State is set automatically when the Job Status is set to Completed. |
A Job Completed Request may be closed. |
Request Closed |
This Request State is set automatically when Closing a Request using the Close selected Completed Requests right-click menu item or closing the Request in the Customer Web Portal. |
A Closed Request may be deleted. |
Note:
A Request can only be deleted if the Workflow for the Request is cleared by the service company.
Press ![]() to show a Request State Workflow Diagram.
to show a Request State Workflow Diagram.
Urgency
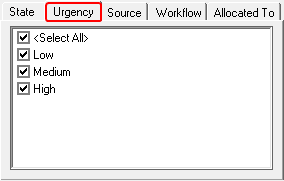
The Urgency is set initially when the Request is created. The Urgency may be modified.
Source
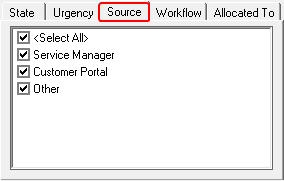
Requests are created from Service Manager (using the Request Manager) or the Customer Portal. It is also possible to import Requests (from a spreadsheet, for example), or create Requests programmatically (using a macro or other application). In this case, the originating application will set Source to Other.
Workflow

Workflow indicators are used to highlight Requests that require attention.
No Action Required |
The Request does not require attention by either party. This Workflow state may be set manually by clicking [Clear Workflow] on the Request or by using the Clear Workflow right-click function on the Request list. Note A Request can only be deleted if the Workflow for the Request is cleared. |
|
This indicator is used to inform the service company that the Request requires their attention. This indicator is set automatically when a Request is created in the Customer Web Portal or when the Customer sends a chat message. It is important that you attend to these Requests. This indicator may be set manually by clicking the Workflow: Attention Service Manager radio button on the Request or by using the Mark Attention Service Manager right-click function on the Request list. |
|
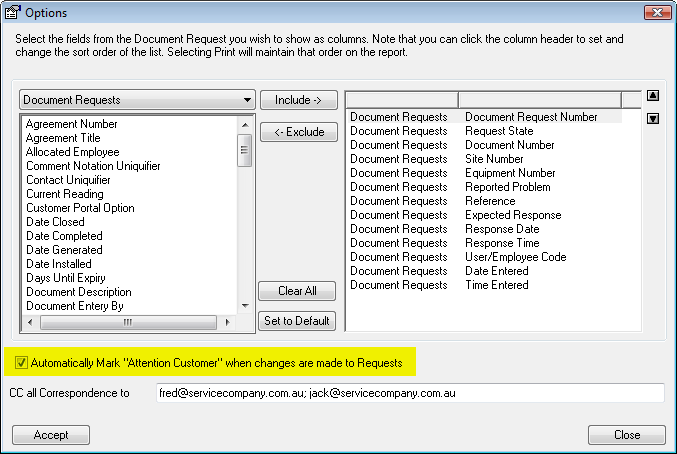
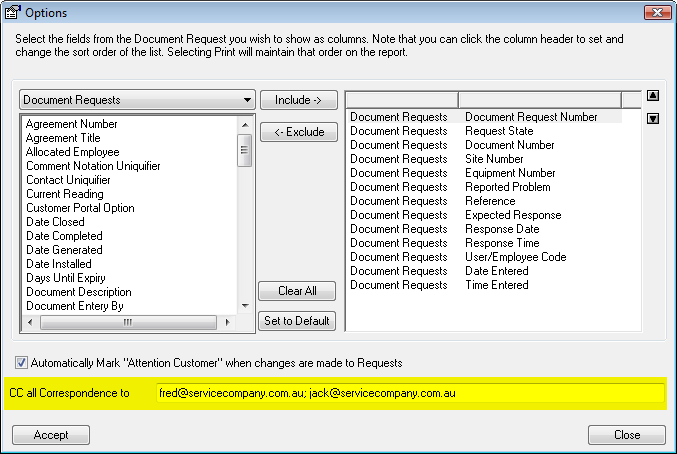
This indicator is used to inform the Customer Web Portal user that the Request requires their attention. This indicator is set automatically when a change is made to a Request if the Automatically Mark "Attention Customer" when changes are made to Requests check box is ticked in Tools » Options.
This indicator may be set manually by clicking the Workflow: Attention Customer radio button on the Request or by using the Mark Attention Customer right-click function on the Request list. Email messages can only be sent to the Customer if the Request is marked |
Allocated To

An Unallocated Request is one that has a blank Allocated To field, i.e., the Request has not been allocated or assigned to anyone.
2. Run the Search
Click Go ![]() .
.
The results will be displayed in the lower Results pane. An example is shown below.
You can Include, Exclude and change the order of the columns in the Request list. To do this, use Tools » Options.
3. Review the Requests
To review a Document Request, double-click the relevant Document Request line.
The Request will be displayed in the Modify Request window.
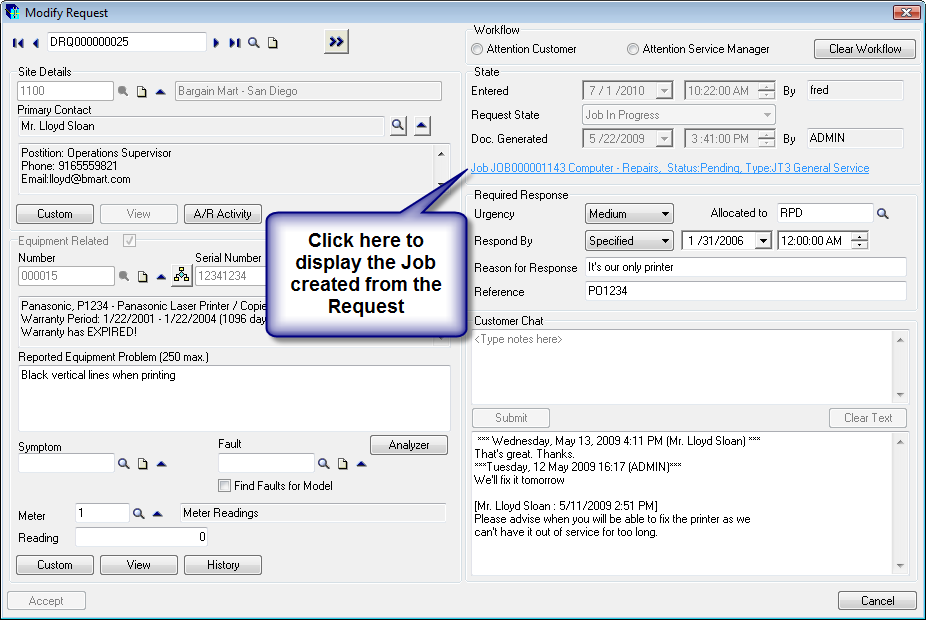
A Request is allocated initially to the Notify Employee set up for the Site.

That Employee, typically a supervisor, may then allocate the Request to another Employee. That is done by changing the Allocated to Employee on the Modify Request window.
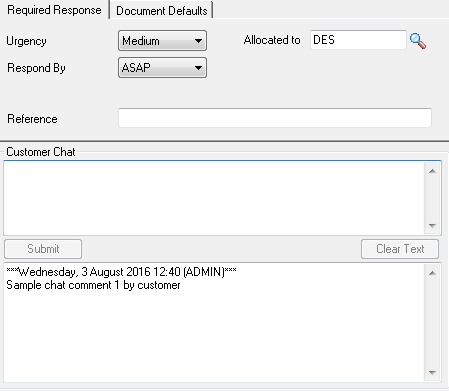
Customer Chat
"Chat" with the Customer
If the Customer Web Portal is installed, it is possible to have a dialog with the Customer using the Customer Chat section of the Request form. Although this is not a "live" chat facility, it does provide an effective means of communication between the service company and the Customer about the request.
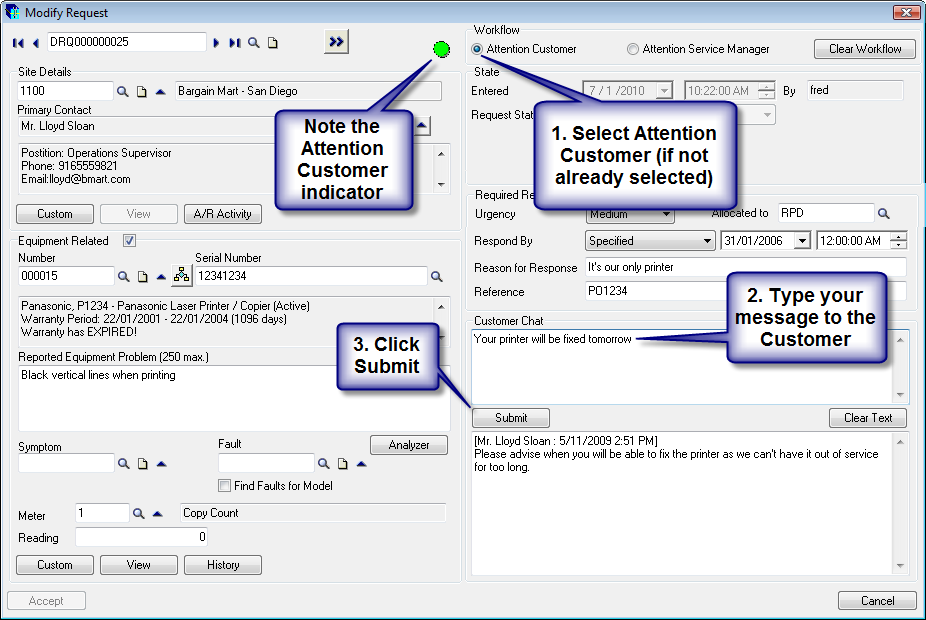
•click the Workflow: Attention Customer radio button (this step is not necessary if the Automatically Mark "Attention Customer" when changes are made to Requests check box is ticked in Tools » Options)
•click in the Customer Chat text box
•type your message to the Customer
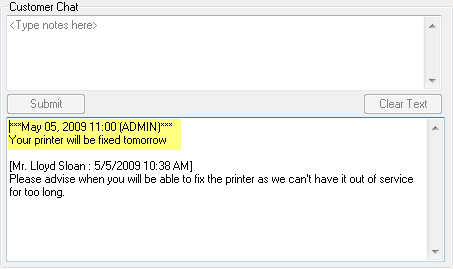
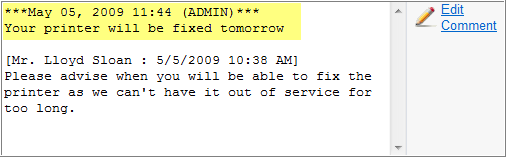
•click [Submit]. The message will be added to the full Chat text.
•click [Accept]
The Customer will be able to view your comments when the request is opened or refreshed in the Customer Web Portal. The Customer can then send you comments, and so on.
When the Customer sends you a comment, the Notify: Service Manager radio button will be selected.
Notes for administrative staff
To add a note that is for the benefit of administrative staff only, proceed as above, but click the Clear Workflow button. Do not click a Workflow radio button.
![]()
Posting Requests to Service Manager Jobs
![]()
Only Pending Requests may be posted to Jobs.
Click the Post icon on the Request Manager toolbar. The Post Requests to Jobs window will be displayed.
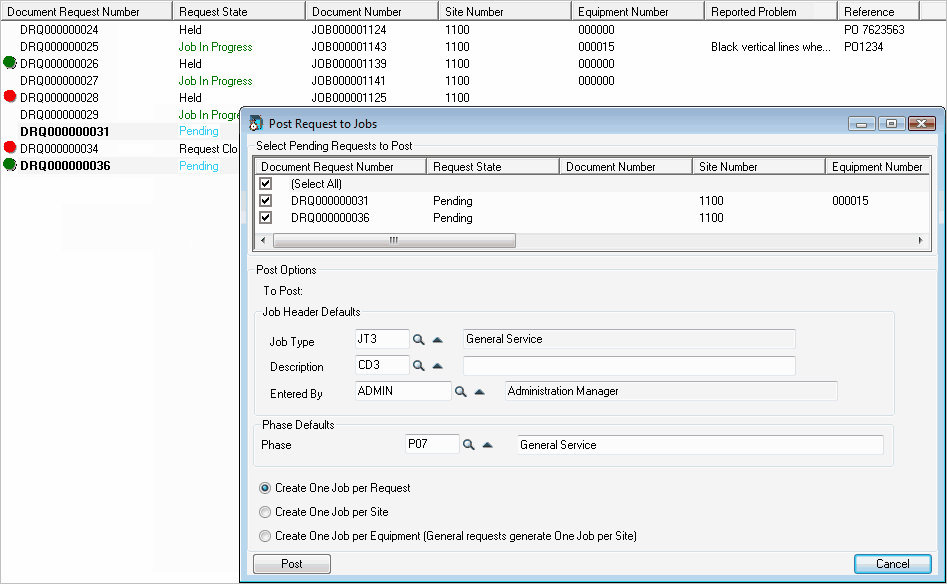
Tick the check box of each Request to post.
Type or select: Job Type, Description, Entered By, Phase. These values will be retained and displayed by default the next time this window is displayed.
Click the relevant radio button to create one Job per Request, one Job per Site or one Job per Equipment.
Click [Post].
A Warning message will be displayed. Click [Yes] to continue.
A Confirmation message will be displayed showing the number of Jobs created. Click [OK] to continue.
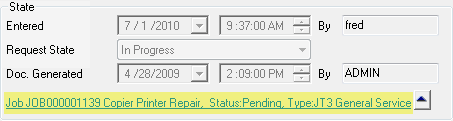
When a Job has been created, a link will be provided to the Job. The Request State will change to Job In Progress.
Creating New Requests
![]()
Click the New icon on the Request Manager toolbar to log a new Request. The Enter New Request window will be displayed.
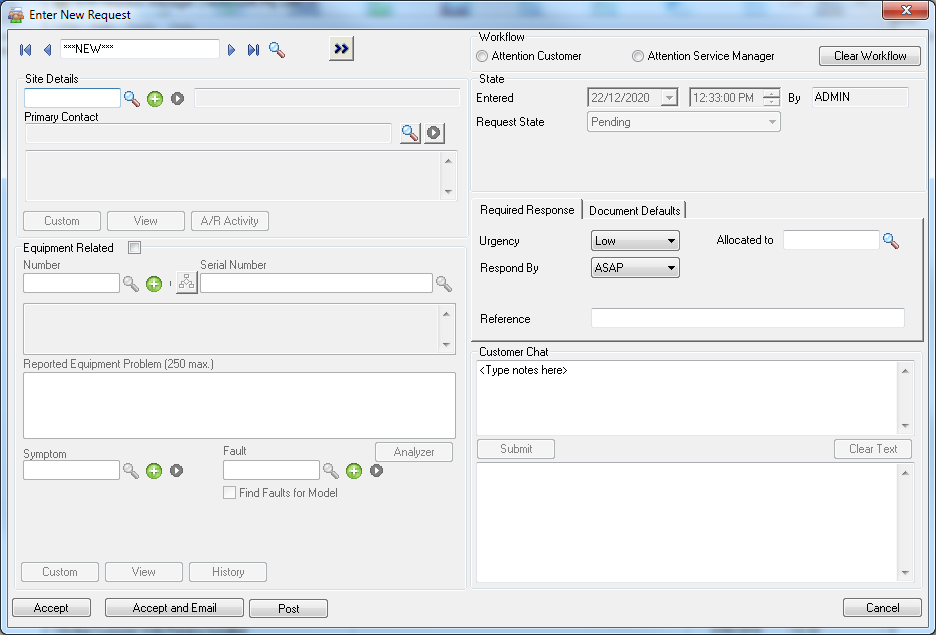
Enter the required information and then click [Accept].
Printing Requests
![]()
Select the Requests to print. Alternatively, you can print all Requests listed.
You may wish to sort the Requests before printing them. Click a column name to sort on that column before printing. Requests will be printed in the sequence that they are listed.
Click the Print icon on the Request Manager toolbar to print Requests. The Print Requests dialog box will be displayed.
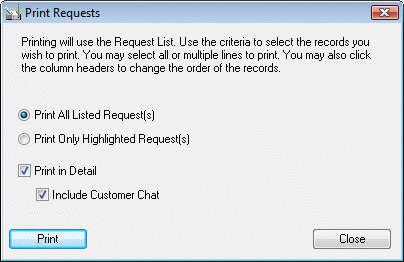
Tick the Print in Detail check box to include all the Request details in the report.
Tick the Include Customer Chat check box to include the Customer Chat messages for each Request.
Click [Print].
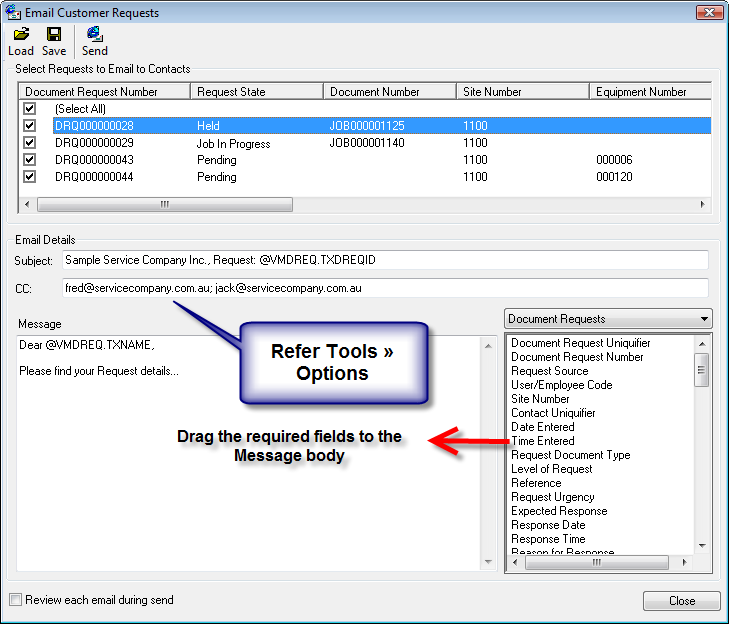
Emailing Requests
![]()
An email message may be sent to Customers. If you want to send an email message to a Customer, you must ensure that the Request is marked ![]() Attention Customer or the Request will not appear in the list of Requests when the Email function is selected. Refer Mark Attention Customer right-click function.
Attention Customer or the Request will not appear in the list of Requests when the Email function is selected. Refer Mark Attention Customer right-click function.
Click the Email icon on the Request Manager toolbar to email Requests. The Email Customer Requests dialog box will be displayed.
Using email templates
We recommend using "templates" to create email messages. This will enable consistent looking messages and avoids having to construct the email format each time you send email.
To create an email template, create the required message format and then click Save. The email template will be saved as a .txt file. The last email template used will used as the default template the next time you email Customer Requests.
Any email template that has been saved may be used as a default template. To do this, click Load and then select the required template.
The email process
1. Select the Requests to email to Customers
Tick the check box of each Request to email to a Customer.
2. Modify the Email Format if required
The Email Details will default to those contained in the last email template used. If you have not used a template previously, a short default format will be displayed.
The Subject and Message consist of text that you type and fields from the Document Request or Job Header. Select Document Requests from the drop-down list to show available fields from the Document Request. Select Document Header from the drop-down list to show available fields from the Job Header. Drag any of these fields any drop it on the Subject or Message, as required.
CC will default from the CC all Correspondence to field in Tools » Options, and can be changed if required.
If you would like to save this email format as a "template", click Save. The name of the current email template will be displayed by default. Overwrite the current template or type a new name for the template.
3. Monitor email messages as they are sent
Tick the Review each email during send check box if you would like to monitor each message being sent. You will then be able to review and modify individual messages.
4. Send the messages
Click Send to send the messages. If you ticked the Review each email during send check box, each email message will be opened prior to sending it to the Outbox so it can be checked before sending.
Other Functions
The right-click menu can be used to select a number of functions.
Highlight one or more Request lines and then right-click. The following menu will be displayed. Note that only functions that are allowed on the currently selected Request(s) will be available. The other functions will be disabled (grayed out).
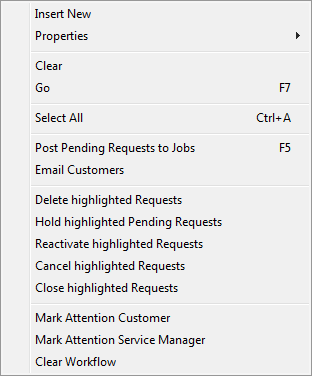
Insert New |
Refer Creating New Requests. |
Properties |
This function is only available for a single Request. It will be disabled if you select multiple Requests. Use this function to display either the Request or the Job associated with the Request. |
Clear |
Resets the search criteria. |
Go |
Runs the Request search based on the search criteria. |
Select All |
Selects all Requests in the list. |
Post Pending Requests to Jobs |
Select this function to post Pending Requests to Jobs. Refer Posting Requests to Service Manager Jobs. |
Email Customers |
Send an email message to Customers for Requests marked |
Delete highlighted Requests |
Delete all highlighted Pending, Held, Canceled or Closed Requests. Requests with a state of Job In Progress or Job Completed cannot be deleted. A Request can also not be deleted if it is marked as |
Hold highlighted Pending Requests |
Hold all highlighted Pending Requests. The Request state of these Requests will change to Held. |
Reactivate highlighted Requests |
Reactivate all highlighted Held or Canceled Requests. The Request state of these Requests will change to Pending. |
Cancel highlighted Requests |
Cancel all highlighted Held or Pending Requests. The Request state of these Requests will change to Canceled. Requests with a state of Job In Progress or Job Completed cannot be canceled. |
Close highlighted Requests |
Close all highlighted Job Completed Requests. The Request state of these Requests will change to Request Closed. |
Changes the Workflow indicator of selected Requests to |
|
Changes the Workflow indicator of selected Requests to |
|
Clears the Workflow indicator of all selected Requests. |