Meters

Contents
 »
»  »
» 
Overview
Each Equipment record can have many Meters, and each Meter can be read at different intervals and processed separately. The Meter will inherit much of its setup information from its associated Meter Type. This includes the Schedule used to drive the recurring readings for the Meter. Several tailoring options exist in the program to specify how to track the readings. Meter reading history is also maintained.
The Meters by Site screen allows users to view all Meter Tracked Equipment by Site and the Meters attached to them. Selecting a Meter will open the Meter record.
Meters can publish meter reading usage values to other Meters of the same Meter Type. This applies to similar Meters for the same Equipment and similar Meters for Component Equipment.
Although it is possible to process Meters from the setup program, Meter Processing in general, is part of the Meter Processing program and Meter Billing is part of Document Entry.
Related Topics
Refer to the following sections in the Service Manager User Guide for additional information:
Estimated Time
Typically allow between two and five minutes to set up a Meter for Equipment.
Import/Export functions available from the File menu can speed up this process dramatically.
Setting up Meters
Meters by Site
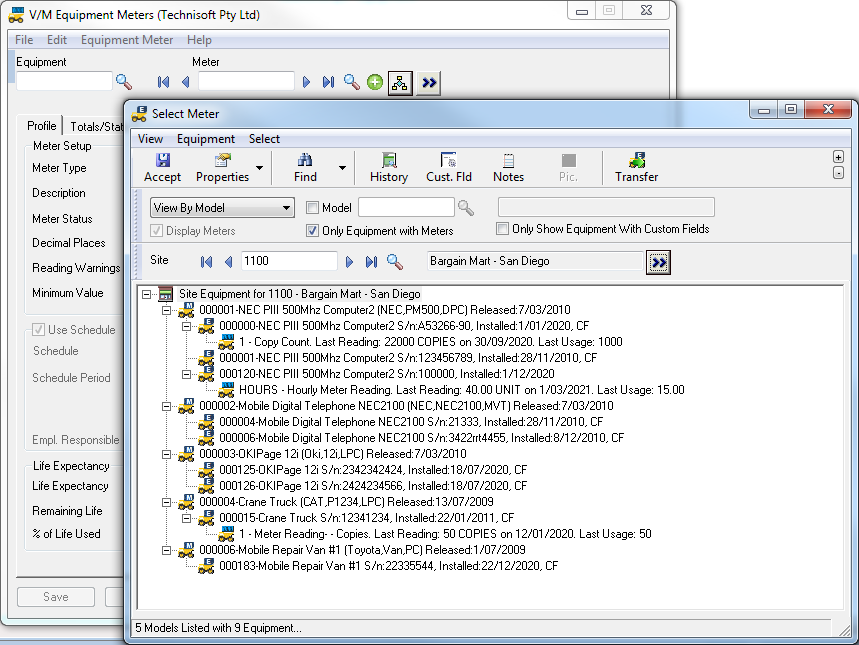
Click the Meters by Site button. The Select Meter window will be displayed.
Select the View By dropdown option and select by Model by Site Location.
Enter or select a Site Code and then click Go ![]() . All Meter Tracked Equipment for the Site will be listed. If an Equipment has Meter Tracked Components then these will also be listed.
. All Meter Tracked Equipment for the Site will be listed. If an Equipment has Meter Tracked Components then these will also be listed.
Double-click a Meter or highlight and click Accept to open the Meter record.
Profile tab
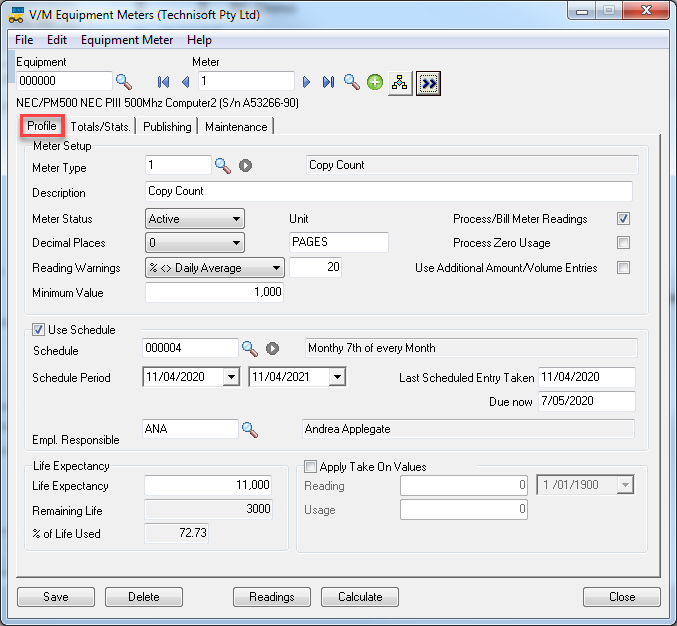
Select the Equipment to create the Meter for.
Click in the Meter field and enter a unique number for the Meter.
Click Go ![]() .
.
Meter Setup
Select a Meter Type.
Description - Defaults from the Meter Type. Change if required.
Meter Status - Defaults from the Meter Type. The Meter Status drop-down list allows you to activate or stop the Meter at any time. If you stop the Meter, you will not be able to process a Meter read or billing for that Meter.
Decimal Places - Defaults from the Meter Type. Change if required.
Unit - Defaults from the Meter Type.
Entry Warning % or Fixed - Defaults from the Meter Type. Change if required.
Minimum Value - Defaults from the Meter Type. Change if required.
Process/Bill Meter Readings - Defaults from the Meter Type. To process and bill Meter Readings, you must tick the Process/Bill Meter Readings check box. The Meter Status must also be Active.
Process Zero Usage - Defaults from the Meter Type. Change if required.
Use Additional Amount/Volume Meters - Defaults from the Meter Type.
Schedule
The Schedule defaults from the Meter Type. Change if required.
Select an Employee who will be responsible for reading the Meter. This can be left blank, but is useful for reporting and queries. e.g., "Show me all the Meters I am due to read today."
Life Expectancy
This is the Life Expectancy of the Equipment. It defaults from the Meter Type. Change if required.
Remaining Life and % of Life Used are calculated fields and include Deductions, if any.
Apply Take On Values
You can now apply Take On Values to a Meter. A Meter can take on a Reading or Usage value. You may want to apply a Take On Value when replacing a faulty meter, for example.
Tick the Apply Take On Values check box, enter the Reading and/or Usage value and the effective date of that value, and then click [Calculate] to recalculate usage.
Click the Totals/Stats. tab.
Totals/Stats. tab
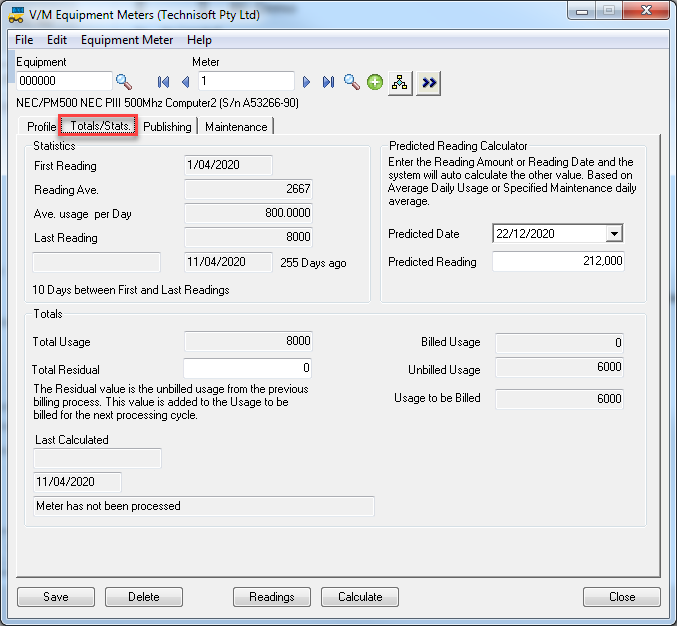
Statistics and Totals are calculated by the system on an ongoing basis.
Billed Usage, Unbilled Usage and Usage to be Billed will only be displayed if the Process/Bill Meter Readings check box on the Defaults tab is ticked.
Use the Predicted Reading Calculator to predict the reading on a particular date. This is based on Average Daily Use.
Click the Maintenance tab.
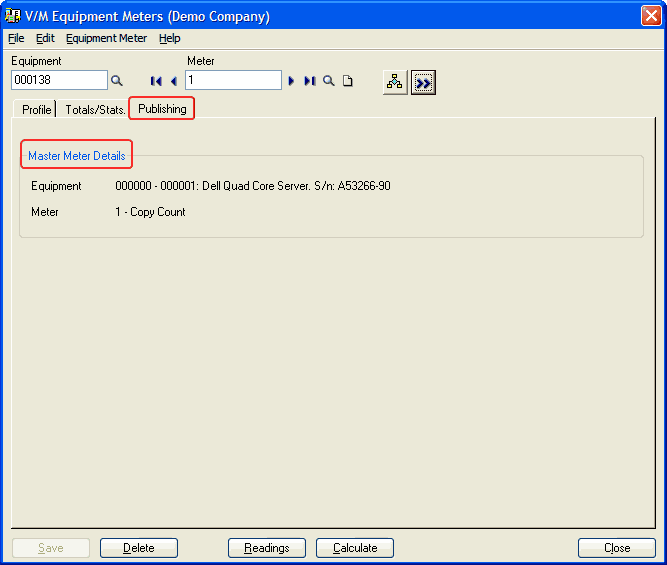
Publishing tab
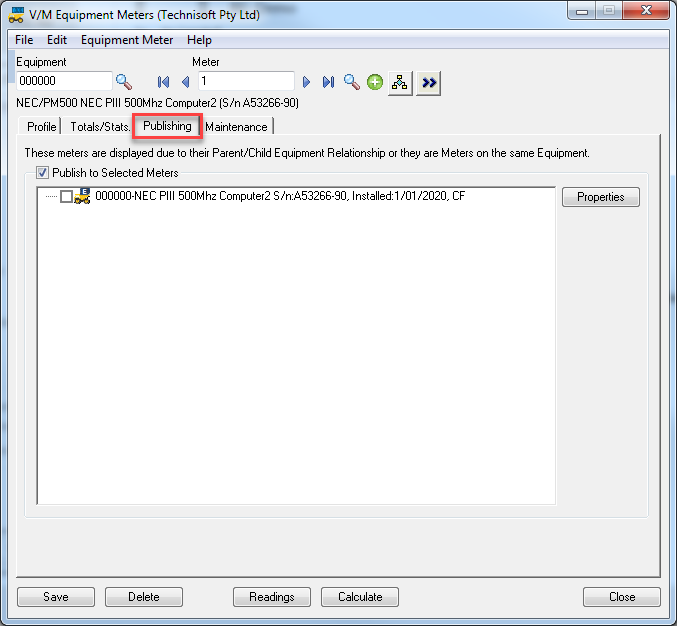
Meters can be set up to publish Meter reading usage values to other Meters of the same Meter Type. This applies to Meters for the same Equipment and Meters for Component Equipment. All Meters that can be published to will be listed.
To enable "master" Meter publishing, tick the Publish to Selected Meters check box and select the Meters to publish the "master" Meter reading usage value to.
Meters that are set to receive a published reading will not appear in the Meter processing list of Meters for data entry. Processing a master publishing Meter will calculate all other Meters on any Meter Agreements. You will no longer be able to edit child Meter readings. When taking readings for the master Meter, it is the usage that is published to the other Meters. This allows you to have child Meters on completely separate reading values to the master Meter.
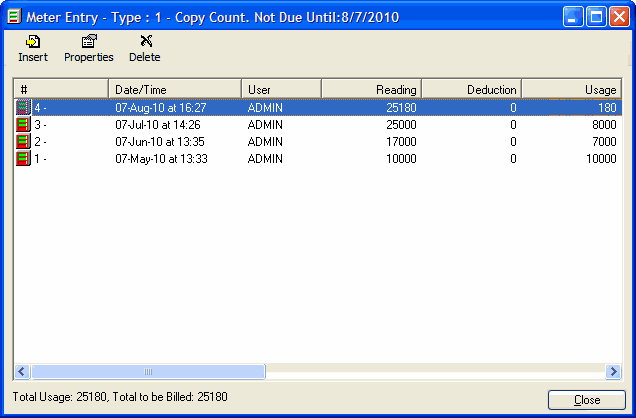
Example
Added a meter reading (Meter Reading 4) with Usage of 180 to Master Equipment 000000 Meter 1.
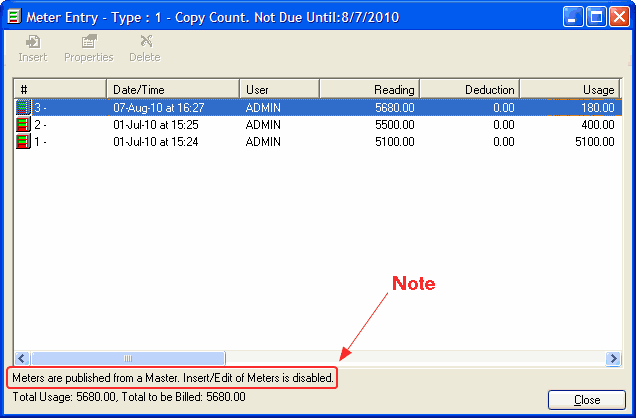
Service Manager automatically added a meter reading with Usage of 180 to Component Equipment 000138 Meter 1.
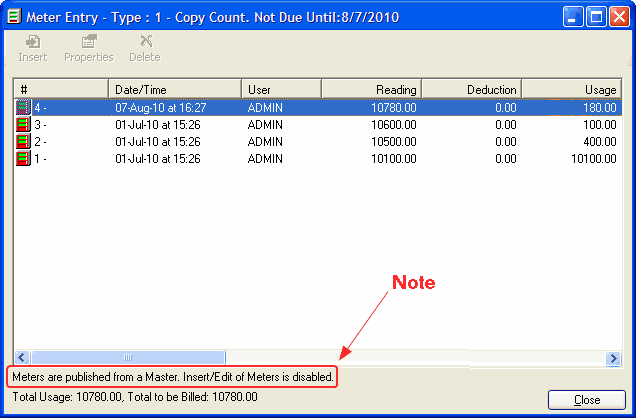
Service Manager automatically added a meter reading with Usage of 180 to Component Equipment 000339 Meter 1.
Note:
•The meter reading value is different in each case. It is the Usage of 180 that is published to the child Meters.
•The Publishing tab for child Meters only shows the master Meter details.
•The Maintenance tab does not show for child Meters.
Click the Maintenance tab.
Maintenance tab
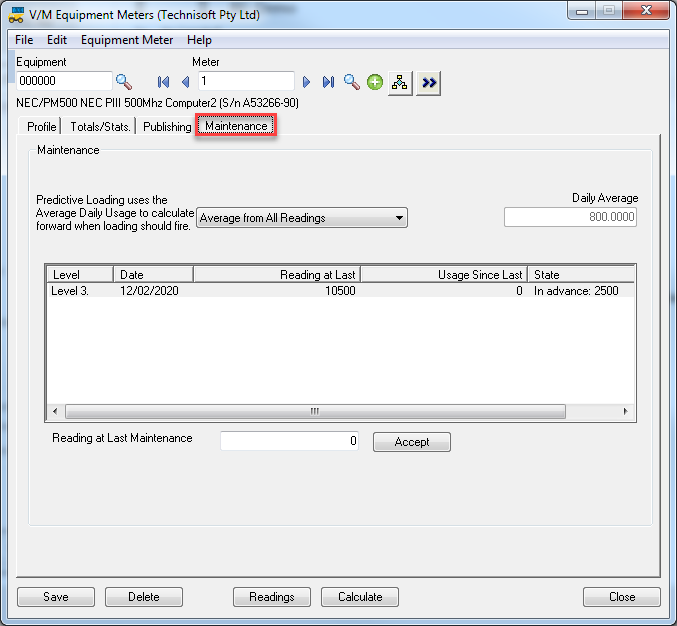
The Reading Tolerance defaults from the Meter Type. Change if required.
To override the calculated Average Daily Usage used in Predictive Loading, tick the Override Average Daily Usage check box and enter the value to use as the Average Daily Usage.
As Maintenance is performed on the Equipment, enter the Reading at Last Maintenance at the applicable Maintenance Level.
Usage Since Last Maintenance is a calculated figure.
Click [Readings] to enter meter readings.
Meter Readings
Past readings will be displayed.
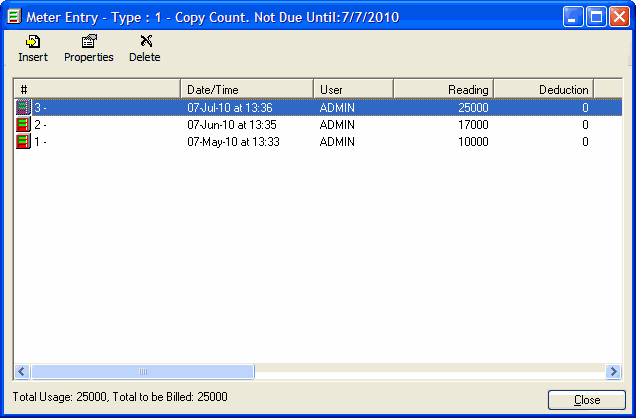
Click the Insert icon on the toolbar to enter a new reading. The Meter Reading window will be displayed.
The Previous Reading will be shown in the Most Recent Reading fields.
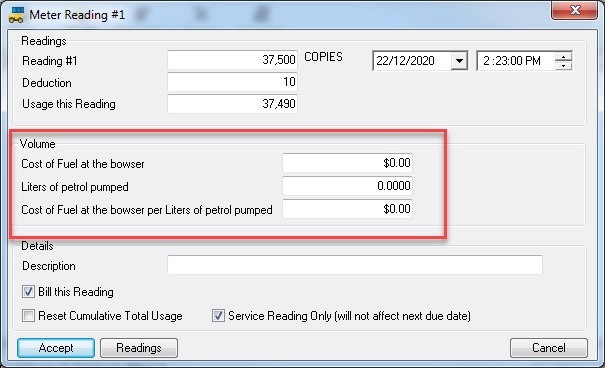
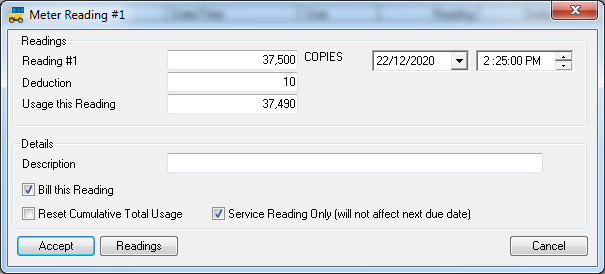
Enter the current reading in the Reading # field.
The Deduction field is used to enter usage that should be deducted from the current reading. This is handy where a service has been performed and tests incurred usage and the value of the test usage cannot be billed to the customer. The Deduction field is reset when an invoice is generated if the Meter is being billed. Deductions do not accumulate, but are added to the history audit for that Meter.
Usage this Reading is a calculated figure.
Enter a Description for the reading if required.
Bill this Reading - As required.
Reset Cumulative Total Usage - Tick this check box to reset the aggregate Meter reading back to zero after the Meter has been read and processed.
Service Reading Only (will not affect next due date) - Tick this check box to have the reading not affect the reading schedule.
Click [Accept].
The Meter Reading window will include a Volume section if you tick the Use Additional Amount/Volume Meters check box on the Meter Profile tab. In the example below, Fuel Cost and Gallons are descriptors defined on the Meter Type.