Equipment

Contents
 »
»  »
» 
Overview
The Equipment setup function allows you to define new Equipment records and automatically add them to Site records in Service Manager.
An Equipment record cannot be created without first linking the Equipment to a Model.
Equipment information includes: Site and Contact, the Model, Serial Number, Install Date, Last Service Date, Warranty Details and Sales and Purchase information. You can also view Custom Field information specific to an Equipment record, Pictures of the Model, History, associated Agreements, Meters and Maintenance details.
The Equipment automatically inherits many of the above features from the associated Model record.
History includes Billing Details, Notations, Audits, Jobs and other information.
Equipment can be transferred between Sites, and History for that Equipment including a transfer audit is maintained at Equipment level.
Equipment can be created "on the fly" during Document Entry or by using the Equipment icon on the desktop.
An Equipment record can be deactivated and prevented from being added to a Job by clearing the Active check box.
If Component Tracking is enabled, serialized Components can be created for Equipment when adding Equipment to a Job. Components can have their own warranty period or they can inherit warranty from their Master Equipment.
You can enter Meter Readings and display the transactional history of Meter Readings for the Equipment.
A Company may use its own Equipment on Jobs or rent out its Equipment. In this case we recommend that you first create an Internal Site and then create Internal Equipment records for that Site. Equipment created for an Internal Site will automatically be marked as Internal. Internal Equipment may be assigned to a Job and scheduled with time entries as you can for Employees and Subcontractors.
Related Topics
Refer to the following sections in the Service Manager User Guide for additional information:
Estimated Time
Typically allow between two and ten minutes to set up Equipment depending on whether a maintenance program is required.
Import/Export functions available from the File menu can speed up this process dramatically.
The Auto Create Equipment program can help initialize an Equipment database from sales in Order Entry or from Serialized Inventory if either of these products are installed.
Profile tab
Enter an Equipment Number or click New ![]() to select the next record.
to select the next record.
Click the Profile tab.
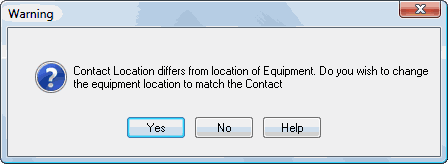
Associate a Site and Contact to the Equipment record. If the Contact Location differs from the Equipment Location, a message will be displayed. Click [Yes] to change the Equipment Location to the Contact Location. Otherwise, click [No].
Equipment - Custom Date Fields
The three (3) custom date fields in Equipment setup are now presented and editable in the Document Equipment forms when viewing the Equipment Properties record on a job.
If one of the date fields is modified and the user Accepts, the master equipment record is also updated.

Type
Site: Equipment at a Customer Site.
Click in the Model Number field and select a Model.
Enter a Serial Number or use the Equipment Number as it is unique, if a Serial Number is not available. It is not possible to add an Equipment record without entering a Serial Number. Serial Numbers are unique per Model. That is, an identical Serial Number can only exist in the database if it is for a different Model.
Select an Equipment Status, if applicable. There are three fixed Equipment Statuses - Active, Suspended and Retired. There are also 10 user definable Statuses which are set in Company Options » Descriptions tab. We recommend that you create statuses for the Equipment whereabouts or operational status.
If using the Norming Fixed Assets program use the Finder to display Asset No. from Norming Fixed Assets and associate with the Equipment record. VMINI settings are required for this association.
The Installation Date will default if the Equipment is created from a sale of inventory, otherwise this can be set manually to initialize it at any time. The Next Serviced date can be manually updated at any time.
Last Job Activity field updates as specific activities for the Equipment Record are changed. The Last Job Activity date considers the date an Equipment record was entered onto a Job as well as the date an equipment task completes. The dates are compared and the Last Job Activity date is set to the very latest date. The Equipment record also displays the Job Number for the Equipment’s Last Job Activity and a drill down button has been added to enable that Job to be opened in Document Entry.
Select an Operating Environment if required. This field can be particularly useful for identifying equipment deployed in a dangerous and hazardous environment as additional preventative maintenance or tools may be required when servicing such equipment.
Click the Processing tab.
Internal: Your own Equipment which may be booked against a Job or Rented Out
We recommend that you first create an Internal Site and then create Internal Equipment records for that Site.
It is possible to specify a base or home site location for internal equipment.
When internal equipment is either loaned, rented or simply added to a job that is not for the internal site it belongs to (i.e. For a customer site), the equipment is automatically transferred to the customers site, but on return the system knows the base or home internal site and transfers the equipment back to the internal site when returned.
This provides the exact whereabouts of the equipment at all times.
That means it is easy to see where the equipment is located at any given point in time and when it is due to be returned which is ideal for rental management.
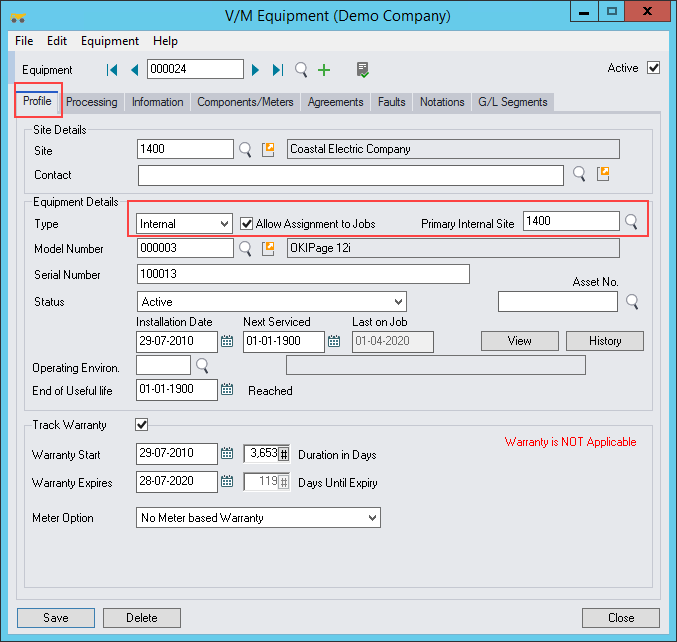
Tick the Allow Assignment to Jobs checkbox if the Internal Equipment is to be assigned to Jobs. Un-checking this box will result in the Internal Equipment not appearing in the Assign Resources window of Document Entry and will not load as a Resource in Advanced Scheduling, which improves load performance.
For a working Example of Internal Equipment Whereabouts see the chapter under Document Entry > Rentals of this User Guide
Processing tab
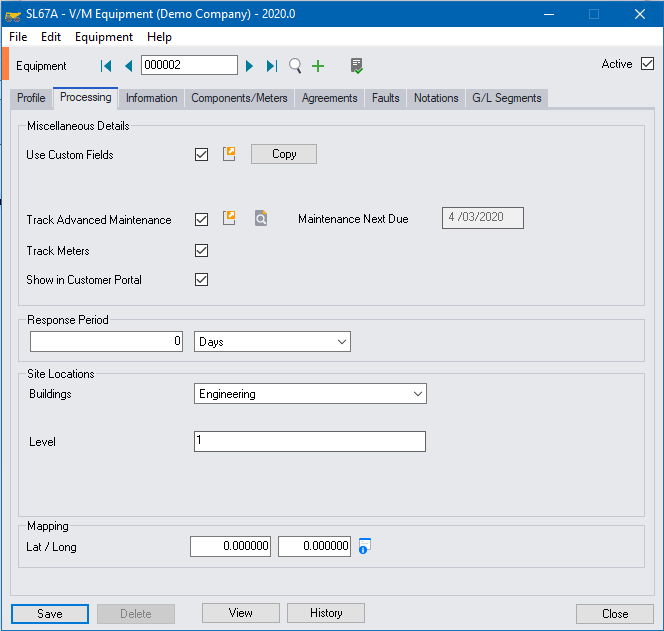
All the check boxes are inherited from the associated Model record for the Equipment.
Enter the Response Period for the Equipment.
Custom Fields
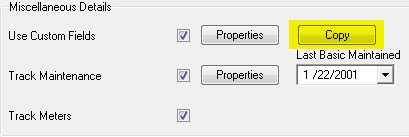
Use Custom Fields to apply particular attributes to individual Equipment.
Tick the Use Custom Fields check box and then click [Properties].
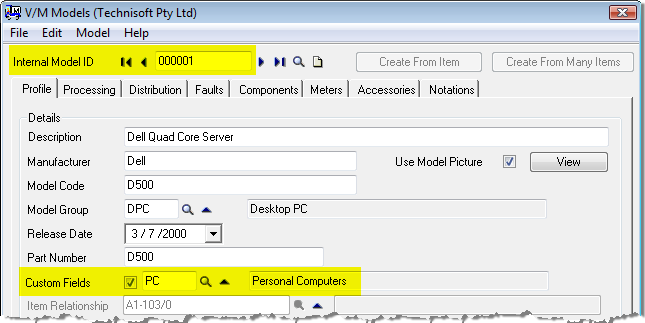
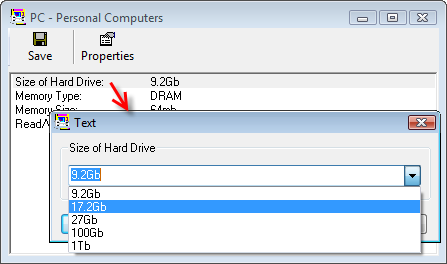
Custom Fields are derived from the Equipment Model. In this example, Custom Field Code "PC" is derived from the Equipment Model, which is 000001.
To change a Custom Field value, double-click the relevant line. Type or select a new value and then click [Accept]. Repeat this process for each Custom Field value that needs to be changed.
Click ![]() .
.
You can also copy Custom Field values from Equipment with the same Custom Field Code. To do this, click [Copy].
An Equipment Finder will be displayed that lists all Equipment with the same Custom Field Code.
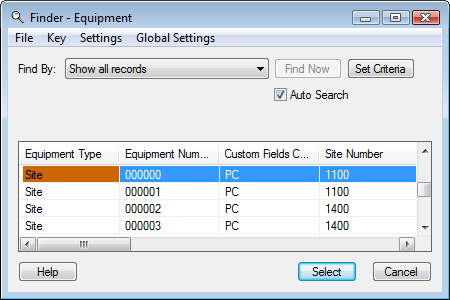
Select the Equipment to copy the Custom Fields from. A Warning message will be displayed.
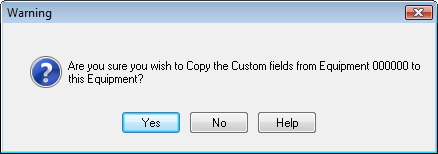
Click [Yes] to continue. A Confirmation message will be displayed.
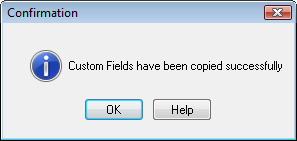
Click [OK] to continue.
Tick the Track Maintenance check box and then click [Properties] to change the Equipment Maintenance set up for the Equipment.
Tick the Track Meter check box to maintain Meters for the Equipment. Note that the Components tab will change to Components/Meters if the Track Meter check box is ticked.
Tick the Show in Customer Portal check box to allow this Equipment to appear in Customer Portal
Enter the specific location of the Equipment in the Site Locations section. The Site Locations section will only be displayed if locations have been set up for the Site. Refer Setting up Site Locations and Assigning Equipment to Locations.
Click the Information tab.
Information tab
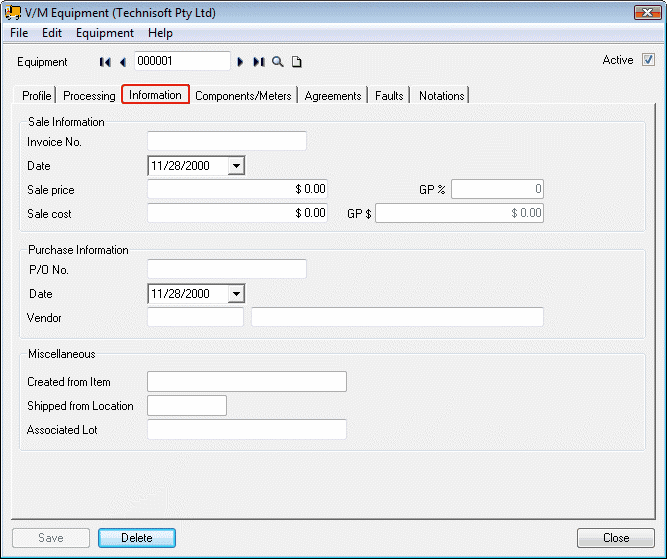
Any of these fields can be updated manually at any time, but it is important to note that when an Item is sold in Service Manager and Equipment is created from the sale of that Item, the Invoice Number, Date, Sale price and Sale cost are updated automatically. Gross Profit % and $ are calculated fields. Also, if the Item was originally ordered using the Service Manager Purchase Orders Add-On,then Purchase Order details such as P/O Number, Date and Vendor will also be updated automatically when the Item is sold and Equipment is created.
The Created from Item field will be updated with the Item Number the Equipment was created from as part of the Auto Create Equipment program.
Click the Components/Meters tab.
Components/Meters tab
The Components tab will change to Components/Meters if the Track Meters check box on the Processing tab is ticked.
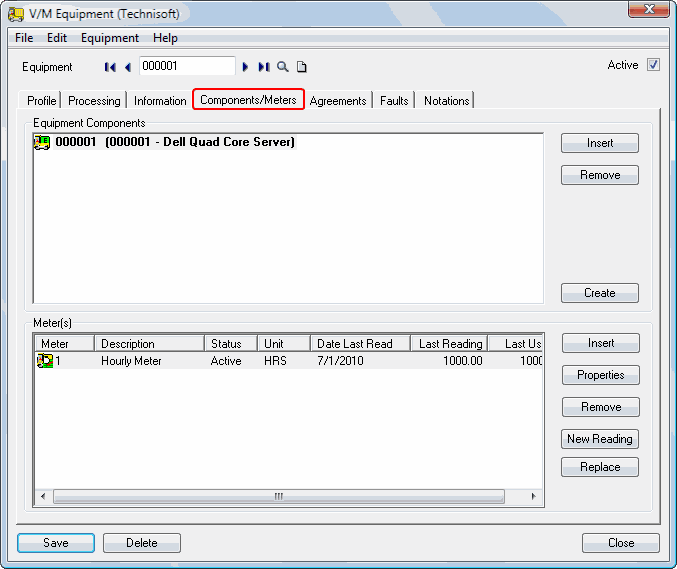
Equipment Components
If a Model has been set up with Components (refer Model Setup » Components tab), when an Item is sold in Service Manager and Equipment is created automatically from that Model by virtue of an Item/Model relationship, the Component Equipment is also created.
To add a Component manually, click [Insert] and specify an Equipment record. If the Equipment you are creating is a Component, a [Transfer] button will appear in place of the [Insert] button allowing the transfer of that Component to another Master Equipment record. To transfer, click [Transfer] and then select the Master Equipment record you wish to transfer the Component to. It is not possible to transfer to a Component record as Component records cannot themselves have Components. Note that the Master Equipment record you are transferring to can also be at another Site. If you transfer a Master Equipment that has Components to a new Site, all its Components will transfer to that Site as well.
Click [Create] to create Equipment from Model master Components. [Create] is disabled if no Components have been set up in the Model master record.
Equipment History stores an audit record of all transfers for both the Master and Component record/s.
If you edit a Master Equipment Record and view History, tabs will appear at the top of the History form for every component. If you select a Component tab you can view that Component's history. Note that if a Component is deleted, retired or transferred, it will still appear in the list for that Master Equipment so a complete History is maintained for that Master Equipment life cycle.
The current record is always highlighted in bold type.
Meter(s)
Note:
This section will be only be displayed if the Track Meters check box on the Processing tab is ticked.
All Meters for the Equipment will be listed.
![]() Insert a Meter
Insert a Meter
![]() Maintain Meter Properties and Meter Readings
Maintain Meter Properties and Meter Readings
![]() Remove the selected Meter
Remove the selected Meter
![]() Insert a Meter Reading
Insert a Meter Reading
![]() Replace a Meter
Replace a Meter
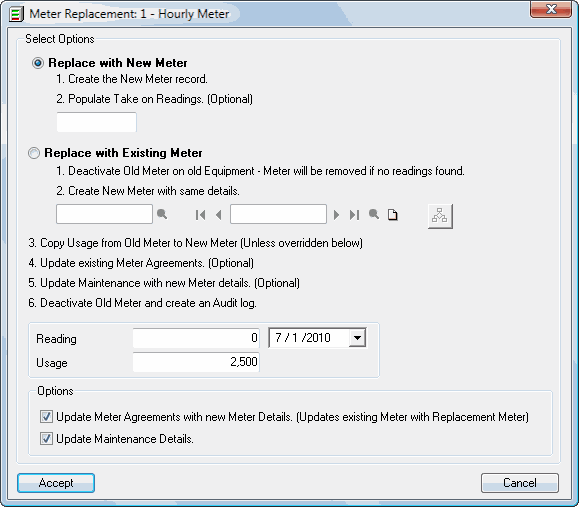
Refer Meters for information about entering and viewing Meter Readings.
Click the Agreements tab.
Agreements tab
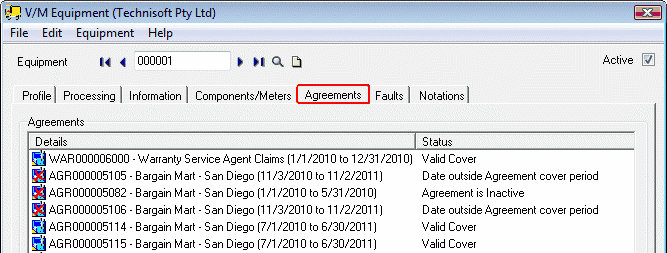
All Agreements that exist for the Site that the Equipment belongs to, will be listed in the Agreements tab.
An Agreement that has a red cross through it is not current.
![]()
Double-click an Agreement to view or modify it.
Remember to update the Agreement billing in the Site Agreement document if billing is affected by the addition of the extra Equipment record.
Click the Faults tab.
Faults tab
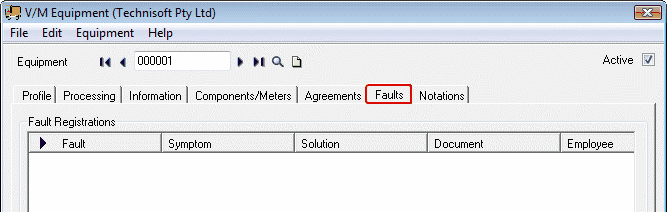
All Fault Registrations for the Equipment will be displayed.
Click the Notations tab.
Notations tab
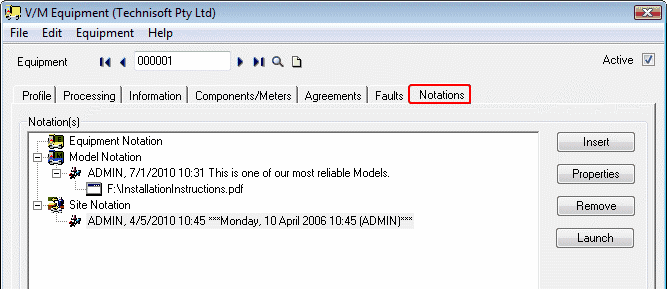
Add Notations as required against the Equipment, Model or Site.
Critical notes specified in the Equipment and Model master record can automatically pop when the Equipment record is added to a Document. Refer to the Document Entry Options > General Tab.
Click [Save].
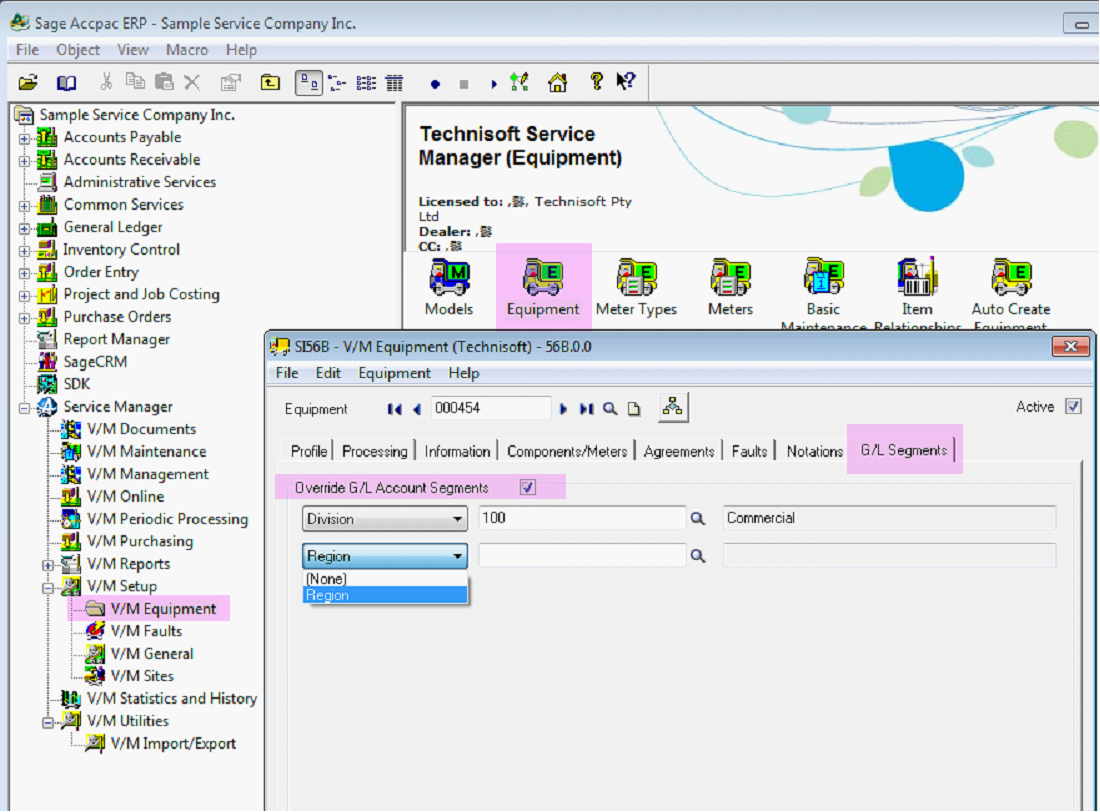
G/L Segments Tab
If Equipment Budgets are specified in the General Ledger, this feature allows all revenues and expenses associated with the Equipment on Service Manager Jobs to now be posted to the specified accounts thereby providing full tracking of performance of actual to budget for reporting purposes.
This is particularly useful for high cost assets (such as in the Mining Industry) where Equipment Accounts are maintained separately in the General Ledger for each Equipment Asset.
To set G/L Segment overrides at Equipment Level, select V/M Equipment, Equipment, select Equipment, select the G/L Segments tab and specify segment overrides as required.
Choose a Segment Type and add the override. To select another segment tab off the existing segment field and choose another Segment Type and repeat the process.
Advanced Maintenance Details
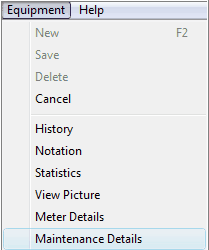
Advanced Maintenance details for Equipment can be displayed by selecting Maintenance Details from the Equipment menu.
The Advanced Maintenance Add-On Maintenance Setup window will be displayed with the Equipment highlighted and the Loading tab selected.
Note:
Maintenance Details are only available for Equipment if the optional Service Manager Advanced Maintenance Add-On is installed.
Key Points
Equipment cannot exist without first creating a Model.
The Equipment Import/Export functions are comprehensive and an Equipment database can be initialized very quickly using the import facilities.
Equipment can be created from inventory Items "on the fly" using the Auto Create Equipment program. The Auto Create Equipment program can also create Equipment records in Service Manager from sales in Order Entry of serialized Items or from Serialized Inventory, if installed.
Equipment can have unlimited Components.
Equipment can have a whereabouts or operational status.