Job Header

Contents
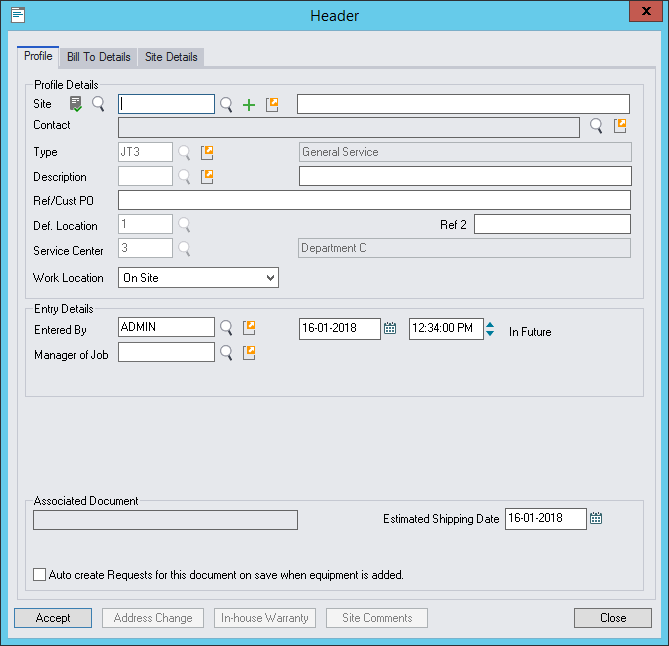
The Header is the highest level in the Document tree. It is the first window displayed when creating a Job.
Profile tab
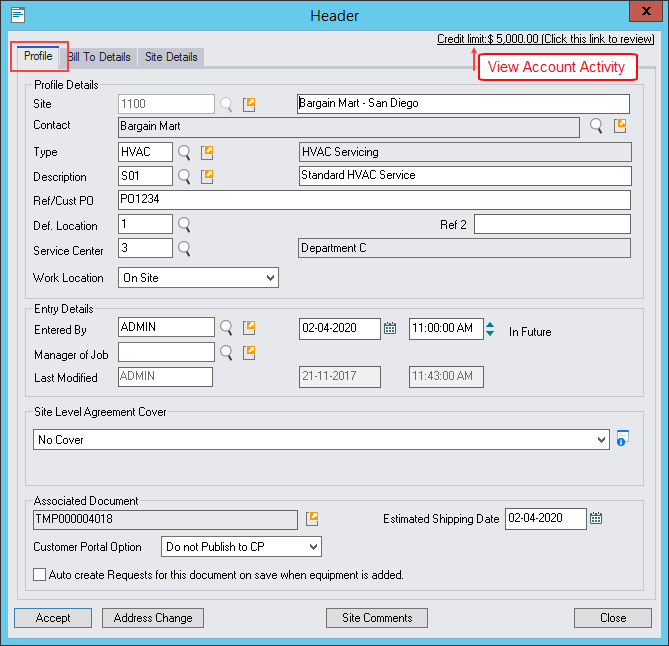
Example: Creating a Job for Site 1100
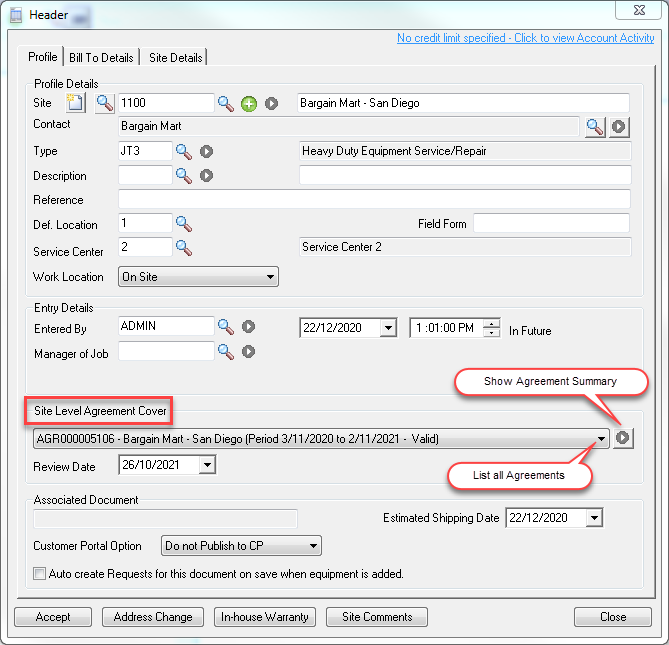
Profile Details |
|
Site |
Enter the Site Number or select it by clicking the Bill To Customer Finder
Click the drill-to arrow
Press Tab.
When you enter a Job for a Site that is covered by an Agreement, the Agreement pop-up window will be displayed showing all details of the cover provided by the Agreement. If there are multiple Agreements for the Site then the system will determine which is the most appropriate Agreement to display.
The Agreement pop-up window will only be displayed if the Document Entry » Tools » Options » General tab » Show Agreement Details Form check box is ticked. Refer Document Entry Options » General tab » Show Agreement Details Form.
Click [View Agreement] to view details of the Agreement. The Agreement will be shown in the Agreement Setup window. Click [View Plan] to view details of the associated Agreement Plan. The Agreement Plans window will be displayed. Click [Close] to return to the Header window.
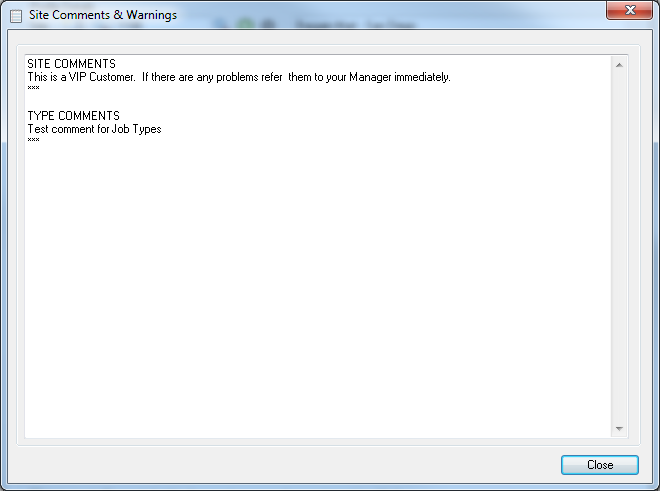
Site and Job Type Comments pop-up window The Site and Job Type Comments pop-up window will be displayed if Site and/or Job Type Comments exist.
Site Comments will be displayed if the Warn on Entry check box is ticked in the Site record and a Site Comment exists. Refer Site Setup » Processing tab.
Job Type Comments will be displayed if the Display on Entry check box in the Job Type record is ticked and a Comment exists. Refer Job Type Setup » Profile tab. Click [OK] to continue.
Note: •Sites are normally maintained in Site Setup, however you can create a new Site as you enter the Job by clicking the New •Service Manager provides direct integration into Accounts Receivable and incorporates the ability to add Customers created in Service Manager directly into Accounts Receivable as you enter the Job. Customers are normally maintained in Accounts Receivable » A/R Customers, however you can create a new Accounts Receivable Customer by clicking the Quick Create icon |
Primary Contact |
Select the Primary Contact for this Job. The Primary Contact for the Site will be displayed by default. Note: •Click the drill-to arrow •Site Contacts are normally maintained in V/M Setup » V/M Sites » Site Contacts. •The default Primary Contact is set up in V/M Setup » V/M Sites » Site Profile » Callout tab » Primary Contact. |
Type |
Enter the Job Type for this Job or select it using the Finder The default Job Type for the site will be displayed by default. Note •You can browse and maintain Job Types by clicking the drill-to arrow •Job Types are normally maintained in V/M Setup » V/M General » Job Types. •The default Job Type for a Site is set up in V/M Setup » V/M Sites » Site Profile » Processing tab » Default Job Type. |
Description |
Enter the Document Description Code for this job or select it using the Finder Note: •You can browse and maintain Document Descriptions by clicking the drill-to arrow •Document Descriptions are normally maintained in V/M Setup » V/M General » Class Types » Grouping: Document » Type: Descriptions. |
Ref/Cust PO |
Enter a Job Reference Number or Customer PO number. This field is optional unless the Site has Document Reference field must be populated check box ticked on in the Site Setup > Profile tab.
The reference field passes through to the AR Invoice Batch PO Number. |
Def. Location |
Default Inventory Location. Refer Inventory Location Defaults. |
Field Form Number |
|
Service Center |
Note: This option will only be displayed if the Service Manager Service Center Add-On is installed and the Track Service Centers check box is ticked in Company Options » Misc. tab. |
If the Service Center Add-on is not installed the work location can be designated On Site or In Service.
If the Service Center Add-on is installed the work location can be designated On Site or At Service Center. |
|
Entry Details |
|
This defaults to the currently logged in Sage 300 user. Change this field as required. |
|
Date/Time Entered & Duration |
This defaults to the current Sage 300 session date and time. Change this field as required. |
The Manager/Supervisor assigned to the Job. This is an optional field. The Sales Activity Report can be sorted by this field. |
|
Last Modified |
The Sage 300 user who last modified the Document. |
Date/Time Last Modified |
The date and time the Document was last modified. |
Agreement |
The Site Level Agreement Section of the Job Header will list all Agreements for the Site.
When you create a Job, only Valid Agreements will show in the drop-down list.
When you modify a Job, all Agreements for the Site will show in the drop-down list.
Select No Cover if the Job is not covered by an Agreement.
To view an Agreement Summary for the selected Agreement, click the drill-to arrow
Invalid Agreements will have a red cross through the Agreement icon
Highlight the Agreement that you want to display the Agreement Summary for (if multiple Agreements are shown).
Click [View Agreement] to view details of the Agreement. The Agreement will be shown in the Agreement Setup window.
Click [View Plan] to view details of the associated Agreement Plan. The Agreement Plans window will be displayed.
Click [Close] to return to the Header window. |
Review Date |
The Review Date of the Agreement selected. |
|
|
Associated Document |
If the Document was created from another Document, e.g., a Job was created from a Template or a Quotation was promoted to a Job, the Associated Document will be the Source Document Number. Refer Templates. |
Estimated Shipping Date |
This defaults to the current Sage 300 session date. Change this field as required. |
This field will only be visible if the Service Manager Customer Web Portal is installed and has been enabled for the Site. This option is only currently available for Jobs.
Select Publish to CP to allow this Document to be published to the Customer Portal.
Select the 'Auto create requests for this document on save when Equipment is added' checkbox if this functionality is required. |
|
|
|
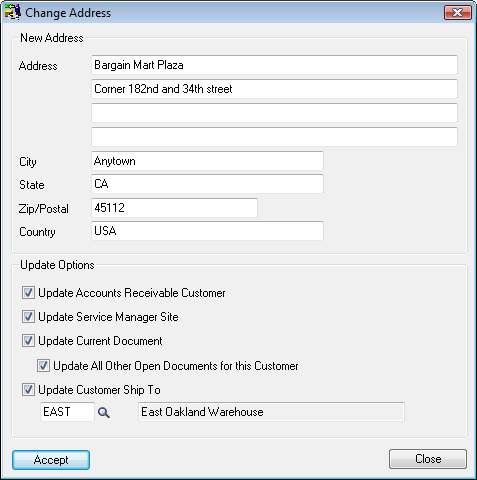
Click [Address Change] to use the New Address on this form to update any of the following: •the Address for the AR Bill To Customer associated with this document •the Geographic Address for the Service Manager Site associated with this document •the Bill To Address for the current document (Tick the Update All Other Open Documents for this Customer check box to change the Bill To Address for all documents that do not have a Completed Status, for the AR Bill To Customer associated with this document.) •the selected Customer Ship To Address
Click [Accept]. If you ticked the Update All Other Open Documents for this Customer check box, you will be asked to confirm your action. |
|
|
|
|
|
Creating an Accounts Receivable Customer
You can create a new Accounts Receivable Customer by clicking the Quick Create icon ![]() to the right of the Site field. The Quick Create window will be displayed.
to the right of the Site field. The Quick Create window will be displayed.
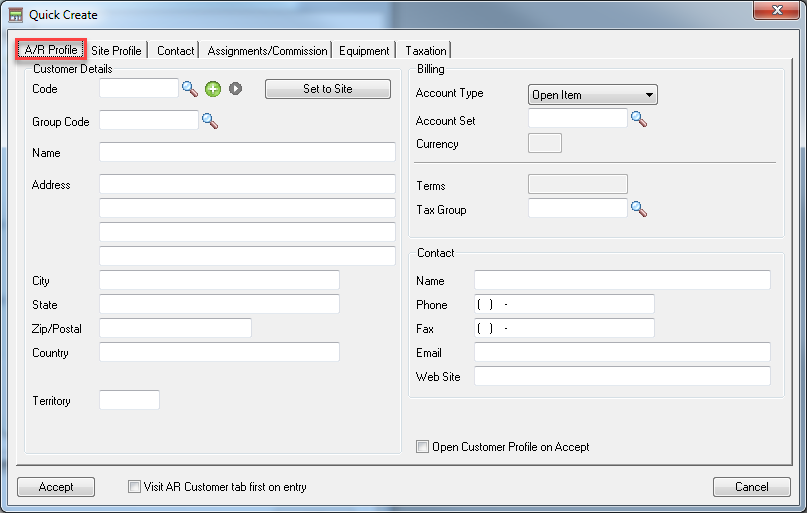
It is important that all details are filled in accurately. Site details, geographic address, Category, Market Classes and Callout Zone are very important and should be entered with as much detail as available. Service Manager queries are extensive and more detail means better results, easier client tracking and marketing.

If you tick the Associate existing Contact from Another Site check box, the Site Contact finder pops up listing all Contacts. If you cancel the finder, the check box will be cleared. If you select an existing Contact, the fields shown are populated and disabled.
The A/R profile contains mandatory fields and will display error messages if details are incomplete.
We recommend that you create or use an existing 9999 account in A/R where you do not wish to create a new A/R customer. For example, if you are quoting a new customer for the first time and are not sure they will accept the quote, you would not want to create an A/R customer until they accept. Similarly if it is a cash account you can use the 999 account.
Bill To Details tab
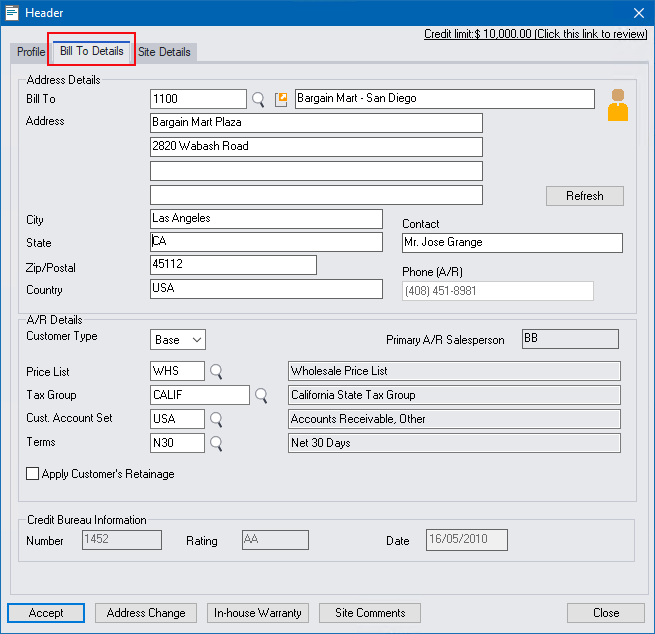
Address Details |
Address Details are gathered from the A/R Customer but can be modified in the Document. Changes apply to the document only. |
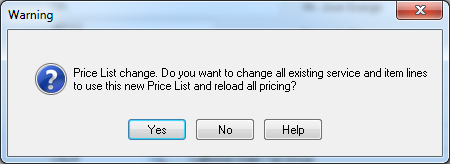
If you change the Price List in the Header, you are given the option to also change all existing lines and reload their pricing from the new Price List.
The AR Account Set can be specified which can be used to change core GL accounts such as Accounts Receivable Control and has advantages for reporting in that many AR reports can be filtered by Account Set. This option is available across all document types except Templates. It is available in Job, Sale, Quote, Agreement and Recurring Job documents. The AR Account Set can be changed prior to posting an invoice or credit note in Service Manager which will affect the next posting only moving forward.
The 'Apply Customer's Retainage' checkbox can be used to auto set the Retainage option in the A/R Invoice Batch Entries after Day End has processed. The A/R Customer must be set to use Retainage and have valid Retainage % value populated for the option to function in Service Manager Document Entry. The A/R Processing Option "Allow Edit of External Batches' must also be enabled for this feature.
|
|
This field will only be visible if the Service Manager Customer Web Portal is installed and has been enabled for the Site. This option is only currently available for Jobs.
Select Publish to CP to allow this Document to be published to the Customer Portal.
Select the 'Auto create requests for this document on save when Equipment is added' checkbox if this functionality is required. |
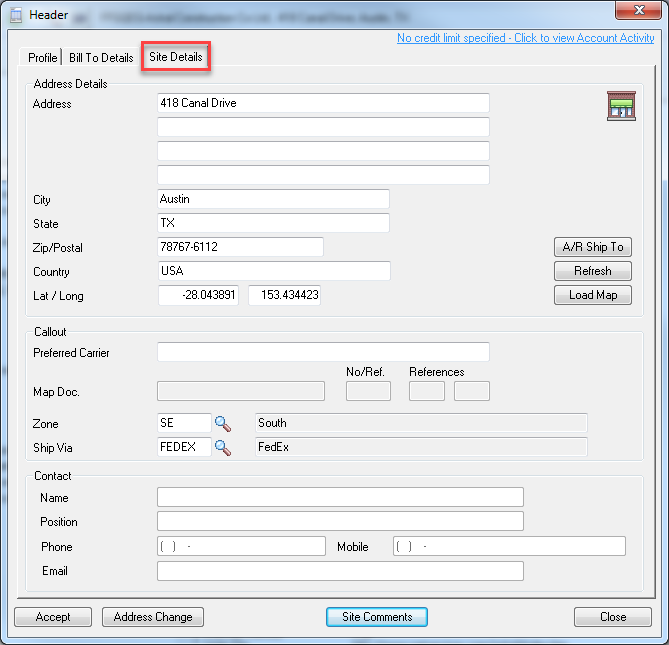
Site Details tab
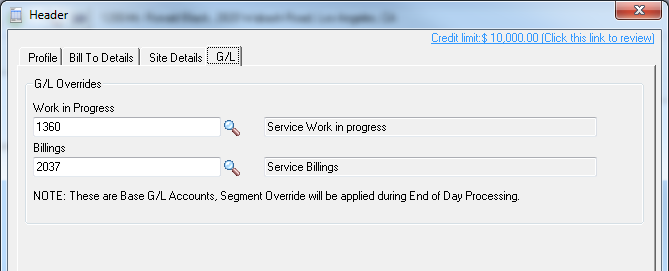
G/L tab
The G/L tab is only visible for Work in Progress Jobs and only after the Job Header has been created. Refer Billing Options » Processing Method.
Click [Accept] once you have entered all the data on the Job Header. The Billing Options window will be displayed.
Billing Options
This is a very important screen that needs to be looked at closely.
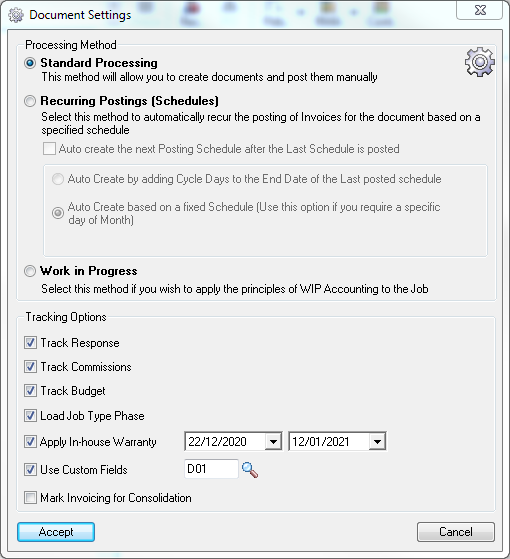
All the Tracking Options are defaulted from Company Options.
To report on the tracking of responses, commissions and budget details, you must tick the appropriate boxes.
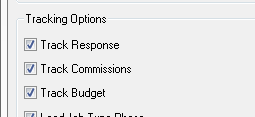
Load Job Type Phase will insert the default job type phase or phases into the document once accepted. Removing this tick, will proceed to the manual selection of at least one single phase which is required to create a job.
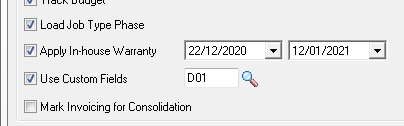
Apply In-house Warranty is a very powerful tool. Once a Job has been created, it will automatically be attributed warranty based on the Job Type in-house warranty settings. e.g., Job Type JT3 may have in-house warranty set to 3 months. You may override these settings on the Job Header in the Apply In-house Warranty section shown below. If a new Job is created within the warranty period, you will be prompted with the warranty information and a new Job can be created and special billing can be applied.
Use Custom Fields is used for adding job specific details relating to customer site and equipment. e.g., Equipment is insured!
Click [Accept].
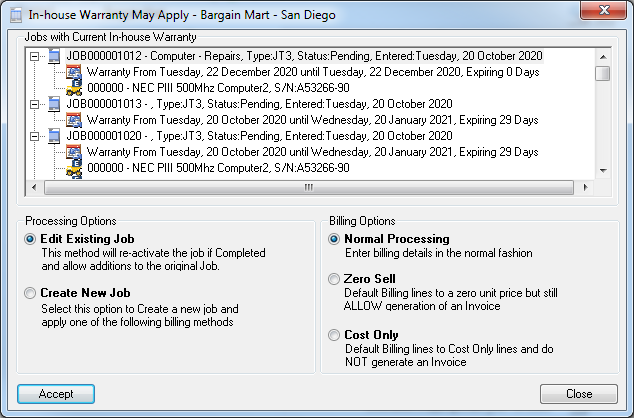
In-house Warranty Details
When you create a new Job and the Site has existing In-house Warranty associated with it, the In-house Warranty May Apply form will be displayed. All Jobs for the Site currently covered by In-house Warranty will be listed.
Select the required Processing Option and Billing Option. Refer Job Type Setup for additional information.
Document Tree
The Document tree for the Job will be displayed in the Document Entry window.
