Creating a Warranty Agreement

Contents
 »
»  »
» ![]() » Warranty Agreement
» Warranty Agreement
Steps
1.Select the Bill To Customer - must have a Vendor Site
2.Set up the Agreement Header
3.Set up the Agreement Details
4.Select Cover Levels - cover all or specific Equipment for the Model
5.The Agreement will be displayed in Document Entry.
In Document Entry:
As you enter Jobs that cover Equipment under the Warranty Agreement, Claims records will be created. You then need to Maintain and Retrieve the Claims to charge the Manufacturer / Vendor.
•Entering a Job where the Equipment is covered by a Warranty Agreement
•Charging the Manufacturer / Vendor
•Retrieving Warranty Claims for billing
Select Customer
![]()
Enter the Bill To Customer Number and then click Go ![]() .
.
Note:
The Bill To Customer must have at least one Vendor Site set up in Service Manager. Warranty Agreements only relate to Vendor Sites. The Manufacturer or Vendor is charged for the work performed under Equipment warranty.
If no Agreements exist for the selected customer, the Insert New Agreement window will be displayed.
If a customer has existing Agreements, click the New Agreement icon on the toolbar.
![]()
The Insert New Agreement window will be displayed.
Set up Agreement Header
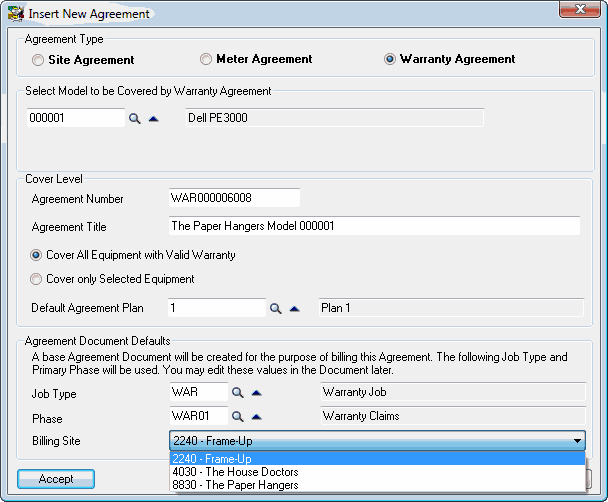
Select Agreement Type: Warranty Agreement.
Select the Model to be covered by the Warranty Agreement. Additional Models can be entered later.
The Agreement Number will default to the next available Warranty Agreement Number when the Agreement is saved. If this is not what you require, enter an Agreement Number.
Change the Agreement Title if required.
The Agreement Title defaults to the Bill To Customer Name. Change the Agreement Title if required.
All or specific Equipment of the specified Model can be covered by the Warranty Agreement. Select Cover All Equipment with Valid Warranty to cover all Equipment of the specified Model. Select Cover only Selected Equipment to cover specific Equipment of that Model.
Enter or select the Default Agreement Plan for the Agreement. Agreement Plans are set up in V/M Setup » V/M General » Agreement Plans.
Enter or select the default Job Type and Phase to be used in the Agreement Document.
If there is more than one Vendor Site for the Bill To Customer, select the required Site from the drop-down Billing Site list. If there is only one Vendor Site for the Bill To Customer, the Billing Site drop-down list will not be displayed.
Click [Accept]. The Agreement Setup wizard will be displayed. Step 1 will be highlighted.
Step 1: Set up Agreement Details
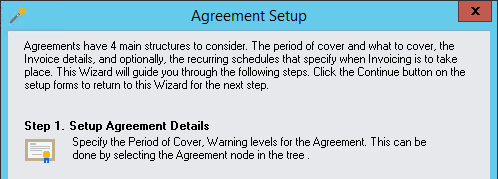
Click [Continue]. The Agreement Setup window will be displayed. The Agreements details are shown in the right-hand pane of the window.
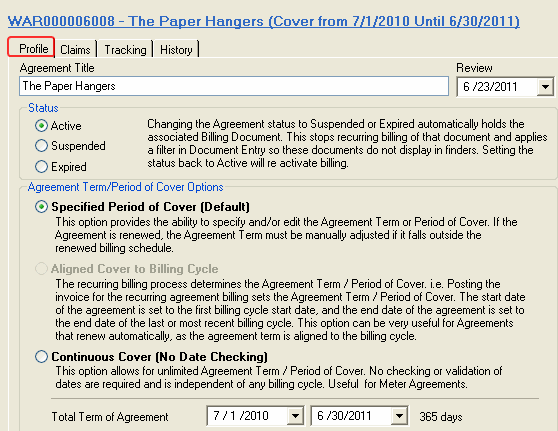
For information about the fields on the Profile, Tracking and History tabs, refer Creating a Site Agreement - Step 1.
Note:
Agreement Term/Period of Cover Options - Aligned to Billing Cycle cannot be selected as it does not apply to Warranty Agreements.
Claims tab
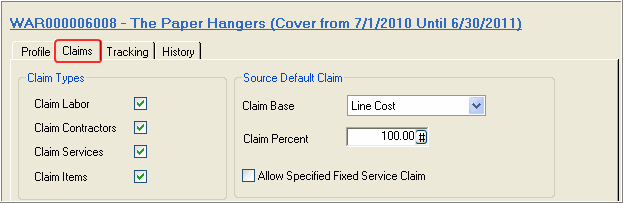
Claim Types
The Claim Types are used to specify what can be claimed from the Manufacturer - Labor, Contractors, Services, Items. Tick the relevant check boxes.
Source Default Claim
The Claim Base can be set to Line Cost or Line Cover. Line Cost is the actual cost of the repair, e.g., it cost $15.00 to repair. Line Cover is your normal Billing charge, e.g., your normal charge for the repair would be $30.00.
It is possible to adjust the individual percentage of each Claim Type that will be claimed back. Enter this in the Claim Percent field.
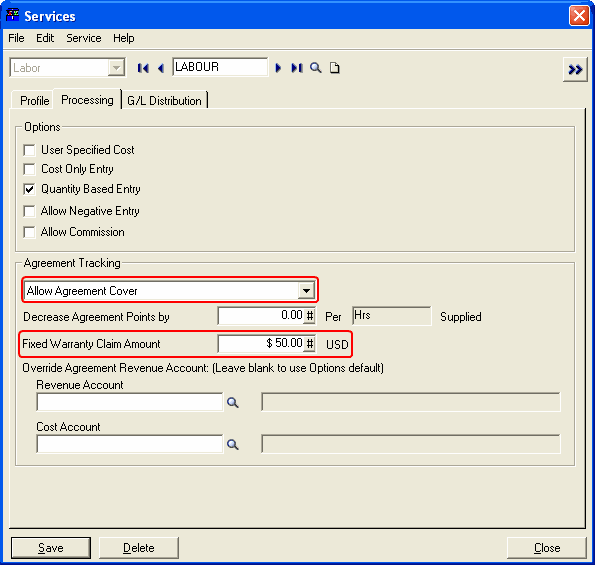
Tick the Allow Specified Fixed Service Claim check box to charge a fixed amount for the repair. The fixed amount is set up for the Service. For example:
Click [Continue] to return to the Agreement Setup wizard. Step 2 will be highlighted.
Step 2: Select Cover Levels

Click [Continue].
In this step you will specify the Equipment to cover by the Agreement. You can cover all Equipment of the Model or selected Equipment of the Model.
Cover all Equipment for the Model
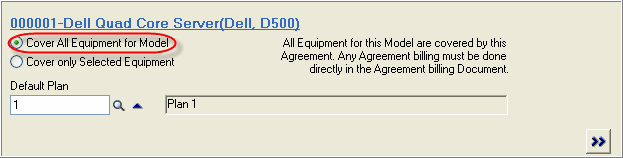
Select Cover All Equipment for Model to cover all Equipment for the Model.
Change the default Agreement Plan if required.
Click Go ![]() to list all the Equipment for the Model. All Active Equipment will be listed. To also list Inactive Equipment, i.e., show all Equipment, tick the Include Inactive Equipment check box. Inactive Equipment will be shown in red.
to list all the Equipment for the Model. All Active Equipment will be listed. To also list Inactive Equipment, i.e., show all Equipment, tick the Include Inactive Equipment check box. Inactive Equipment will be shown in red.
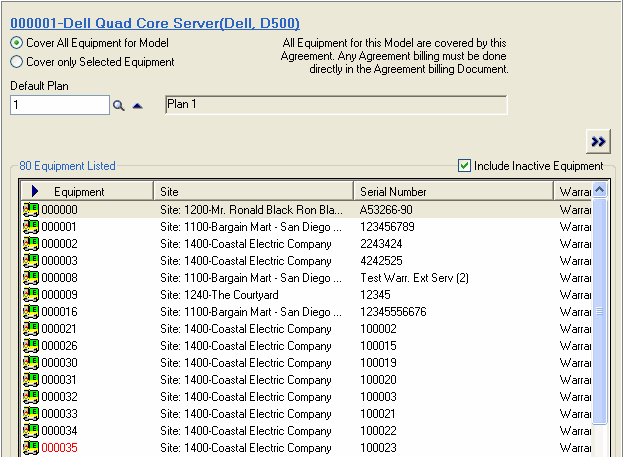
Double-click an Equipment line to view the Equipment properties.
Note:
You will need to create a Billing Group and Service line manually in Document Entry to bill this Agreement.
Click [Continue] to return to the Agreement Setup wizard. Step 4 will be highlighted.
Cover Selected Equipment
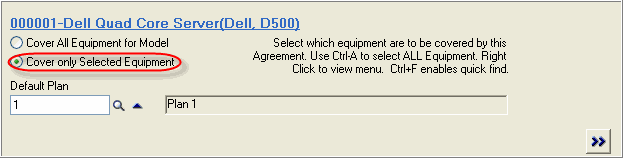
Select Cover only Selected Equipment to cover selected Equipment at the Site.
Change the default Agreement Plan if required.
Click Go ![]() to list all the Equipment at the Site.
to list all the Equipment at the Site.

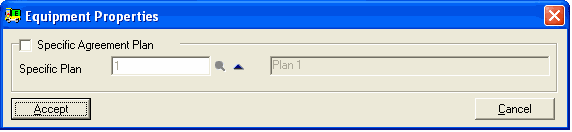
Tick each Equipment item to be covered by the Agreement. If the Equipment is to be covered by a plan different to the default plan for the Agreement, double-click the Equipment item, tick the Specific Agreement Plan check box and enter or select the Specific Plan number.
Click [Accept].
Note:
•You can set the Specific Plan for multiple pieces of equipment. To do this, tick and select the equipment to modify, right-click on the selected equipment and select Edit All Selected Equipment.
•You will need to create a Billing Group and Service line manually in Document Entry to bill this Agreement.
Click [Accept] to save changes to the equipment covered.
Click [Continue] to return to the Agreement Setup wizard. Step 4 will be highlighted.
Covering Multiple Models
To cover an additional Model, click the Add Model icon on the toolbar.
![]()
The Insert Warranty Model window will be displayed.
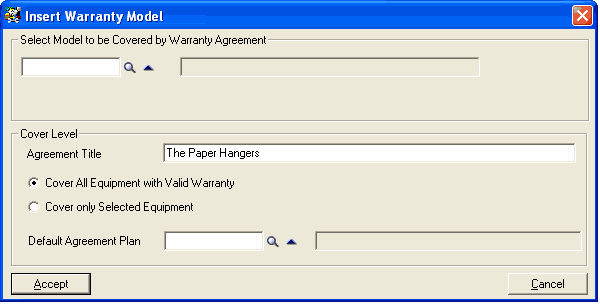
Select the Model, Cover Level and Default Agreement Plan. Click [Accept]. Select the Equipment to cover, if applicable.
An Agreement that covers two Models is shown below.

Step 3: Set up Recurring Invoice Schedules
Step 3 of the wizard is bypassed for Warranty Agreements.
Step 4: Set up the Agreement Document for Invoicing
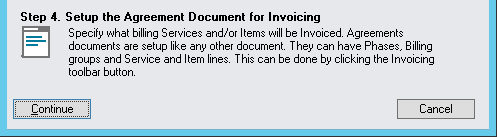
Click [Continue].
The Agreement will be displayed in Document Entry.

Click the Save button on the toolbar if required.
![]()