Services

Contents
 »
»  »
» 
Overview
There are three specific types of Service: Standard, Labor, and Contractor. Each Service can be tailored in many different ways to suit a company's individual billing requirements.
Services include Defaults, Processing Options, General Ledger accounts and Taxation Overrides.
Each Service may have Base Rates, Model Rates and/or Site Rates associated with it. Labor Service types can also have Employee Rates.
If you operate a multicurrency company, rates can be specified in each currency that the company supports.
Estimated Time
This varies enormously depending on the number of Services required, your General Ledger account structure and whether you use special rates for Employees, Models or Sites.
Typically, allow a couple of minutes per Service assuming all information is available, but if adding Site Rates, for example, this may take longer.
Import/Export functions can speed up this process dramatically as can the copy services function (select Tools » Copy). Import/Export functions are available from the File menu.
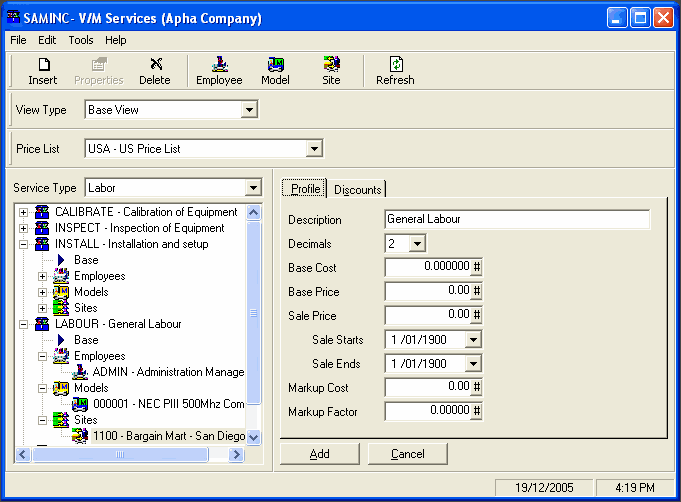
Main Form
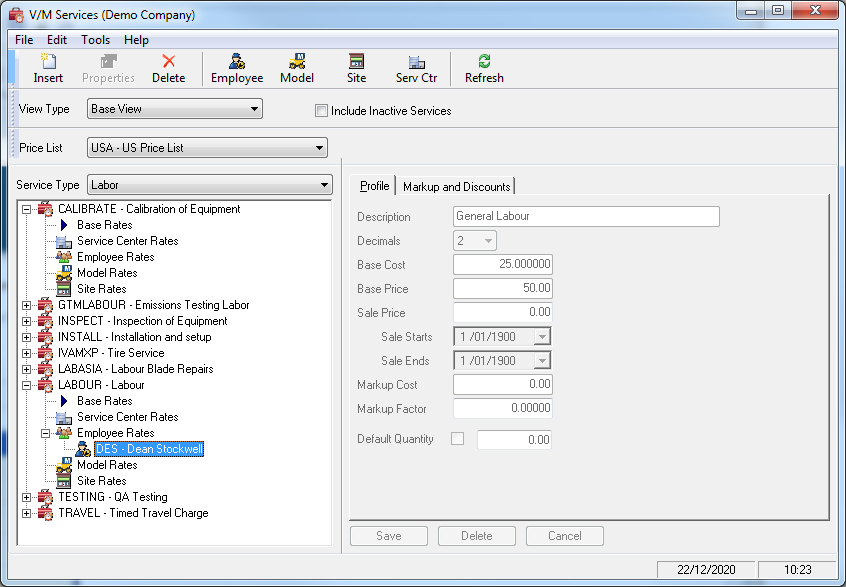
1.Choose a View Type.
![]()
Stay with Base View for this example.
2.Choose a Price List.
3.Choose a Service Type.
![]()
4.Click the Insert icon on the toolbar to create a new Service.
Creating a New Service
Profile tab
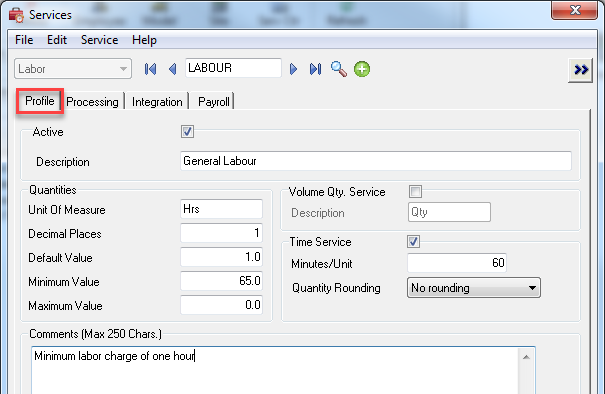
1.Enter a Service Code.
2.Click Go ![]() .
.
3.Click the Profile tab.
4.Tick Active to activate the Service and complete the fields as required.
5.Tick Volume Service to add an additional field to the Price x Quantity relationship when billing. E.g. Days x Quantity x Price.
6.Tick Time Service if time billing. e.g., a 60 minute unit means for every 60 minutes of time, a Quantity of one (1) will calculate. If you enter 240 minutes, a quantity of four (4) would calculate, therefore when setting up employee rates make sure the rate equates to the time unit specified. Quantity Rounding options include nearest 5, 10 and 15 mins. If rounding has been set then the quantity will be adjusted and calculated accordingly.
7.Click the Processing tab.
Processing tab
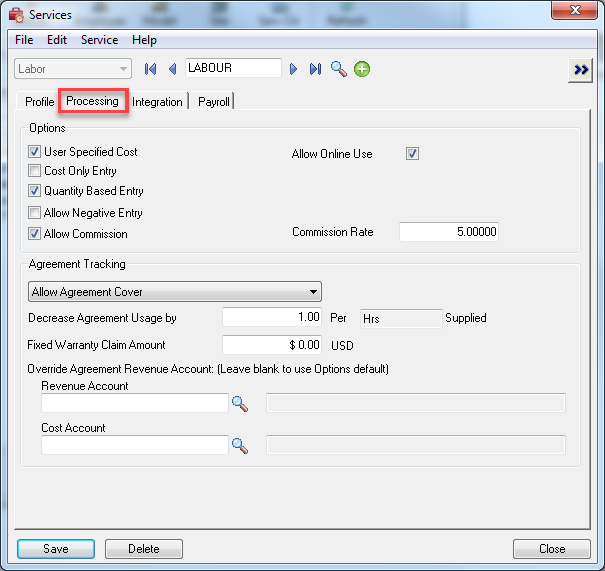
Set up default Options as required.
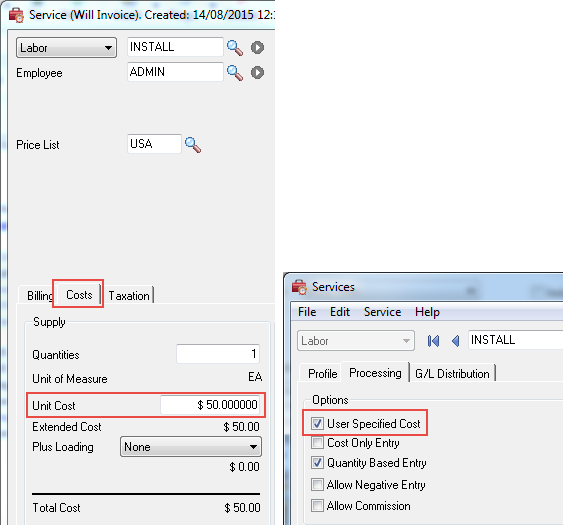
User Specified Cost allows entry of cost when a Service is added. Do not tick this check box unless you wish users to view costs, e.g., labor costs may be sensitive.
Allow Online Use allows the Service Code to be made available in Field Portal or the Employee Portal. When switched off there are no restrictions from seeing and working with existing Service Lines containing the Service.
Allow Negative Entry allows you to set up a Service as a Trade In, Rebate, Refund or Discount type Service. You will then be able to enter negative values on an Invoice. Refer to the Entering Negative Service Values section in the Service Manager User Guide for additional information.
Tick Allow Commission if the Service is commissionable. This will allow you to specify a Commission Rate. Service Manager always uses the lower of the Employee and Service Commission rate. To default to the Employee Commission Rate, tick Allow Commission and set the Commission Rate to zero (0).
Refer to the Employee Commissions section in the Service Manager User Guide for additional information about the commission tracking process in Service Manager.
There are three Agreement Tracking options:
![]()
None - If the Service is added to a Job that is covered by an Agreement, no cover will be deducted and the Service will be billed as normal.
Sale of Agreement - This type of Service is intended for Agreement billing only and would normally only be used on the Agreement document.
For a Usage based Agreement, enter the Usage sold in the Increase Agreement Usage by field. e.g., sell cover for 20 hours.

Allow Agreement Cover - If the Service is added to a Job that is covered by an Agreement, cover will be deducted.
For a Usage based Agreement, when the Service is sold, the Agreement Usage balance will decrease by the amount entered in the Decrease Agreement Usage by field. For example, if you set your Labor Service to deduct one hour from the Usage balance every time a Labor hour is sold, one unit will be deducted from the 20 originally sold in the example above. Service Manager will track the Usage balance for the Agreement.
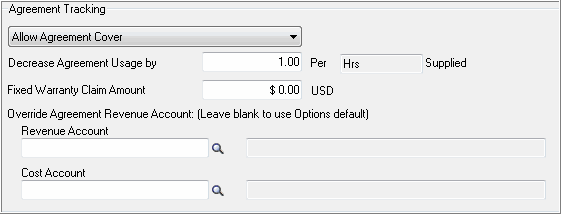
The Fixed Warranty Claim Amount field allows you to specify a claim value when this Service is used for claiming Labor for work performed under warranty where you act as a warranty agent for a manufacturer and are entitled to raise a claim on the manufacturer for the work performed.
Integration tab
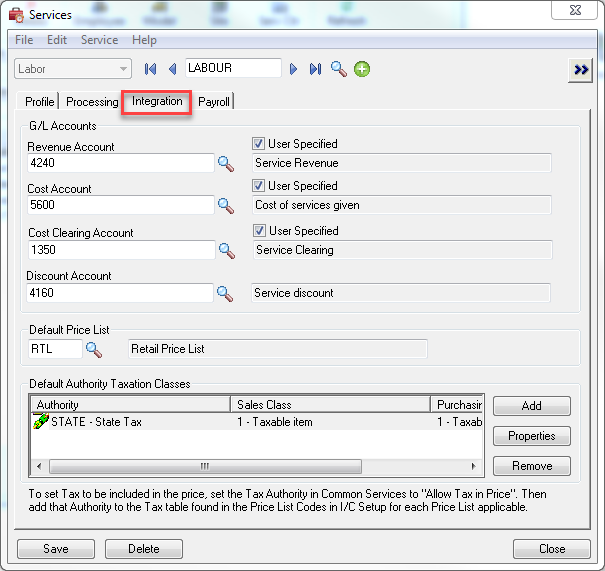
Enter Revenue and Cost accounts as applicable. You must enter a Revenue Account, but it is not compulsory to enter Cost accounts. Tick the relevant User Specified check box to change G/L codes from within a Document after adding the Service Code to a Job or Sale Document.
If the Service Discount Account is left blank, the G/L Integration Discount Account will be used when discount is applied. Refer G/L Integration » Integration General tab.
Note:
•G/L Account defaults are set similarly in Inventory Control in Categories and in Account Sets.
•It is important that if using Segment Overrides at any level in Service Manager, the default accounts specified must include at least one account code from G/L that includes the segment that will be overridden. If a default account is set that does not include a Segment Override (e.g., base account), no Segment Override will occur. i.e., Segment Overrides are ignored and the base account is used only. This applies to Service Setup in Service Manager and Category and Account Set code setup in Inventory Control.
•Refer to the Day End Processing of G/L Segment Overrides section in the Service Manager User Guide for information about how Day End processes G/L Segment Overrides and what happens if a G/L segment account does not exist.
•G/L Segment Overrides can be set for any of the following: Employee, Phase, Job Type, Service Center (if the Service Manager Service Center Add-On is installed). If you are using User Specified G/L Accounts in Service Setup, all G/L Segment Overrides will be ignored when Day End is processed.
Select a Default Price List code. This can be left blank if required.
Click [Add] to add the Service. The Default Authority Taxation Classes section will be displayed.

Click [Add] to insert a Tax Override if applicable.
General Ledger Fallback
Defaults are set in Company Options.
G/L codes can be set in a Service.
Overrides can be set in Phases.
Overrides can be set in Job Types.
When adding a Service to a Job or Sale Document, Service Manager reads the Company Options table, then it reads the Service table. If codes exist in the Service that are different to those in the Options table, it will use these instead. If the Service Cost (G/L) accounts are left blank, Service Manager will use the Options G/L codes. If these are blank, no codes will be used and no journal entries will be generated or posted to the General Ledger for cost entries. Costs will still be reflected in the Document that the Service was added to in Service Manager so profitability can be calculated.
If you use Phase Overrides then when you add a Service to a Phase it will inherit the Phase G/L accounts.
If Job Type Overrides are set then they will override at all levels. That is they will override Options, Service, and Phase defaults or Overrides.
The G/L Override codes have been enhanced to allow the provision of single codes (instead of requiring all three). This allows you to set, for example, a revenue override, but still use the cost and cost clearing accounts from the service. Similar functionality has been added to G/L Phase overrides as well. Refer Phase Setup.
Price List Fall Back
If a Customer Price List is set in Accounts Receivable, that Price List will load into the Header of a Document in Service Manager by default. Any Items or Services added to the Document will inherit the Customer Price List.
If a Site Override Price List is set in Service Manager - refer Site Setup - the Customer Price List will be overridden by the Site Price List and load into the Document Header. Any Items or Services added to the Document will inherit the Site Price List.
If Customer and Site Price Lists are set blank, Service Manager checks the Item and Service Price list defaults and will load the Service or Item Price List to the Detail line when added to a Document.
Tax Fall Back
Service Manager checks the Customer Tax Group, Authorities and Classes first, it then checks if a Site Override has been specified. If a Site override has been set then when a Service or Item is added to a Document in Service Manager, it will inherit the Site Tax Group, Authorities and Classes instead of the Customers. If you specify Tax Authorities and Classes at Service or Item detail level, and those Authorities exist in the Customer or Site Tax Group, the Service or Item Tax Classes are used and override that in the Customer or Site profile as applicable.
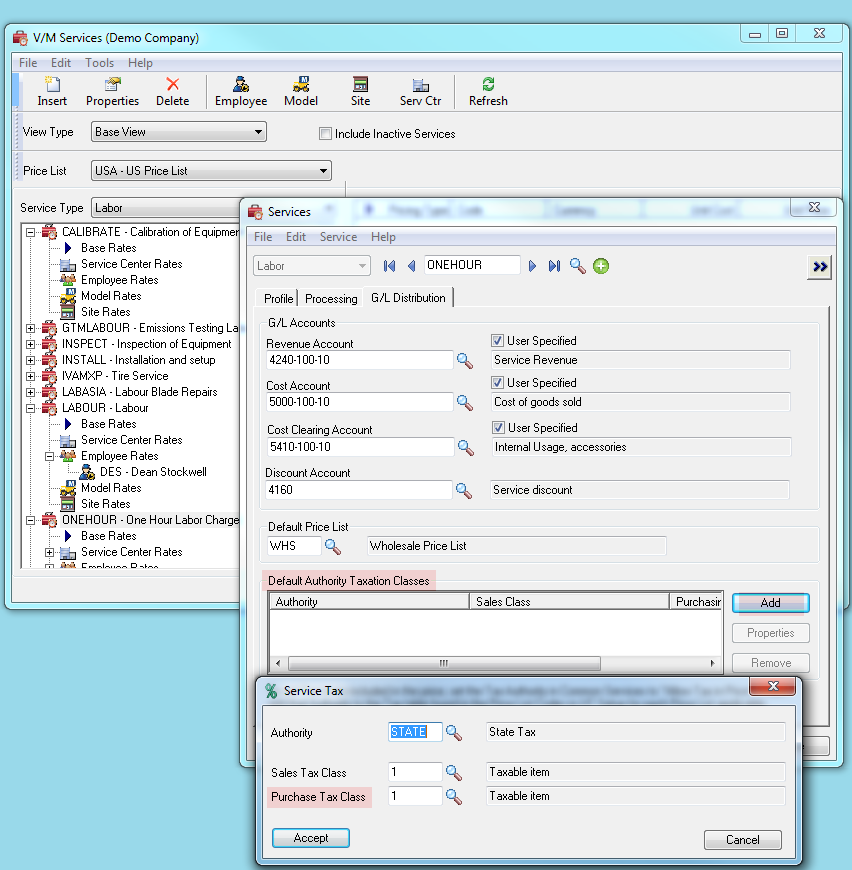
Specify Default Purchase Tax Classes
Tax Class defaults are considered during the generation of a PO in Service Manager.
When a PO is created for example for a Contractor Service within Service Manager the Default Tax Class specified here will be used.
To setup a Purchase Tax Class for a Service, go to V/M Setup, V/M General, select Services, select a Service, press >>, select the G/L Distribution tab, go down to the section on the form “Default Authority Tax Classes”, select Add, specify a default Purchase Tax Class.
Payroll Tab
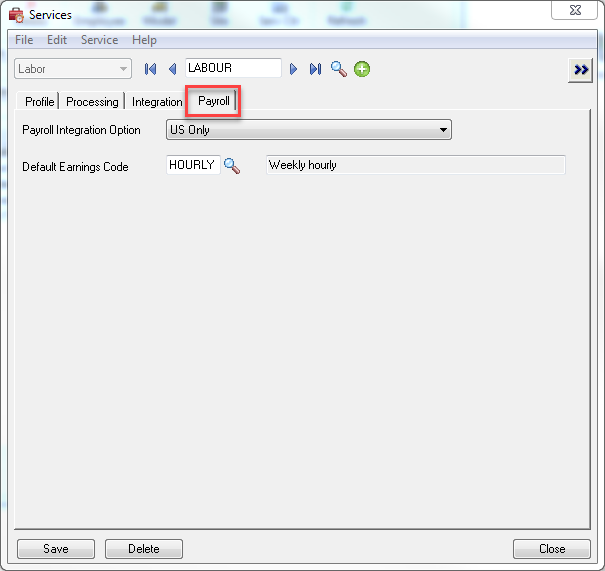
Select a Payroll Integration Option if applicable.
Select the Default Earnings Code which Payroll will associate with the Service.
Service Rates Profile tab
Note:
Remember to create Service Rates for each Price List.
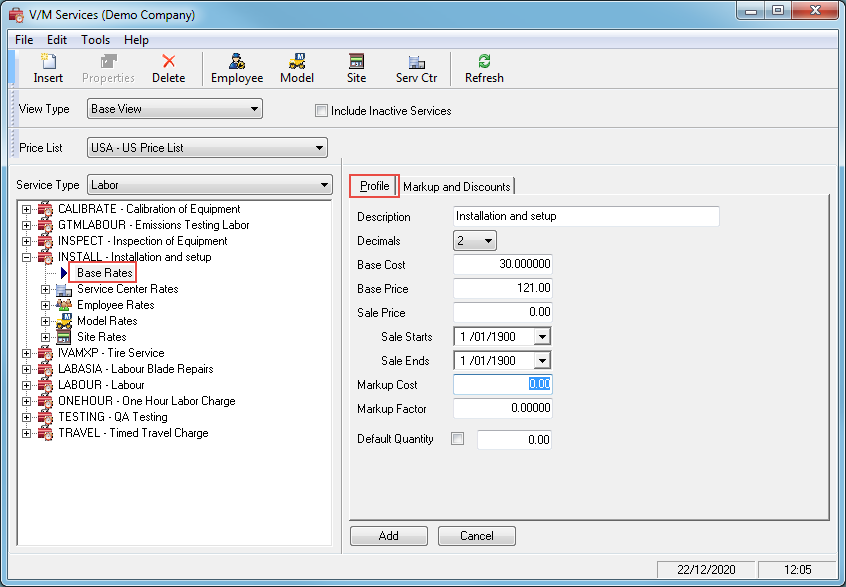
1.Click on Base to add Base Rates for a particular Service.
2.If you are using a single currency system, click the Profile tab on the right to enter a Base Cost and Base Price.
3.Enter a Sale Price if applicable which will apply from Sale Starts to Sale Ends.
4.Enter a Markup Cost if you are setting up the price list to calculate selling prices by marking up your cost.
5.Markup Factor is a documentary field and is not used in any calculation.
6.Click the Markup and Discounts tab to apply Discounts or Markups if applicable.
Service Rates Markup and Discounts tab
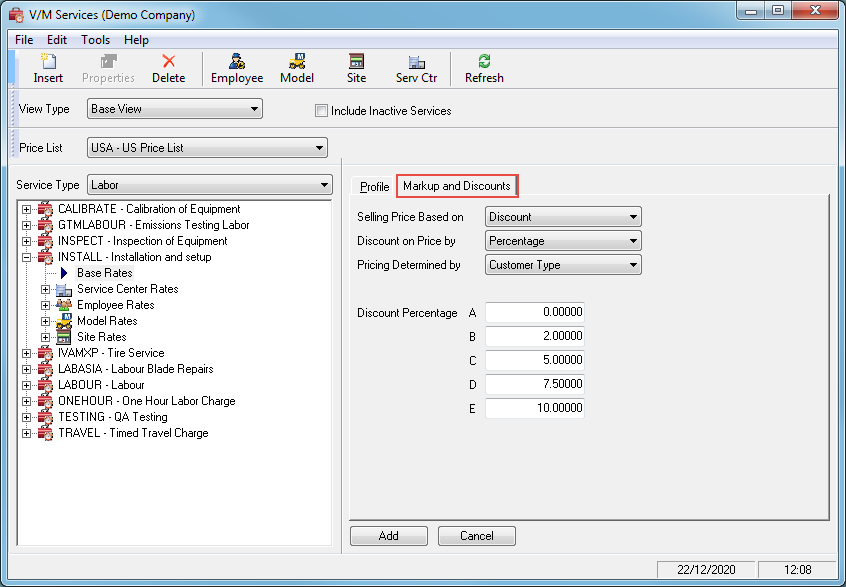
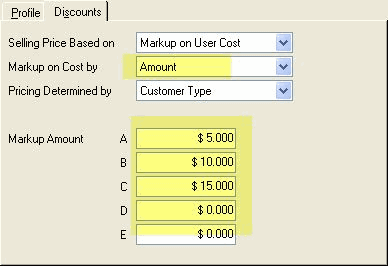
1.Selling Price can be based on:
![]()
Discount is applied to the Base Price.
Markup on Markup Cost calculates Selling Price based on Markup Cost entered in the Service Rates Profile tab.
Markup on Standard Cost calculates Selling Price based on Base Cost entered in the Service Rates Profile tab.
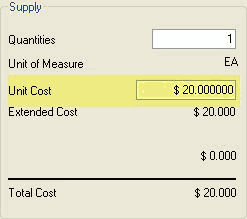
Markup on User Cost calculates Selling Price based on the Cost entered in the Costs tab of the Service billing line. (User Specified Cost must be enabled for the Service.)
Example
Service Setup
Cost on the Job line
Price on the Job line (Customer is Customer Type "A")
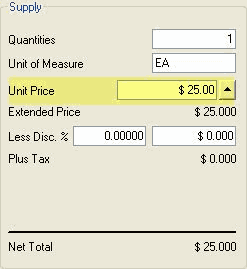
Discount or Markup can either be a Percentage or an Amount.
![]()
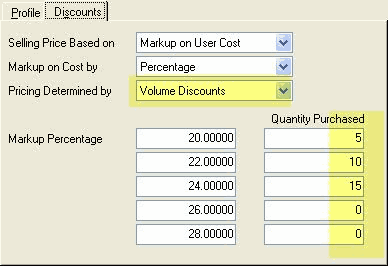
Pricing can be determined by Customer Type or Volume.
![]()
If pricing is determined by Customer Type, enter the Discount/Markup Percentage/Amount for Customer Types A, B, C, D and E, as applicable.
If pricing is determined by Volume, enter the Discount/Markup Percentages/Amounts in the first column and the Quantity at which they apply, in the second column. In the following example, if the customer buys 5, then 20% markup applies; 10 and 22% applies, etc.
2.Click [Add] when creating a new rate or if editing an existing rate, click [Save].
3.If you use multicurrency accounting, click the Currency icon on the toolbar to add rates for the various currencies used.
Labor Service Rates
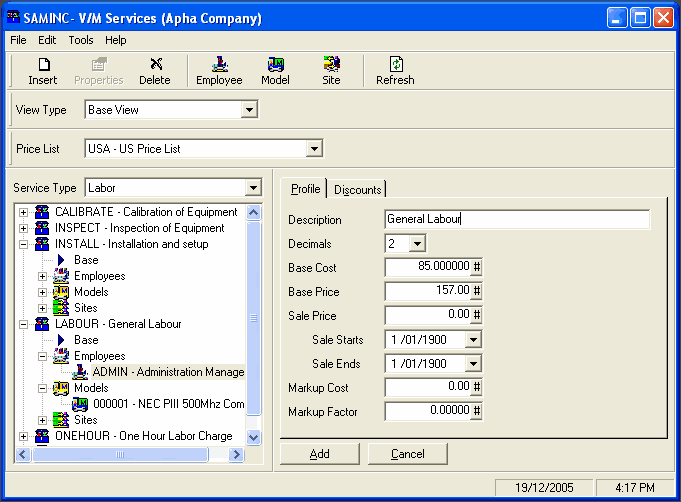
If creating a Labor Service, click the Employee node and then click the Employee icon on the toolbar to add Employee specific rates.
![]()
The process is the same as that described above including adding rates for multiple currencies if you use multicurrency accounting. When adding this Service to a Job or other Document in Service Manager, the Employee's rate is inserted into the Service automatically. That includes unit sell price and unit cost.
Model Service Rates
Click the Model node and then click the Model icon on the toolbar to add Model specific rates.
![]()
The process is the same as that described above including adding rates for multiple currencies if you use multicurrency accounting.
If Equipment is added to a Job and a Service that uses Model rates is inserted under that Equipment, the special Model rate created here for that Model will be used.
Site Service Rates
Click the Site node and then click the Site icon on the toolbar to add Site specific rates.
![]()
The process is the same as that described above including adding rates for multiple currencies if you use multicurrency accounting.
If special Site rates are used, when adding a service to a Job or other Document in Service Manager for a particular Site, the special Site rate created here for that Site will be used.
Contractor Service Rates
Click the Contractor icon on the toolbar to add Contractor specific rates.
The process is the same as that described above including adding rates for multiple currencies if you use multicurrency accounting.
Additional Information
1.Service Manager first checks if special rates/pricing exists for the Service Code for a Site. If special pricing/rates exist for that Site, when the Service is added to a Document the special Site Unit price and/or Unit cost will be used and automatically loaded to the detail line. If the Unit Price or Unit Cost is left blank, the next option or fall back that is checked is Model Pricing.
2.If the Service is inserted below an Equipment record, then Service Manager checks for special Model rates. If special pricing or rates exist for that Model, when the Service is added to a Document the special Model unit price and/or unit cost will be used and automatically loaded to the detail line. If the unit price or unit cost is left blank, the next option or fall back that is checked is Employee rates. So, for example, if there is no Site pricing, but there is a Model unit price set, but no Model unit cost, then when loading the Service underneath an Equipment record, the Model unit price will be used, but the Employee unit cost will be inherited if one exists for the Employee selected.
3.If a Service is inserted and no Site or Model rates exist, Service Manager next checks for Employee rates. If Employee rates exist then when the Service is added to a Document, the special Employee unit price and/or unit cost will be used and automatically loaded to the detail line. If the unit price or unit cost is left blank, the next option or fall back to check for is the Base Service rate.
4.If the Base unit price is non-zero for the Currency and Price List then the Base unit price and or unit cost is used.
5.Remember for steps 1. to 4. you can have different Price Lists and different Currency settings as required.
Copying Service Rates
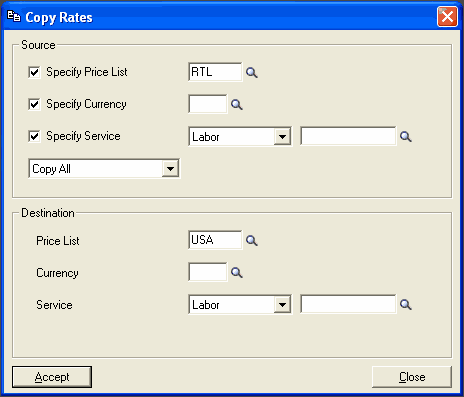
To copy rates between currencies, price lists, or services, select Tools » Copy.
Price and/or Cost Adjustments
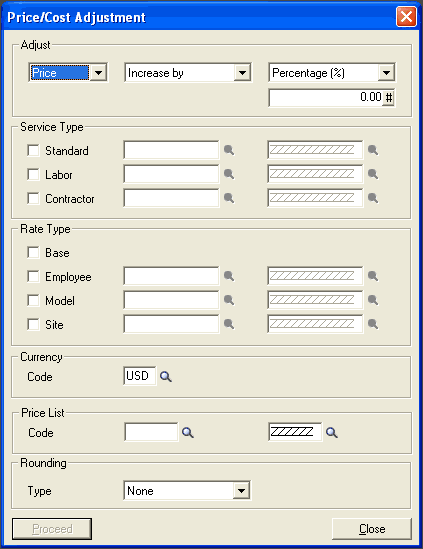
To adjust pricing or costs for a Service or range of Service Types, Rates, Currencies, or Price lists, select Tools » Adjust Costs/Pricing.
You can use the Rounding options to round adjustments.
Prices/Costs can be Increased, Decreased or set To a percentage or an amount.
Use this program to quickly adjust pricing or costs across the board if, for example, there is company-wide price increase on all Services.
Key Points
You must create Home currency rates for a Service to exist.
You can view Services in Base, Employee, Model, Site or Contractor mode by selecting a View Type. If you select Base, Services will be listed in Service Order. If you select Employee they will be listed by Employee. If you select Model they will be listed by Service then Model order, etc.
Services include an option to set a default quantity in the Profile Tab. When entering a service to a document the quantity will default to that line but can be changed manually if required.
In Summary
•Select a View.
•Select a Price List.
•Select a Service Type.
•Click Insert to create a new Service or click on a Service and select Properties to edit an existing Service. If a Time Service, tick the Time Service check box. Click the Processing tab and choose defaults as required, paying attention to Agreement Tracking if applicable.
•Select Base to create Base Rates for the Service.
•Select Employee if a Labor Service to create Employee Rates.
•Select Model to create Model Rates.
•Select Site to create Site Rates.
•Select Contractor to create Contractor Rates