Tasks

Contents
 »
»  »
» ![]()
Overview
Tasks are used to define work requirements for particular individuals or subcontractors. Tasks can be applied to Sites, Equipment or general Activities within a Job.
Tasks can be used in conjunction with Service Manager Advanced Maintenance Add-On, or manually added to Jobs. Tasks are included as part of the core Service Manager product.
There are two types of Task: Site Related or Model/Equipment Related
Site Tasks are related to general site activities, e.g., cleaning of areas, building inspections, management assessment, security or surveillance issues, environmental tests, cabling systems, light globe replacement, rubbish collection, etc. Site Tasks do not relate to specific Equipment.
Equipment Tasks relate specifically to Equipment records. Tasks can be set up by Model so Equipment of a specific Model type will inherit all Tasks for that Model. Additional Tasks can be added to specific Equipment if required.
It is not possible to apply a Site Task to an Equipment record and vice versa.
Tasks can also be added directly in the Job system at any time. The Billing attributes are set up in the Task. Billing lines are predefined using a Billing Template and are loaded into the Document tree when the Task is added to the Job.
In the Service Manager Advanced Maintenance Add-On, Tasks are added to Maintenance Entities and can be applied to general Site and Equipment maintenance or to Model maintenance.
A Task Manager is also included to help manage the Tasks allocated to Jobs.
The Task Status is used to track the status of the Task.
Related Topics
Refer to the following sections in the Service Manager User Guide for additional information:
Setup Programs » V/M General » Class Types
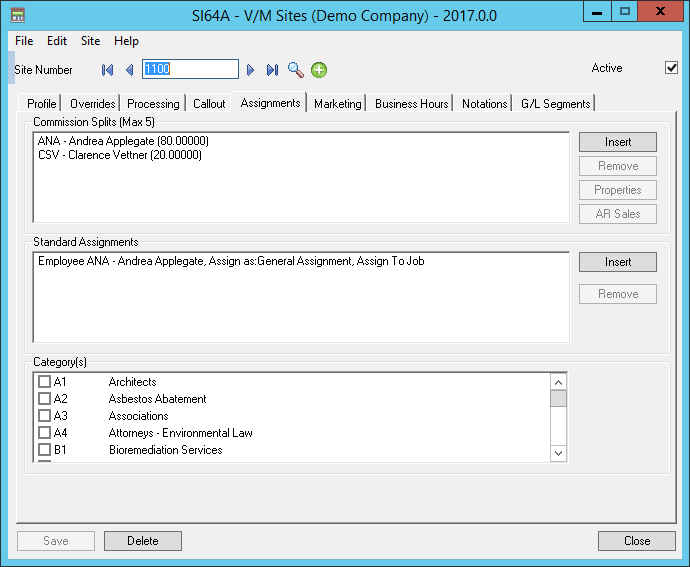
Setup Programs » V/M Sites » Site Profile » Assignments tab » Standard Assignments section
Setup Programs » V/M General » Employees
Setup Programs » V/M General » Subcontractors
Document Programs » Document Entry » Jobs » Billing Groups » Task Billing Group
Document Programs » Document Entry » Jobs » Billing Groups » Billing Templates
Management Programs » Task Manager
Setting Up Tasks
Click the Tasks desktop icon.
![]()
The Tasks window will be displayed.
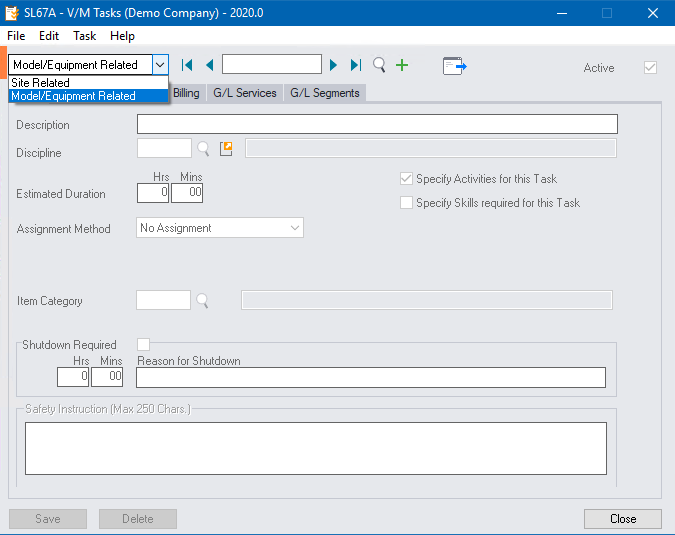
Task Types
![]()
Select Site Related to maintain Site related Tasks or Model/Equipment Related to maintain Model/Equipment Related Tasks.
Use the Finder![]() to locate an existing Task. The Finder window will list Tasks of the selected type only - either Site Related or Model/Equipment Related.
to locate an existing Task. The Finder window will list Tasks of the selected type only - either Site Related or Model/Equipment Related.
Creating a new Task
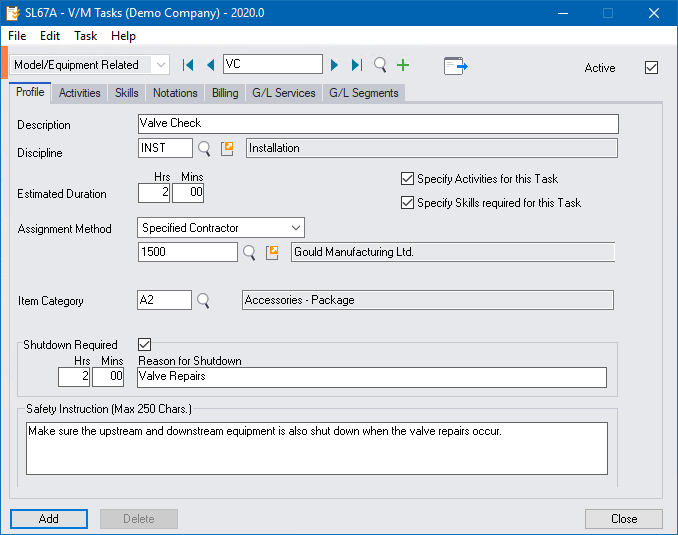
Profile tab
Task Type
Select the Task Type - Site Related or Model/Equipment Related.
Task Code
Enter a unique code to describe the Task. The code can be alphanumeric and up to 12 characters in length. Click Go ![]() to begin creating the new Task record.
to begin creating the new Task record.
Active
The Active check box is ticked by default. To prevent a Task from being used for future maintenance, clear the Active check box. Existing maintenance will not trigger if a Task has been deactivated.
Description
Enter up to a 60-character Description to describe the Task.
Discipline
Select a Discipline to categorize the nature of the Task. This field may be left blank.
Tasks can be organized by Discipline so, for example, all electrical tasks are grouped by department within a building. Loadings for parts and labor requirements can be calculated by Discipline for an entire year to determine resource allocation requirements and to optimize stock management.
Estimated Duration
Enter the expected Duration or standard time taken to complete the Task. This can be measured against the actual time taken to complete the Task and aids in planning for the future resource allocation and cost analysis.
This field may be left blank.
Specify Activities
Tick the Specify Activities for this Task check box to enable the Activities tab.
Activities can then be entered against a task. A task may have unlimited activities. There are four activity types: a check procedure; a numeric measurement; text input and a question.
Some tasks are self-explanatory and do not require activities. Clear the Specify Activities for this Task check box if activities are not required for the task.
Specify Skills
Tick the Specify Skills required for this Task check box to enable the Skills tab.
Skills can then be specified for that Task. Skills are defined in Class Types and then allocated to an Employee. It is then possible to search for an Employee with the appropriate skill set for the Task.
Clear the Specify Skills required for this Task check box if skill definition is not required for a Task.
Assignment Method
A task can be pre-assigned to a particular Employee or Subcontractor.
When a maintenance Job is processed into the system, the Employee or Subcontractor specified in the Assignment Method will auto default to the Task assignment in the Job. Assignments can be changed manually in the Job if necessary.
Select No Assignment if assignments are not required.
Select Site Assignment to load the Employee who is the Standard Assignment for the Site. If more than one Employee is the Standard Assignment for the Site, the first Employee in the list will be selected.
Select Specified Employee to assign a specific Employee to the Task.
Select Specified Subcontractor to assign a specific Subcontractor to the Task.
Item Category
Enter an Item Category to be used as default for Item lines when added to the Task's Billing Group.
Shutdown Required
If an Equipment Task will require shutdown of plant and equipment, tick the Shutdown Required check box. When the Task loads to a Job, information relating to the estimated shutdown time, reason for shutdown together with applicable notes and instructions will be available in the Job. Reports can be obtained in advance, highlighting when shutdowns are due so the appropriate action can be taken to ensure minimal disruption during the shutdown period.
Safety Instruction
Enter a safety instruction up to a maximum of 250 characters to highlight any safety instruction information pertinent to the performance of the Task.
Additional safety information including file attachments containing safety manuals, bulletins or compliance information can be attached to notations in the task.
Activities tab
The Activities tab will only be displayed if you tick the Specify Activities for this Task check box on the Profile tab.
Unlimited Activities may be attached to Tasks. Task and Activity information is stored in Site and Equipment history.
There are four types of Activity:
•Check Procedure
•Numeric Measurement
•Text Input
•Question
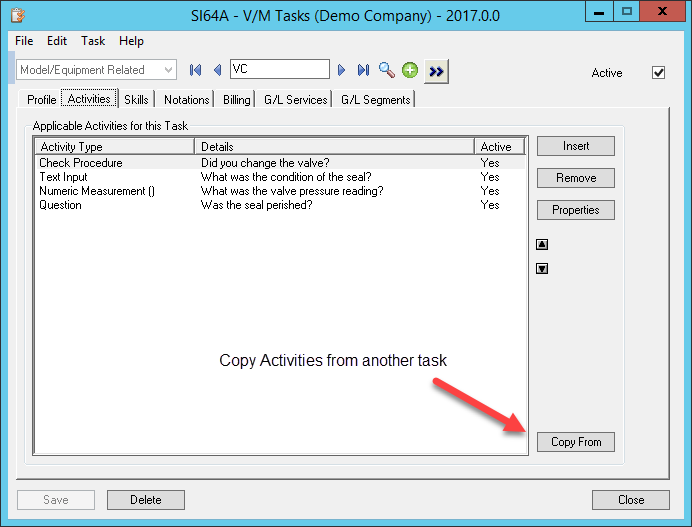
Click [Insert] to create a new Activity. The Task Activity window will be displayed.
Highlight an existing Activity and then click [Remove] to delete an existing Activity.
Highlight an existing Activity and then click [Properties] to view the detail of that Activity. The Task Activity window will be displayed.
Tick [Copy From] to copy Activities from another Task.
When editing a master Task record, inserting a new Activity will insert the Activity across all maintenance setup entities using that Task. Likewise, removing an Activity will remove the Activity from any maintenance using the selected Task.
Modifying a master Task will not affect existing Tasks already loaded to Jobs.
It is therefore important to plan Task setup to include the most likely to be used Activities. It is easy to include new activities in the future, but deleting existing activities is not recommended as that may impact historical transactions.
If Activities exist on a Job that is still in progress, a Warning message will be displayed advising that the Activity may not be deleted until the associated Task has been completed. Deleting Activities will remove associated historic records.
Creating an Activity
Check Procedure
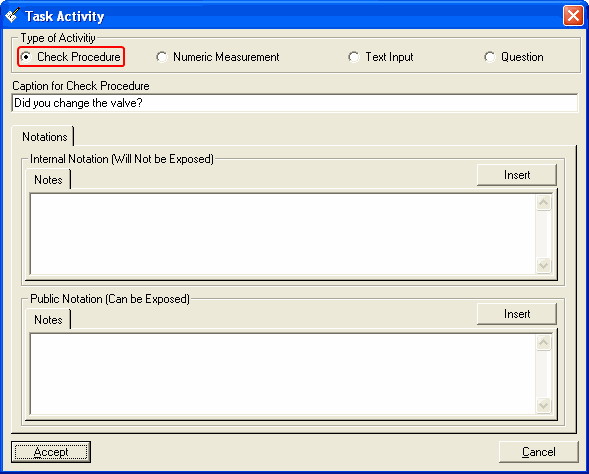
Select Check Procedure to create an Activity to check a procedure.
Enter a Caption for the Check Procedure, up to 250 characters in length.
When a task is created on a Job, activities associated with that Task can be actioned. Where an activity is a Check Procedure, the caption specified will appear as an Activity. A Complete check box will appear with the Check Procedure caption. When the Activity has been completed, the Complete check box automatically sets the Activity status to Complete.
Numeric Measurement
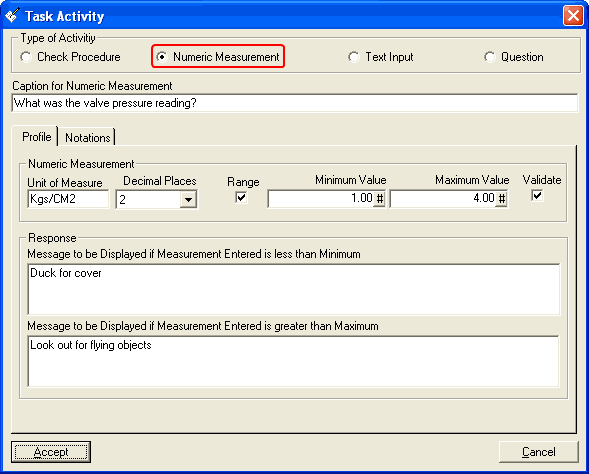
Click Numeric Measurement to create an Activity for taking measurements.
Enter a Caption for the Numeric Measurement.
When a task is created on a Job, activities associated with that Task can be actioned. Where an activity is a Numeric Measurement, the caption specified will be displayed and the user will be required to enter a value for the measurement. Entering the value completes the Activity automatically by ticking the Activity Complete check box.
Enter a Unit of Measure for the measurement being taken.
Specify the number of Decimal Places required for measurement accuracy - up to four decimal places.
A Warning range can be specified so if the measurement value entered falls outside the Warning range, the user will be prompted with a message.
Type a Message (up to 250 characters) to be displayed if the measurement value entered is below the Minimum Value specified and another Message to be displayed if the measurement value entered is above the Maximum Value specified.
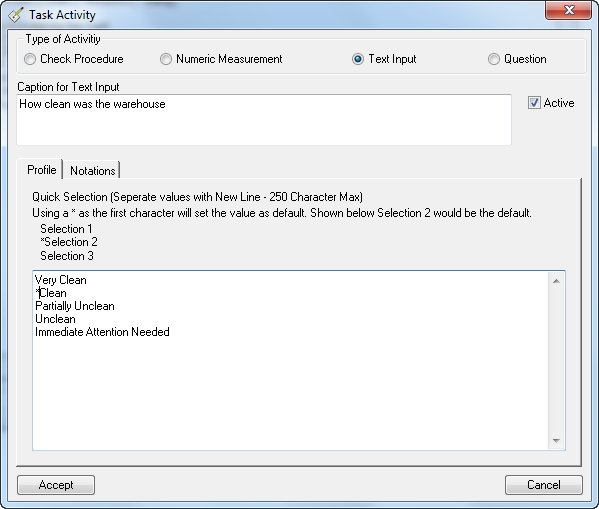
Text Input
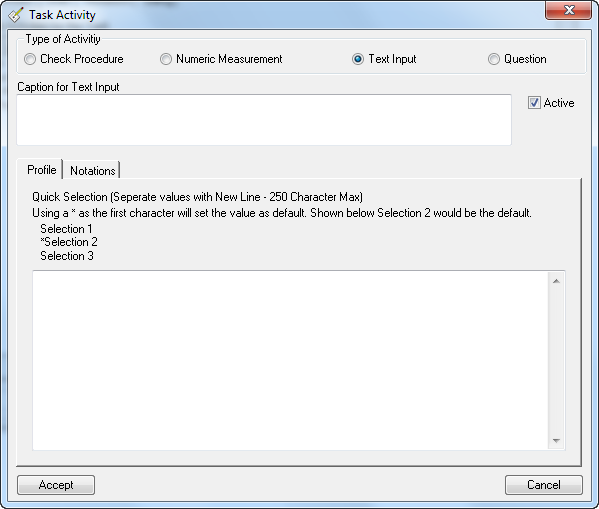
Click Text Input to create an Activity for entering plain text.
Enter a Caption for the Text Input.
When a Task is created on a Job, Activities associated with that Task can be actioned. Where an Activity is a Text Input, the Caption specified will be displayed and the user will be required to type in text. Entering the text completes the Activity automatically by ticking the Activity Complete check box.
Under the Profile Tab, values can be entered into the Quick Selection window which will be displayed when the Quick Select button is chosen for actioning an activity. Placing a * at the start of the option will make it the default option.
Question
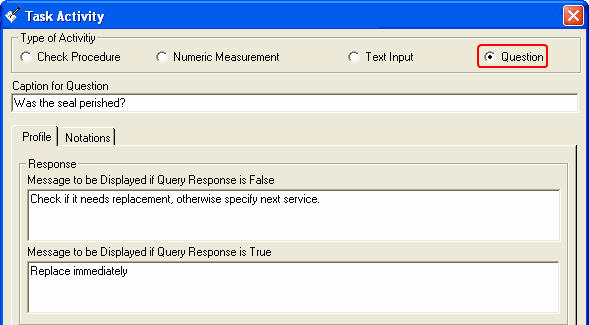
Click Question to create an Activity for answering a question.
Enter a Caption for the Question.
When a Task is created on a Job, Activities associated with that Task can be actioned. Where an Activity is a Question, the Activity Caption (question) specified will be displayed. True/False radio buttons will appear and the user clicks the appropriate response. Entering an answer completes the activity automatically by checking the Activity Complete check box.
Notations
Notations containing objects such as file attachments can be added to any Activity. Attachments are accessible from within the Activity properties.
Notations are either Internal/Private or Public. Internal/Private Notations contain information for the technician/engineer; a Public Notation contains information for the Customer.
Skills tab
The Skills tab will only be displayed if you tick the Specify Skills required for this Task check box on the Profile tab.
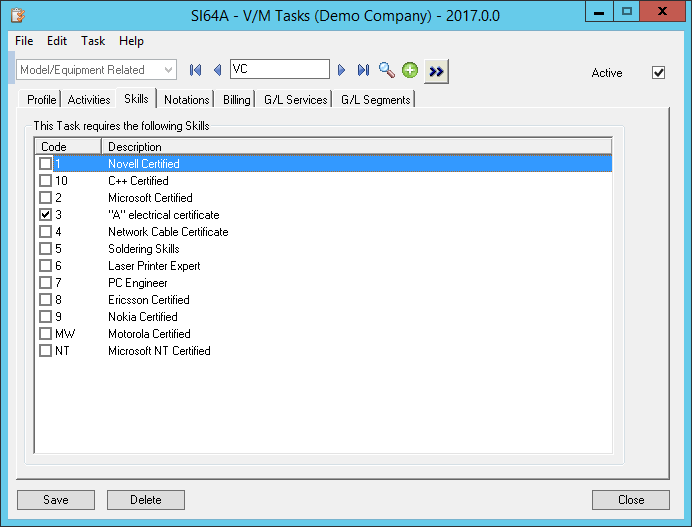
Tick the check box to the left of each Skill required for the relevant Activity.
When a Task is created on a Job, skills associated with that task are visible. Skills are not processed anywhere and are merely used to help determine the appropriate employee/subcontractor to assign to do the work required to complete the Task.
If the employee/subcontractor scheduled for the Task does not have the required skills then a Warning message will be displayed.
Notations tab

Notations containing objects such as file attachments can be added to any Task and relate to the Task itself, not the Activities within the Task. Activity Notations are entered separately with the Activity.
Notations are either Internal/Private or Public. Internal/Private Notations contain information for the technician/engineer; a Public Notation contains information for the Customer.
Billing tab
The Billing tab is where you specify billing defaults for the Task created on the Job.
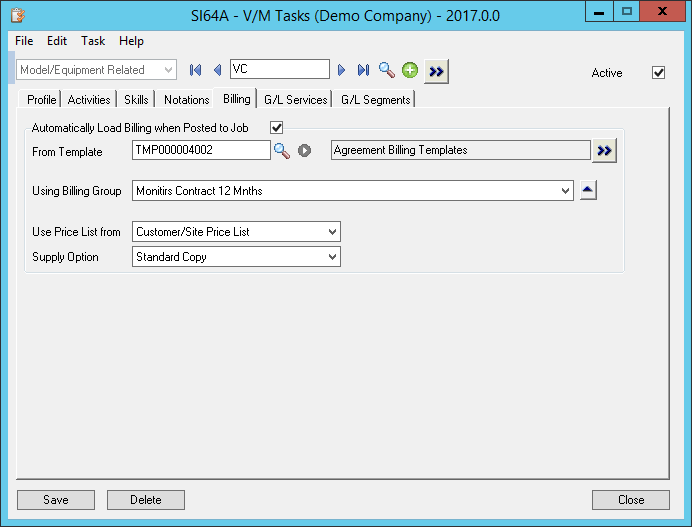
Clear the Automatically Load Billing when Posted to Job check box to create the Task without Billing lines.
Enter or select the required Billing Template and Billing Group within the Template. Templates can bring in notations, parts and labor related to the Task and are used for loading calculations to predict part and labor usage for the period.
Select the required Price List to use for billing. To specify a particular Price List, select Specify and then enter or select the Price List to use.
![]()
Select the required Supply Option.
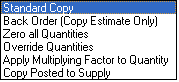
Standard Copy - all quantities will be set in the Supply column of a detail line during copy. It is perfectly correct to use this option, but please note that if you run the Multi post program, because they are set in the Supply column, they would appear in the list for Jobs ready to invoice, when in fact they may not yet be ready. We recommend you use one of the other options if this becomes an issue for management.
Back Order (Copy Estimate Only) - places all quantities on back order and zeros the supply quantity.
Zero all Quantities - is self-explanatory.
Override Quantities - allows you to specify a quantity. This can be useful for builds or where multiple services or items are required.
Apply Multiplying Factor to Quantity - allows you to specify a multiplying factor to a quantity.
Copy Posted to Supply - is self-explanatory.
Enter an associated Quantity if applicable.
Click [Add] or [Save] as required.
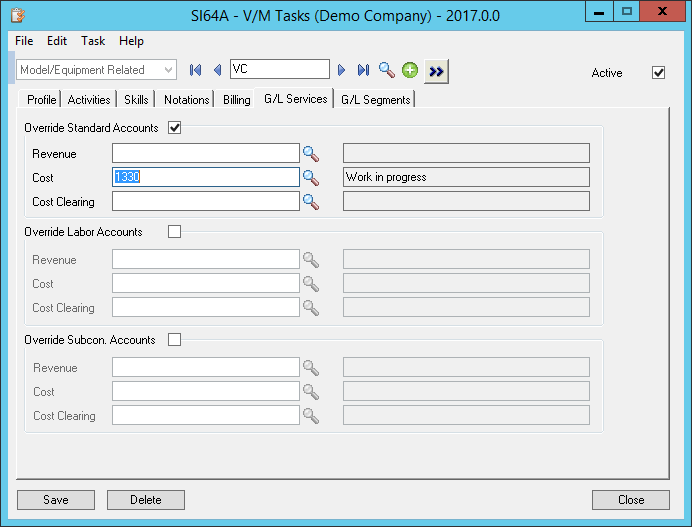
G/L Services tab
Tick the Override Accounts check boxes to set General Ledger Overrides for Services when this Task is added to a Job. Enter the Override Accounts. When a Service is added to a Job it will inherit these codes instead of the codes set in the Service.
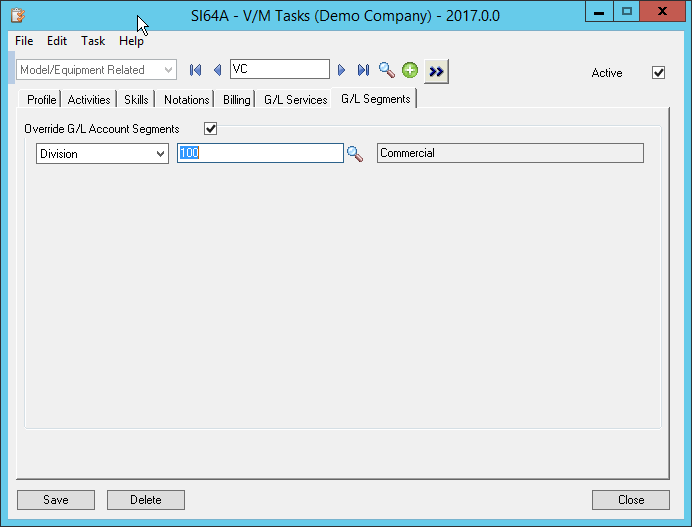
G/L Segments tab
Tick the Override G/L Account Segments check box and then select Division or Region to override these G/L Segments.
Note:
•Refer to the Day End Processing of G/L Segment Overrides section in the Service Manager User Guide for information about how Day End processes G/L Segment Overrides and what happens if a G/L segment account does not exist.