Job Types

Contents
 »
»  »
» 
Overview
Job Types can be used to categorize an entire Document in Document Entry.
Document defaults can be specified in a Job Type, so when a Document is created using a particular Job Type, it inherits defaults from that Job Type.
Defaults include: Status, Priority, Budgeting and Commission flags, Inventory defaults, Custom Fields, In-house Warranty, Agreement defaults, Comments, Override General Ledger accounts, and default Phases.
If default Phases are specified when setting up a Job Type, they will be added automatically when that Job Type is used to create a Document in Document Entry.
You also have the ability to override the Phase Response settings for each Phase specified in a Job Type. A graphical tool is available to assist in setting up Phase Response Tracking in the Job Type setup program.
Estimated Time
Typically allow a couple of minutes per Job Type depending on whether Phases are used.
Import/Export functions available from the File menu can speed up this process dramatically.
Profile tab
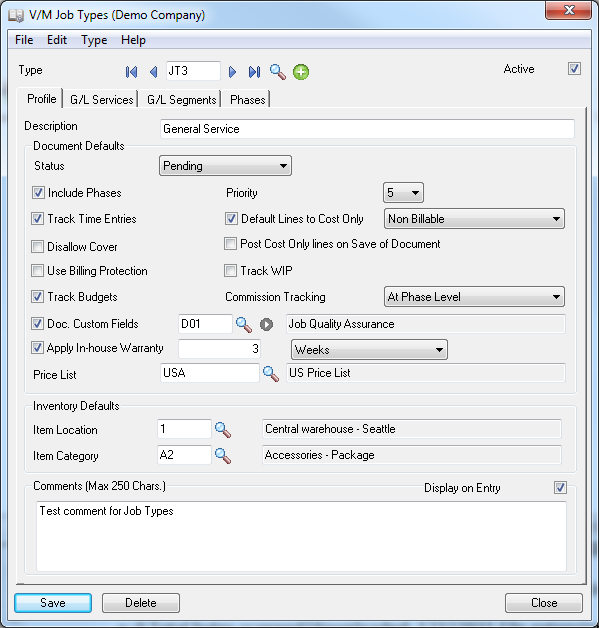
Enter a Job Type Code. Press Tab and then enter a Description of the Job Type. Click the Profile tab.
When you add this Job Type to a Document, the defaults set in the Document Defaults section will be loaded, but can be changed in the Job if necessary.
Tick the Track Time Entries check box if you wish to assign Resources and Time Entries to Jobs.
Tick Default Lines to Cost Only to choose whether to set Cost Only lines as Non-Billable or Delayed Billing as a default.
If you tick Disallow Cover, Services or Items added to a Job covered by an Agreement will not be covered, regardless of whether they are set to allow cover or not.
Tick the Use Billing Protection check box to enable Billing Protection for this Job Type. Refer to the Billing Protection section in the Service Manager User Guide for additional information about setting up Billing Protection in Service Manager.
Tick Document Custom Fields and specify a Custom Field Template if you wish to use Document Custom Fields for a Job of this type.
Tick Apply In-house Warranty to use the In-house Warranty functions. Specify the period of cover. When a Job is added to Service Manager, at its completion it will automatically be covered for the period set here. Refer to the Job Header section in the Service Manager User Guide for additional information.
In-house Warranty can be preset in Job Types or set up when creating a new Job in the Job Header.
In-house Warranty is in addition to Manufacturer Warranty and allows you to specify a period in which you will cover or guarantee work performed by your company. For example, all work is guaranteed for a period of 3 Months.
After completing a Job covered by In-house Warranty, if for some reason you are required to start another Job for that Site within the In-house Warranty period of an existing Job, as soon as you enter the Site code and press Tab, the In-house Warranty May Apply window will be displayed (Agreement Details and Site and Job Type Comments may display first). All Jobs that are currently covered by In-house Warranty will be listed.
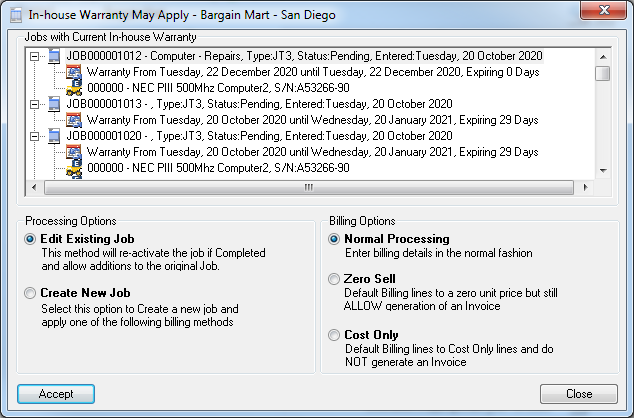
There are two basic options: Edit Existing Job or Create New Job.
Select a Billing Option:
•Normal Processing will allow you to enter and bill details as if not covered at all
•Zero Sell will zero out all billing and allow you take up costs (this method also allows a Zero Sell invoice to be produced)
•Cost Only also zeros selling lines but no invoice is generated
Select the default Price List for this Job Type.
Enter Inventory Item Location and Category defaults if you want to override default locations and categories when an item is added to a Job using this Job Type. This can be very useful if you wish to change G/L account codes by Job Type for items.
Comments Add a comment as required. If you tick Display on Entry, the comment will be displayed whenever this Job Type is added to a Document.
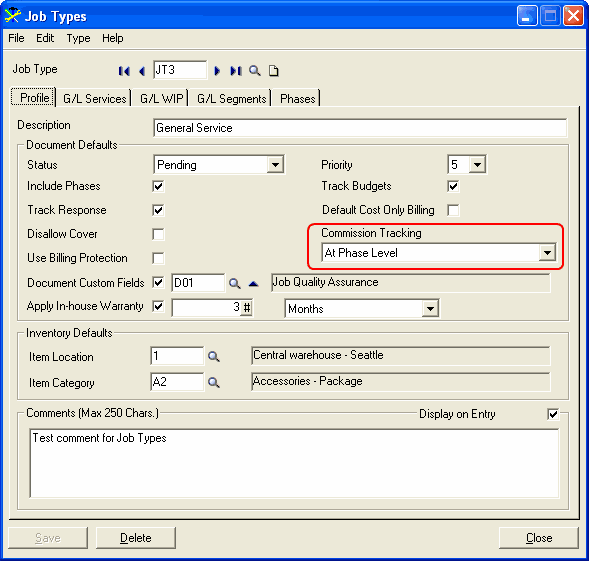
Default Cost Only Lines If you tick this check box, all Services and Items will be set to Cost Only. This will override any Service settings in Service Setup. This is particularly useful if you are just costing internal jobs where no billing will take place.
Commission Tracking
Default commission tracking settings for a Job/Document are set for the Job Type. All Service and Item detail lines will inherit that setting by default.
![]()
•Non Commissionable - disable commission tracking
•At Phase Level - calculate commission based on the Commission Split and Employee Commission Rates for the Phase
•At Line Level - calculate commission based on the Commission Rates set in the Employee record for the Employee entered on the Service or Item detail line
Note:
These settings can be overridden at line level in Document Entry.
Refer to the Employee Commissions section in the Service Manager User Guide for additional information about the commission tracking process in Service Manager.
G/L Services tab
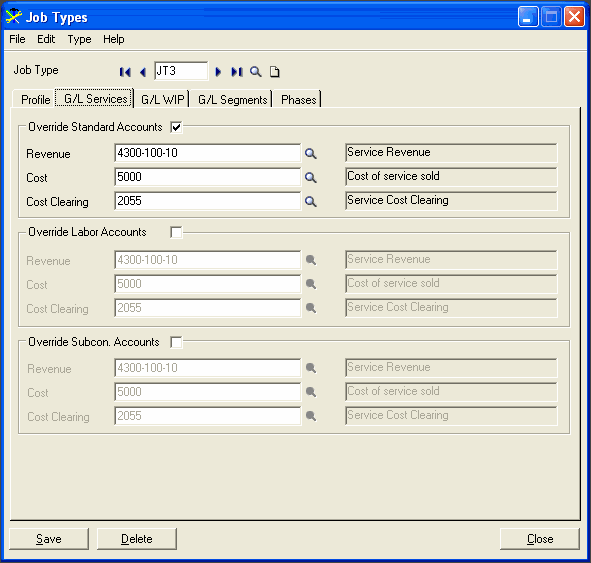
Tick the Override Accounts check boxes to set General Ledger Overrides for Services when this Job Type is added to a Job. Enter the Override Accounts. When a Service is added to a Job, it will inherit these codes instead of the codes set in the Service or Phase.
Click the G/L WIP tab.
G/L WIP tab

Tick the Track WIP check box to track Work in Progress Jobs. This will automatically set the Job to track WIP when this Job Type is used. WIP accounts, Overhead and Burden details are inherited from Company Options. When a Job is created of this Job Type, the WIP accounts will be overridden in the Job Header.
To override WIP Accounts, tick the Override WIP Accounts check box and change the accounts as required.
To override Overhead details, tick the Override Overhead Details check box and select the required Allocation Method and % or $ amount (if applicable), and accounts.
To override Burden details, tick the Override Burden Details check box and select the required Burden Method and % or $ amount (if applicable), and accounts.
Click the G/L Segments tab.
G/L Segments tab
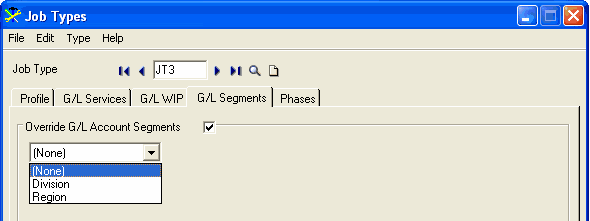
Tick the Override G/L Account Segments check box and then select Division or Region to override these G/L Segments.
Note:
•G/L Segment Overrides can be set for any of the following: Employee, Phase, Job Type, Service Center (if the Service Manager Service Center Add-On is installed). If you are using User Specified G/L Accounts in Service Setup, all G/L Segment Overrides will be ignored when Day End is processed.
•If you are using G/L "Account" Overrides for a Job Type, G/L "Segment" Overrides for that Job Type will be ignored.
•If you add a Service to a Job using a Job Type that has a G/L Segment Override and then turn off G/L Account Segment tracking for that Job Type before running the Day End process, the resultant G/L entries will not have G/L Segment Overrides, as Segment Overrides are processed during the Day End process.
•Refer to the Day End Processing of G/L Segment Overrides section in the Service Manager User Guide for information about how Day End processes G/L Segment Overrides and what happens if a G/L segment account does not exist.
Click the Phases tab.
Phases tab
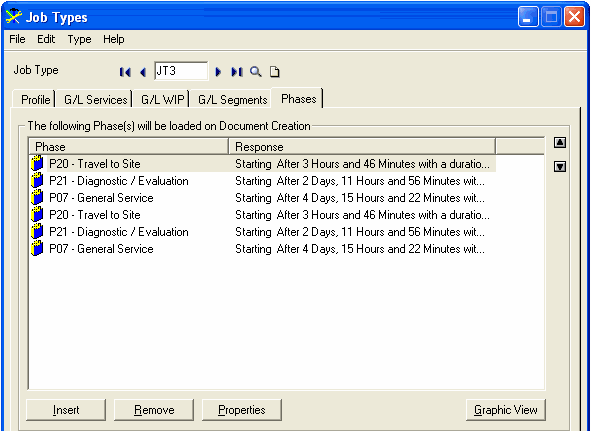
Phases can be preset to auto load when this Job Type is used. Click [Insert] to add a Phase.
It can be difficult when there are many Phases to work out the start and end Response times of Phases. Click [Graphic View] to simplify this procedure using drag and drop tools.
Phase Graphical View
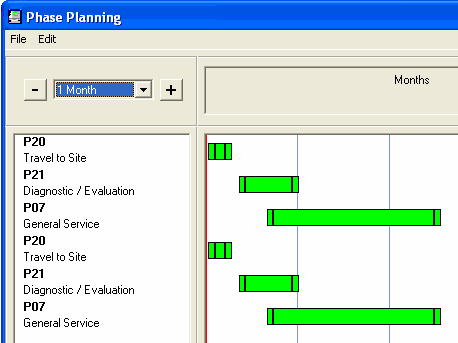
Click on a Phase and use your mouse to drag or stretch the phase length accordingly. Duration will be displayed as you implement the drag or stretch. Select the View drop-down to specify a different timeframe in which to view the screen. Double-click a Phase to display its properties so you can round values if necessary. Close the Phase Planning window when you have finished with Phase planning.
Click [Save] to add the Job Type.
Key Points
You should add at least one Phase to a Job Type, so when it is used, at least one Phase will auto load to a Job. Otherwise, you will need to insert a Phase manually.